Video: Easy-to-Store Outdoor Chair
In this video, DIY Creators demonstrates how to make an affordable outdoor chair with a genius easy-store design.
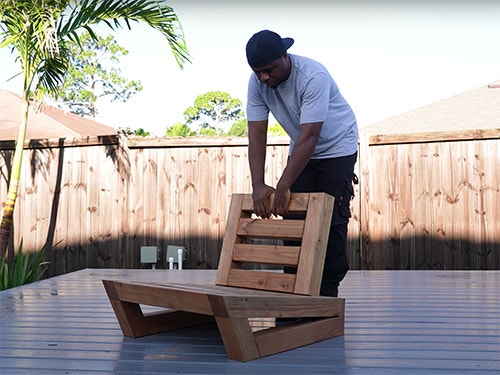
You can't go wrong with an attractive and sturdy outdoor chair—especially one that is collapsible for storage. Now you can freshen up your patio, deck, or even poolside with a new set of chairs, one you can create on your own.
Featured Tools:


Glen: I have this habit of building really heavy furniture, and it's not on purpose. I just happen to like the look. Typically, my process start off with the look I want, the budget, and then the lumber. If budget was not an issue, I would've likely went with cedar because it's lighter. The lumber I'm using here is Douglas fir. I get started by cutting the parts down on the miter saw. Majority of the parts are cut straight, but then there are also parts that are cut at an angle. The nearest box store to me do not carry 2x4 Douglas fir. This mean I have to split a 4x4 on a bandsaw.
The front section of the chair will be cut at an angle just as the sides. I'll need to create two reference line on here to get the angle right. I measured an inch and a half from one side and placed a line. From the corner of that line, I drew out another line to the other corner. I tilted the table on the bandsaw until the blade lined up with the line I created on the endgrain. Now, all I have to do is keep the lumber pressed up against the fence as I feed it through the blade.
I need to cut two parts like this, which is for the back. Removing this section would allow the back to sit at an angle and also create a wedge which allow the back to be easily removed, making it easy to transport and store.
The lumber is quite rough, so I do the best I can to sand this down while the parts are loose. I passed over it with an 80 grit sandpaper first. Then I came back with 120 grit sandpaper.
Now, it's ready to carve and for that, I'm using the power carving unit from Arbortech with their turbo-plane attachment installed. This is my go-to for roughing passes, it's great for hollowing out materials and it just makes short work. Even this really dense oak, it chews right through it. I spent about between 5 and 15 minutes per section of these just hollowing them out. I don't need them to be super precise but just nice enough saw cut, plenty of glue surface later, but it's also pretty hollow to eliminate that weight.
For now, I got all the parts cleaned up as much as I could using a sander. To begin the assembly, I start with the back of the seat. I line up the two sides and then place a mark going across both. Now, I'll place the middle section in between the two sides and then transfer the lines over from the sides to these middle sections. Now, I've made some outdoor furniture before and I've used screws and lag bolts to put those together.
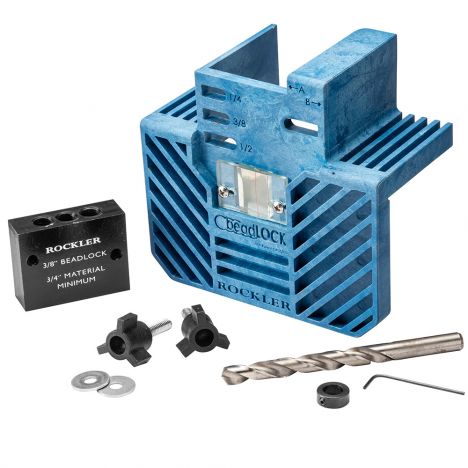
For this chair, I'll be using beadlock tenons, and I'll be using Rockler's beadlock jig. I'll attach sandpaper directly to the frame of the jig. This way, the jig doesn't shift as I'm drilling. Now, I'll line up the jig to the lines that I previously marked. Finally, I'll clamp the jig on. Now, if this is your first time seeing this jig, I have a full video explaining how to use this jig. Be sure to check out the popup link.
To make the beadlock tenon work in this setup, you'll need to drill two sets of holes. I've already drilled the first set of holes in the A position, then I shift the jig to the B position, and drill the second set of holes. Finally, I clean this out and dry fit the tenons. The next thing I want to do is label the parts so you know which side go to which side. Now, I'll continue to drill out the remaining holes near the reference marks. I have a limited amount of tenons on hand, so I'll drill out the three-eights first. Then I'll switch to the half-inch ones once I get low.
Now that I have the sides drilled, I'll focus on the endgrain. With so much to drill, I figured it was easier to get these all set up so I can move from one to the next quickly. Once you have your reference line in place and you figure out what works best for you, this should go by fairly quick.
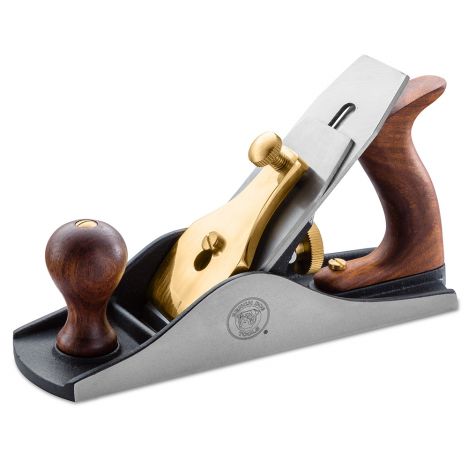
This looks good, so now, I set it off to the side and focus on the other parts. Some connection went fairly easy, and in this case, some connection didn't go as smooth. In this case, I used the hand plane to clean up the sections and make sure they fit together nicely. When it comes to the miter sections, I line the parts up and drew a line across both parts, then line up the jig to the line and drill the holes.
Now, I'll fit the parts together and make sure they align properly. Let's say if I drilled this and they were off, what I would do here is plug the holes and re-drill them. With these lumbers coming from the box store, often they're twisted or they're not the same thickness. When I encounter an issue that I do not like, I'll just use a hand plane to clean it up.
Since I was running low on a three-eights tenon, I decided to switch over to half-inch for the seat area. Just as I addressed it back to the chair, I'll do the same thing for the seat area. The tenon should fit into the mortise section fairly easy. If not, do make some adjustments, so it's not an issue during glue-up. At this point, everything's been dry-fitted and marked so I know how to put it back together when it's time to glue.
When it comes to gluing up, there is so much to attend to. It's best if you have glue that take a lot longer to dry, rather than something that dries fairly quick. In a nutshell, plan your glue-up before you glue up. Starting with the back, I glue the sides first, get the tenon installed in those, set those off to the side, and then sandwich it all together.
Once you have the parts clamped, you should experience some glue squeeze-out. That will let you know if you have enough glue in it and if it's clamp tight enough. Just be mindful of how you glue it all together and make sure you don't glue it together twisted.
Moving on, let's address the bottom. Just as the back, I'll install a tenon inside the side part first. Once I was done with side one, I repeated that on side two, then moved the focus over to the middle section.
The glue I use is ready for interior and exterior projects. In about 15 minutes, the glue really starts to show strength. Right now, it's go-time until I get all the parts pushed together.
Before I glue the legs on, I made one more cut. This overhang section was left to figure out on the fly. I cut it off at an angle so that it aligns with the sides. Finally, I put the legs in place, glue them on, and wait.
I tried to come up with an easy way of securing these two parts together, and then it just hit me like, "Why don't I just use wood glue?" That's what I did here. Wood glue is strong enough to hold these parts together, and so I'm going to trust the wood glue. The other thing I had in mind was to drill a screw or dowel from the bottom all the way through the leg and into the side of the chair area.
Being that I didn't mill the lumber, the corners are still around. Right at the joint, you'll see the round over on one part and the other part have an edge. You can use a router and a V bit to possibly take that edge off, but I'll go the manual route and use a chisel to shave off the edge. While I'm doing that, I'll also be removing any glue squeeze-out. I'll then use sandpaper to sand down this gap and also remove any chisel marks. Finally, I'll pass over it one more time using an orbital sander to remove the pencil marks and any dried glue.
This is the part of the project that always have me on the edge trying to pick that perfect color. I was thinking about going with a dark gray, which I may still go to it in the near future. It all depends on how I think this fit in, where I want to use this. For now, I'll finish this off with a medium walnut Danish Oil. Being that this stuff just wipes on, I get instant gratification.
I designed this chair for the deck and it's meant to be low, but I don't see a reason why it couldn't be utilized inside. With that in mind, adding furniture feet to this will raise this up a few inches. Now, I'll drill the holes and install the mounting hardware for the feet. Now, I think the hardware will look better if I decided to counter sync these, but all fairness, I'm not even sure I'm going to keep the feet on these, especially not for outside. The reason why I even chose these clear feet were to give the chair a floating look being that they are clear and you can see right through them.
If you happen to miss it in the beginning, the reason why I made this a two-part chair is due to my inability to make lightweight furniture. Overall, I like the bulkiness of the lumber, so for me, it looks overweight. This design solves all of my concerns. Not only will I be able to break it down and transport it, but I can break it down and store it. I personally like the look of the chair without cushions, but nonetheless, the chair is designed to hold cushions up to 24x24 inch.
You've seen the chair with a clear feet, which I think looks okay, but I'm more of a fan of the chair without the feet. My question to you is, what do you think looks better, the feet or no feet? To make this thing outdoor ready, a few coats of varnish was applied.


Keep the inspiration coming!
Subscribe to our newsletter for more woodworking tips and tricks