Project: Building a Cherry Wood Sideboard
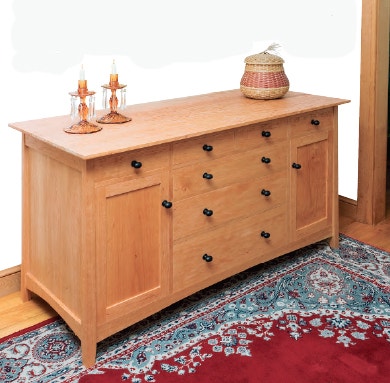
This sideboard project is made from cherry wood in the Thos. Moser and Shaker styles and built for lots of storage.
Relatively few folks can afford to spring for a complete dining room suite. Newly settled into their first house, my son Jeremy and his wife Tara bought several Thos. Moser Windsor-style chairs, intending to buy a matching table and sideboard at some future time.
For the sideboard carcass diagram and materials listin PDF format, click here.
Well, that sure threw down the gauntlet in a family sort of way, not to mention a woodworking gauntlet for me! Undaunted, I forged ahead, and while Jeremy and Tara may have to wait a spell for their table, the sideboard you see here puts them one big step closer to that complete suite. My design doesn't copy any Moser piece that I’m aware of, but it does harmonize with the chairs. I think it's spare and elegant, like the Shaker furniture that inspires many furniture makers. Here's how to build one of your own.
Preparing Your Stock
The first big step toward your new sideboard is gathering all of the lumber, plywood and hardware. You'll need primary (cherry in my case) and secondary woods in 4/4, 5/4 and 6/4 thicknesses, as well as a chunk of riftsawn 8/4 of primary wood for the legs. You’ll also need a single sheet each of 3/4" and 1/4" plywood with face veneer that matches the primary wood.
Prepping the lumber is a big job because of all the stock that must be resawn for the drawers. Resaw 5/4 stock to produce 3/8"-thick drawer sides and backs for the top-tier drawers, as well as bottoms for all the drawers. Resaw 6/4 stock for 1/2"-thick sides and backs for the other three drawers. Sticker and stack your resawn stock with a weight on top so the new faces can release moisture without warping.
Building Carcass Subassemblies
This sideboard's case construction reminds me of auto unibody construction. Instead of the case being a frame supporting independent panels, the panels are integrated into the assembly to make it stronger and more rigid. Routed mortises and loose tenons join the posts and bottom rails, while dovetails join the top rails to the legs. The end panels are plywood, biscuited to the legs and rails. The bottom is plywood, biscuited between the bottom rails. Web frames in stopped dadoes support the drawers.
Begin building the case by cutting the joints that connect the rails to the legs, forming the framework. With a plunge router, edge guide and a shop-built mortising block, you can rout the following mortises quickly and accurately:
<
- Single mortises in the legs and bottom front/back rails
- Twin mortises in the legs and bottom side rails
- Single mortises in the legs and top side rails
Next, construct the loose tenons and test-fit the joints, then cut short tapers on the legs and shape the bottom-rail arches.
For the sideboard leg and rail diagrams in PDF format, click here.
Cut the plywood panels for the sides, bottom, partitions and back panels. Lay out and cut biscuit slots in the side and bottom panels, with matching slots in the rails and legs.

Go ahead and edge-band the partitions with strips of solid stock, then rout grooves in the rear bands to accept the back panels. I did this on the router table with a 7/32" straight bit. While you're set up, rout back-panel grooves in the legs as well as the back bottom and top rails.
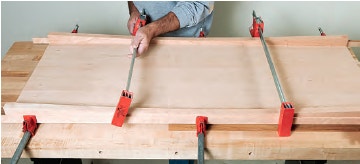
After a dry-fitting to ensure the parts fit properly, glue up three subassemblies: two side units, each consisting of two legs, top and bottom side rails, and a side panel; and the bottom, consisting of the bottom panel and the front and back bottom rails.

Rout the shallow dadoes for the drawer dividers and runners next. These dadoes extend from the back-panel grooves to within 3/8" of the front edge. To ensure that the dadoes would line up properly, I clamped the partitions edge-to-edge and used a long straightedge clamped across both to guide my router. Square up the ends of the dadoes with a chisel. Rout corresponding dadoes in the two side assemblies.

The two cupboard compartments (behind the doors) have adjustable shelves. Now is the time to drill the shelf-pin holes in the partitions and the side assemblies. Notch the top front and back corners of the partitions to fit around the top rails. The partitions are joined to the case bottom with biscuits. Lay out the locations and cut biscuit slots in bottom assembly and partitions.

Cut the web frame parts — drawer dividers, runners, rear rails and dust panels. Notch the front corners of the drawer dividers to fit the stopped dadoes. Rout the web-frame joinery: stopped grooves for stub tenons joining the dividers/rails and runners. Plow grooves for the specified dividers, runners and rails for dust panels. Glue up these frames.

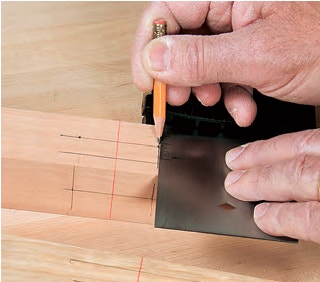
Now move onto constructing the top frame, which consists of the front and back top rails and four top stiles. Stopped grooves and stub tenons join the top stiles and rails. A single dovetail connects these long rails to the legs. Lay out and saw the dovetails on the rails first. Then, dry-fit the side and bottom assemblies together, set the top rails in place and scribe around each tail onto the leg tops. I roughed out the sockets with a router and straight bit, then pared them to the final fit with a sharp chisel. Glue up the rails and top stiles.
Preparing Your Stock

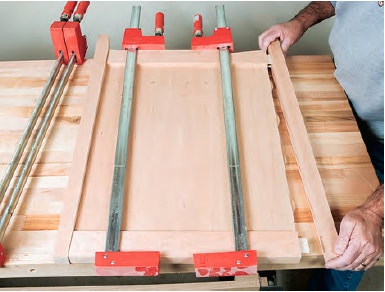
Begin the final case assembly process with the center unit, capturing the three large web frames between the partitions. Clamp the assembly and make sure it's square and true.
For the sideboard frame diagrams in PDF format, click here.
Even before the clamps are off the center unit, you can glue it to the bottom. Apply some clamps to draw the partitions tight to the bottom. I drove 2-1/2"-long screws through the bottom up into the partitions to pull the centers of the parts together.
Next, join one side assembly and web frame to the case, then the second. Slide the dust panels into place and glue the top frame dovetails into the leg sockets. Apply glue in the back-panel grooves and install the three back panels.
Making Doors
In keeping with the sideboard’s spare Shaker-like design, the doors are unembellished and have flat panels. The panels are made of solid wood, not plywood, so movement must be accommodated. The rails and stiles are joined with more groove-and-stub tenon joints.
Start by making the door frames. Rip and crosscut the rails and stiles to size. Cut the panel grooves, then the stub tenons on the rail ends. You want a snug press fit, not a fit that requires you to hammer the parts together. While the groove-and-stub tenon is generally acceptable for cabinet doors, I reinforced these joints with loose tenons fit into routed mortises.
Now make the panels. Plane your stock down to 1/2" thick (perhaps a skosh less), and rip and crosscut the panels to size. Under-cut the edges of the inner faces as needed so the panels fit their frame grooves.
Before gluing up the doors, apply finish to the panels. The finish prevents glue from sticking to the panels, which could restrict wood movement. It also prevents unfinished wood from showing when the panels shrink.
Creating and Fitting Drawer Boxes

I built traditional drawers, with thin sides and backs and solid-wood bottoms fitted into slips. I used dovetails - half-blind in front, through at the back - although I routed them rather than hand-cutting them. (Tradition only goes so far!)
For the sideboard drawer diagrams and materials list in PDF format, click here.
I wanted the drawers to fit their pockets like pistons in engine cylinders. To achieve that precision, I made the drawers one by one.
Fitting begins as you cut the individual parts. Methodically trim each part to very tightly fit one specific pocket in the case. Cut the joinery, including the drawer bottom groove in the front (but not the sides). Assemble the box, ensuring it’s square and sits flat.
Tweak the fit next. Hand-plane or sand the edges of the drawer - both top and bottom - and the faces of the sides just enough to ensure a good fit. Like that piston, it must fit without wiggling or binding.
Adding Slips and Bottoms
A pair of narrow slips attach the drawer bottoms to the thin drawer sides. Here’s how to make them: Begin with boards planed down to 5/8" thick and crosscut a little over 20" long. Saw or rout a 1/4" groove for the drawer bottom, 3/8" from each edge. Now rip a 1-1/8"-wide slip off of each board edge. Saw or rout a bevel above the groove, leaving a 1/8"-wide flat between the groove and the bevel. Finally, mill the front end of each slip to form a stub tenon that fits into the drawer front groove.
Sand the slips. Fit two slips inside each drawer, trimming them to length and paring away the bevel where it intersects the drawer back. Glue the slips to the drawer sides.
Finally, make and install the solid-wood drawer bottoms. Bear in mind that the grain must run from side to side, so you need to edge-glue stock to form short, wide panels. Three edges of each bottom must be rabbeted to fit the bottom grooves in the drawer front and slips. Cut a slot in the center of the back edge of the bottom panels for a mounting screw (so the bottom can expand without blowing the back out of the drawer). Slide the drawer bottoms into their boxes, and drive the screws up into the backs.
Complete the drawers by drilling centered holes for the knob screws and threading the knobs in place.
Installing the Top and Doors
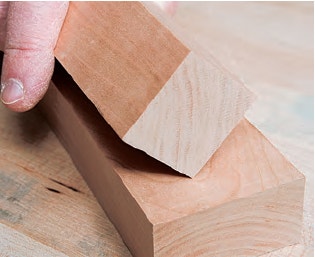
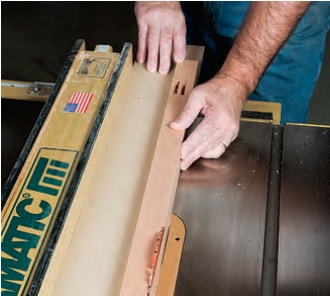
Make the sideboard top from 5/4 stock, thicknessed to 1" and edge-glued to form the panel. Bevel the edges and ends of the underside to reduce their thickness to around 5/8" to 9/16". You can cut these bevels on the table saw with the blade tilted about 20°, balancing the top on-edge and feeding it along the rip fence. A small panel-raising bit in the router would also work, or plane the bevels by hand. After pre-finishing the top, I mounted it to the case with cabinetmaker's buttons.
With the top in place, my final bit of fitment on this sideboard was to hang the inset doors. I wanted to keep the look of hardware to a minimum, so I opted to hang the doors on thin, offset knife hinges. I cut the shallow mortises for the "door side" hinge leaves with a trim router and straight bit, and cleaned up the mortises with a chisel. The mating leaves mount to the drawer dividers and bottom front rail. I chiseled these carefully by hand — no room for a router here. Brass ball catches came next, which keep the doors closed.

That wrapped up the construction phase of this project. After some thorough sanding and a few days spent applying finish, my son and his family now have the next piece in their dining room set ... and I can pick up that gauntlet.


Keep the inspiration coming!
Subscribe to our newsletter for more woodworking tips and tricks