Don't Make These 7 Epoxy Project Mistakes
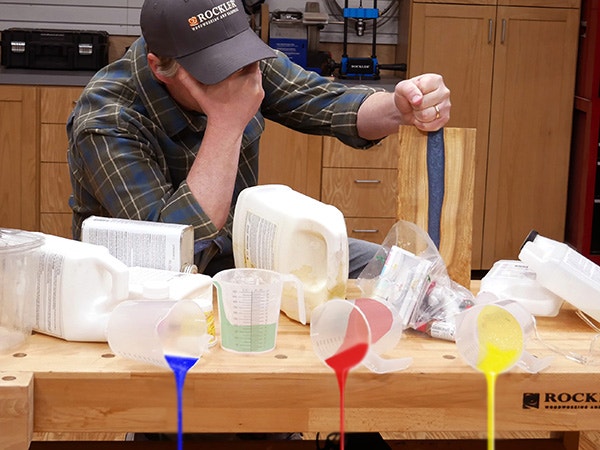
In this Rockler demo we’re going to share 7 of the most common mistakes you can make when working on a project that include pouring epoxy. Working with epoxy resin pours isn’t difficult, but there is a little bit of a learning curve and epoxy is not an inexpensive material. Avoiding these mistakes will make your projects more successful and could save your money. We've also created an epoxy buying guide that will help you choose the right epoxy for your project.
VIDEO: Avoid These 7 Epoxy Project Mistakes
Mistake #1 - Going too big, too soon.
Start with a small project to understand the process and characteristics of epoxy. Rather than tackle a large river table that will require mixing and pouring several gallons of epoxy resin, start with a small project that is easier to manage, such as a set of coasters.
Mistake #2 - Choosing the wrong epoxy.
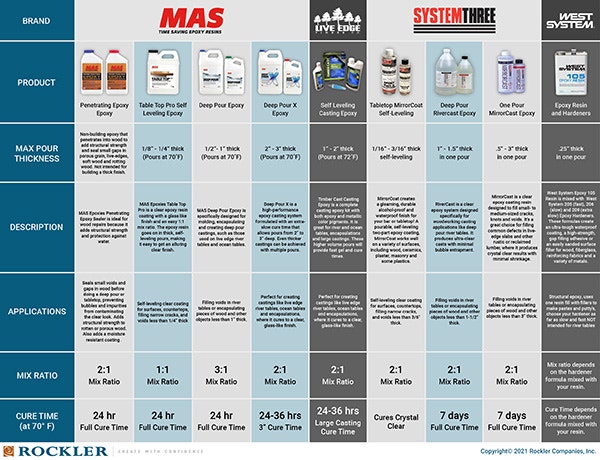
You need to use an epoxy that is intended for the type of project you're making. For example, the epoxy must be designed to work with the thickness you are pouring. For example using a deep pour epoxy to fill a small crack will eventually work, but it will take a long time to cure. It needs a larger mass to cure. On the other hand you the maximum pour depth of a table top is typically ¼” per pour. The following chart presents the most common types of epoxies used for woodworking projects and the important characteristics of each.
Download: Epoxy Selection Chart
Shop for Epoxy
MirrorCoat® Bar/Tabletop Finish
WEST SYSTEM 205, 206 and 207 Epoxy-Hardener
Mistake #3 - Not building, sealing or leveling your form properly.
Don't sabotage your project by taking shortcuts when making your mold. Take the time to make sure that your mold is the correct size, made from the right materials and that it will not leak.
Tips for Making Epoxy Pour Molds and Forms:
- Choose your mold material. MDF and Melamine are common choices because they are readily available, inexpensive and smooth.
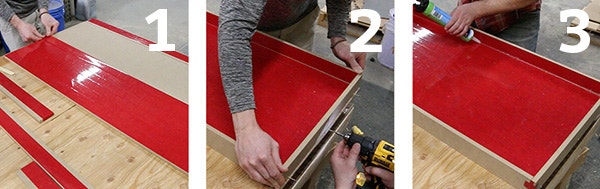
- Cut your mold bottom and sides to size. Make the mold a little oversized to allow for any imperfections along the sides. Cover all of the inside faces of the bottom and sides with siding tape, such as 3M Construction Seaming Tape or a similar smooth plastic tape (photo 1, below). Overlap the tape seams by 1/4" to 1/2".
- Assemble the molds with #8 x 2" countersunk screws (photo 2, below).
- Seal all of the seams between the bottom and sides of the mold with silicone caulk (photo 3, below). Pay special attention to seal all of the seams. Epoxy is like water, if there is even the slightest opening to escape, it will leak.
- Apply a bead of sealant on the bottom of the slab and along the edge of the live edge. This sealant will help prevent epoxy from leaking under the slab.
- Finally, place your mold on a sturdy surface and make sure it is level in every direction. If the mold is not level, the epoxy will settle towards the low end. It's also a good idea to lay down some plastic to protect the floor around the mold.
Mistake #4 - Your workshop or epoxy temperatures are too hot or too cold.
The process of mixing epoxy is sensitive to both the room and resin temperatures. For best results the two parts should be 70-80 degrees Fahrenheit. That means you may need a heater or air conditioner to get your workspace in the right zone. Also, mix you're epoxy when you are ready to pour.
Mistake #5 - You mix the wrong amount.
Math may not be everyone’s favorite, but it's very important to take the time to calculate how much epoxy you need to pour, especially if you’re filling a void. You should mix a little too much, but you don’t want to waste money mixing way too much. Making multiple pours is one way to limit your risk of error. But if you’re doing a small pour with a unique color mix that you don’t know if you can recreate, then you don’t want to come up short. This handy epoxy calculator from MAS Epoxies makes estimating easy.
Mistake #6 - Over mixing.
Small bubbles are created when you mix epoxy. This is not a problem because they will typically float to the surface and break during the pour and you can get them to rise to the surface and pop with a torch. They key is to not mix too much and too quickly. If you’re mixing less than a gallon, use a mixing stick and stir at a slow steady rate. If you use a mixer paddle attachment for a drill, keep the drill speed slow and move at a steady rate. Whatever method you choose, be sure to scrape the sides and bottom regularly as you mix.
Mistake #7 - Rushing your final surface prep and finishing.
This applies to all woodworking projects. When you've spent so much time building a project, don’t cut corners in the final steps just to get done sooner. Flatten the surface and sand it smooth, starting with a 80 grit and working up to around 600 before applying a top coat finish. Oil finishes can react differently to the wood and epoxy surfaces. Apply the finish, wipe the excess, let it fully cure and then buff and reapply. Another option is to apply table top epoxy as the top coat. It leaves a glossy finish and self-levels to fill any imperfection. If you choose to use table top epoxy as the top coat, then only one sand up to 220 to give it a better bond.


Keep the inspiration coming!
Subscribe to our newsletter for more woodworking tips and tricks