Choosing the Best Epoxy for Your Woodworking Project
What type of epoxy is best for your project? And, how do you mix and apply the epoxy?
Epoxy Resins are engineered to pour and cure at different depths ranging from 1/8” up to 3", in a single pour or multiple pours. It is important for you to choose the correct type of epoxy based the type of project you are making, the total thickness of the epoxy, and the temperature of your work area.
SELECT THE RIGHT EPOXY FOR YOUR WOODWORKING PROJECT
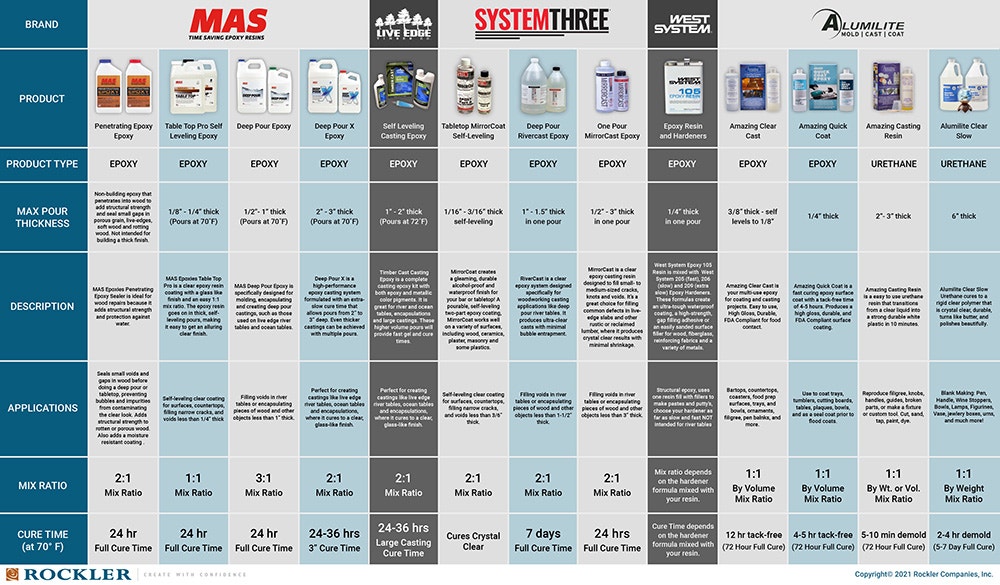
The following chart presents the most common types of epoxies used for woodworking projects and the important characteristics of each.
Download: Epoxy Selection Chart
Shop for Epoxy
MirrorCoat® Bar/Tabletop Finish
WEST SYSTEM 205, 206 and 207 Epoxy-Hardener
Alumilite Clear Slow Casting Resin
PREPPING YOUR WORKPIECE FOR AN EPOXY POUR
Tips to prepare the surface of the wood that will be coated or encapsulated:
- Remove debris and sand: This is an important step, as you don’t want particles floating in your epoxy.
- Use mineral spirits to to clean the wood surface. Allow mineral spirits to dry completely before you pour epoxy.
- Use a penetrating epoxy to seal the wood before your pour. This sealer will help prevent air bubbles from surfacing during the curing time. This is especially important when working with thick slabs that feature porous live edges or bark. The penetrating epoxy is less dense than water and penetrates deep into the wood sealing it, which minimizes bubbling and debris floating in your epoxy.
VIDEO: How to Apply Penetrating Epoxy Sealer
MAKING MOLDS AND FORMS FOR EPOXY POURS
Don't sabotage your project by taking shortcuts when making your mold. Take the time to make sure that your mold is the correct size, made from the right materials and that it will not leak.
Tips for Making Epoxy Pour Molds and Forms:
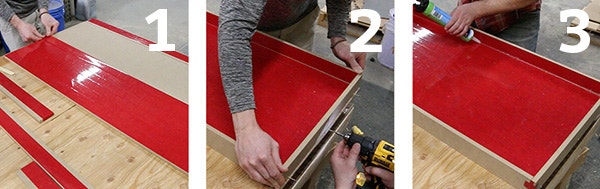
- Choose your mold material. MDF and Melamine are common choices because they are readily available, inexpensive and smooth.
- Cut your mold bottom and sides to size. Make the mold a little oversized to allow for any imperfections along the sides. Cover all of the inside faces of the bottom and sides with siding tape, such as 3M Construction Seaming Tape or a similar smooth plastic tape (photo 1, below). Overlap the tape seams by 1/4" to 1/2".
- Assemble the molds with #8 x 2" countersunk screws (photo 2, below).
- Seal all of the seams between the bottom and sides of the mold with silicone caulk (photo 3, below). Pay special attention to seal all of the seams. Epoxy is like water, if there is even the slightest opening to escape, it will leak.
- Apply a bead of sealant on the bottom of the slab and along the edge of the live edge. This sealant will help prevent epoxy from leaking under the slab.
- Finally, place your mold on a sturdy surface and make sure it is level in every direction. If the mold is not level, the epoxy will settle towards the low end. It's also a good idea to lay down some plastic to protect the floor around the mold.
VIDEO: Making a Mold
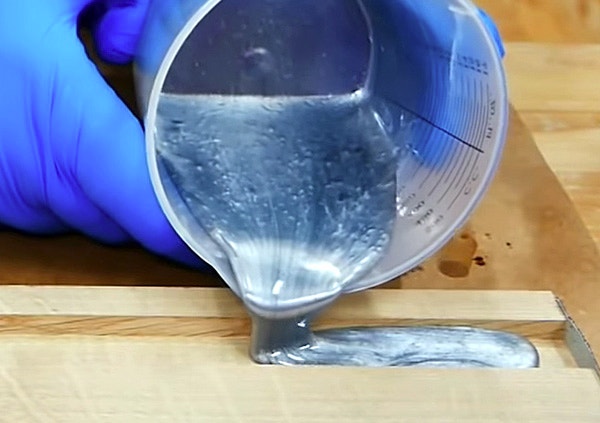
MIXING EPOXY RESIN
It is very important to carefully calculate the amount of epoxy you will need for your project. MAS Epoxies has Resin Calculators that work well, or you can use one of the other online calculators or make this calculation yourself. It is also important to have all your mixing supplies and materials ready before you begin because once the two parts of the epoxy have been mixed together a chemical reaction begins and you can not stop or pause the process.
Tips for Mixing Epoxy:
- Calculate volume of epoxy needed.
- Use clean mixing containers and mixing sticks, paddles or drill mixer attachments. If you are using clear epoxy, even a small piece of debris or old pigment can contaminate your pour.
- Make sure both parts A and B of epoxy are the proper temperature for mixing as stated on the bottle. This is typically round 73 to 75 degrees.
- Mix both parts continuously and thoroughly for approximately 4 minute.
- Scrape the sides and bottom as you mix.
- If you are mixing with a drill attachment, the faster the mixer spins the more air bubbles you will whip into the mix. Mix at a slow and controlled speed to minimize bubbles.
VIDEO: Ultimate Guide to Mixing Epoxy>
COLORING EPOXY
Dyes and pigments can be used to coloring epoxy. They are available in powdered and liquid forms. Both powdered and liquid offer a variety of colors and metallic effects. Whichever coloring agent you choose, it should be mixed into the epoxy after epoxy parts A and B are mixed. Add very small amounts of the colorant to a small amount of epoxy to refine the color effect. Then multiply the ratio to account for larger volumes of epoxy resin.
Popular Colorant Options:
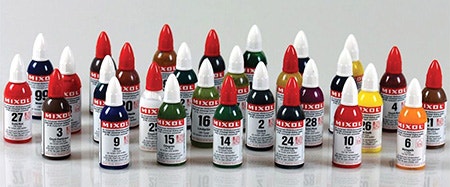
Mixol® Universal Tint is a universal colorant that mixes quickly into water-based, oil-based, or solvent-based stains, finishes, epoxy, filler, gel stains, gel polyurethanes, French polish, wax, glue, paint and more. It is sold as a concentrated liquid—just a drop goes a long way. Use it to color wood and many other materials. Thanks to its finely ground pigment base, it can be used to create or intensify nearly any hue or tint. Unlike other types of colorants, it contains no binder, just pure color in a universal solvent. That means that it will mix with almost anything, and that it has an extraordinarily long shelf life and high resistance to heat or frost damage.
Eye Candy Multipurpose Mica Pigment

Mica powder is made from a reflective stone mineral that has a naturally glassy shimmer. When mixed into epoxy resins, lacquers, paints, plastics, candles and other DIY crafting projects, it creates an eye-catching metallic shine. Eye Candy mica pigment powders are available in a wide range of vibrant colors, all using top-quality base materials. The ultra-fine pearls blend with a wide variety of mediums. Their natural sparkle and sense of depth makes them perfect for slab-style river tables and other deep pour epoxy projects.
CastFX Dry Metallic Pigment and CastFX Liquid Colorant
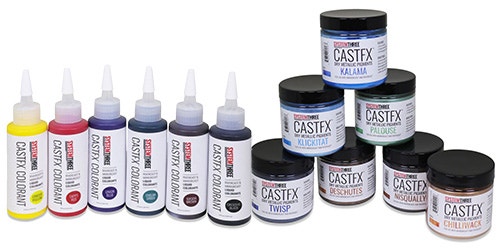
Add vibrant colors to your epoxy creations with CastFX Liquid Colorants. Designed to work specifically with System Three® RiverCast and MirrorCast epoxies*, CastFX lets you achieve anything from a subtle transparent shade of color to complete opacity, depending on how much colorant is added. CastFx Liquid Colorants can also be intermixed with one another to create unique color blends unseen anywhere else. For even more creative potential, mix them with Dry Metallic Pigments (sold separately) to create stunning, pearlescent effects.
Create shimmering pearlescent effects by mixing CastFX Dry Metallic Pigments directly into System Three® RiverCast, MirrorCast, and MirrorCoat epoxy resins. Different colors can be easily intermixed with one another to create custom colors, and they can also be mixed with CastFX Liquid Colorants (sold separately) for an even wider range of effects.
POURING EPOXY
Filling Voids and Channels

If you're creating a deep pour, then follow the epoxy directions to be sure you do not pour deeper than recommended. Pour the epoxy mix around your slab and/or into the channel of the mold. Wait 10-15 minutes, then use a propane torch to apply heat 6 inches above the surface in a slow waving motion to release air bubbles. After you torch you can start to create your own pattern using a mixing stick to swirl the epoxy. This is the fun part and you can create a interesting pattern for you base layer. Repeat this process for the first 30 minutes until the epoxy starts to gel. Once the epoxy has a syrup like consistency, swirl and apply heat one final time and cover your piece to keep off any dust from settling.
Tabletops

For tabletops, thoroughly mix the epoxy resin for 5 minutes. Again, mix with a slow and steady mixing speed to prevent micro bubbles. Let the epoxy mix sit for 2-3 minutes to allow bubbles to rise. Then pour the epoxy on to the surface and spread to the edges with a notched scraper. Use your gloved hand to smooth and even the epoxy along the edges of the table. Use a propane torch to apply heat 6 inches above the surface in a slow waving motion to release air bubbles.
FINISHING YOUR EPOXY PROJECT
Once epoxy has fully cured after 24 hrs you can start to take apart the mold. Using your power drill, remove screws from all sides of the form. Next, using a mallet or hammer tap the inside edge of the mold to release the edges separate the table from the bottom. Continue to do this on all sides until the table releases from the mold.
The next step is to sand all sides of the table. Using a random orbital sander with 80 grit sand paper, sand down the surface and edges of the table. Progress through the sandpaper grits up to 400 to 800 grit. Once you have sanded the surface completely, wipe the surface down with denatured alcohol and a clean rag. Using an air compressor helps blow off any small dust particles to ensure a clean surface.
There are several topcoat options, including several wipe-on oils and water-based finishes, but many consider the best option to apply a Tabletop Epoxy.
WOOD AND EPOXY PROJECT IDEAS


How to Make an Epoxy Resin Coffee Table - Woodworker's Journal Premium


MAS Epoxy Faux Marble Surface


Keep the inspiration coming!
Subscribe to our newsletter for more woodworking tips and tricks