Wall Trim & Working with Uncommon Angles
When you encounter angles other than the usual 45 or 90 degrees do you end up scratching your head? Don’t feel alone. Here’s a question from one of our readers. Mike was nearly driven over the edge trying to figure out how to calculate the odd-angled miters for a few trim pieces.
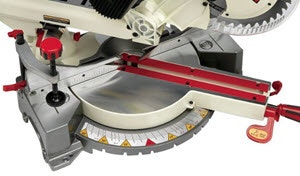
Woodworking Question: "I have a mid wall trim which is damaged and I need to replace it. It is fairly straight forward but it follows a staircase and I am having a lot of trouble getting the miter angles for the down slope. I have a 10" compound miter saw.
I have reproduced all the horizontal cuts without too much problem. Maintaining a good cut for the slope following the stairs has me pulling my hair out and obviously I've wasted a lot of trim. Has anybody got any suggestions????"
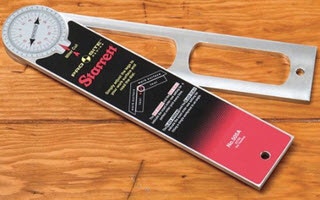
Answer From The Experts: If we understand the question, you have a piece of "mid-wall" trim, such as chair rail, that runs horizontally until it gets to the stairs and then follows that slope of the stairs. You want to know the miter angle setting for your saw to make the joint where the horizontal piece meets the piece that follows the slope of the stairs. If that's right, the easiest way will be to "read" the angle. To do that, you'll need some sort of angle gauge like the Starrett Angle Finder.
If you are replacing trim that's already in the right place, then the job will be easy. Just take off the existing trim and measure the angle of the miter. Depending on how the scale is set up, you will either get the correct miter angle setting or its complement.
In all likelihood, your miter saw scale is set up so that a cut straight across a piece of wood is a zero degree cut. If that's the case, then the correct setting for the joint you want to make will be somewhere in the neighborhood of 17 to 18 degrees.
So, when you read the angle of the miter, if the tool you are using says that the angle is 17-1/2 degrees (for example) you're all set. If it says that the angle is 72-1/2 degrees (for example), it's giving you the complement, and you'll need to subtract it from 90:
90 - 72.5 = 17.5 degrees.
If you don't have an existing piece of trim to use as a guide, you'll need to know the angle of the stairs, and to know that, you'll either need to measure it or calculate it using the "rise" and "run". If there is a base molding running down the wall where the stairs meet the wall, then measure the angle where it meets the horizontal base molding. You should get somewhere around 145 degrees. Subtract that number from 180 and then divide the result by 2:
180 - 145 = 35, then 35/2 = 17.5. That is the miter angle.
Or, you can use rise and run to calculate the angle. The easiest way to do that will be to measure the length of a stair tread (subtract the length of any nosing that sticks out past the riser). That is the "run". Then measure the rise (total height) of one of the stairs.
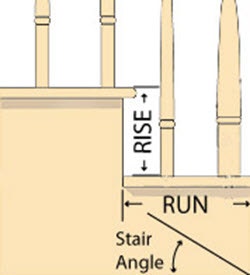
Next, use a Triangle Calculator to find the angle of the stairs. On the calculator, enter the measurement of the rise into "side O" and the run into "side A". The result for "angle 1" will be the stair angle. Divide it by two for the miter angle. With this or any of the methods mentioned, you may still have to make a few test cuts and adjustments to get the perfect saw setting.
Mike went with the Starrett Angle finder – a good choice, in our opinion. It’s frequently much easier and more accurate to “read” an angle than to work through the math that really only tells you what an angle “should” be. Apparently, that worked out. Mike wrote back with:
"I now own a Starrett angle gauge... Once I purchased the gauge, and then of course asked how to use the damn thing, I was away to the races. 11 cuts and 36 linear feet in one hour and 10 minutes."
A tool that gives you accurate angle readings can be a real time-saver, and just about indispensable when you're working with older structures, where even "square" corners are usually only in the general neighborhood of 90 degrees.


Keep the inspiration coming!
Subscribe to our newsletter for more woodworking tips and tricks