Wood Sealers and Pore Fillers
When and how to use sealers and pore fillers for a better finish.
When to Use Sealer
Strictly speaking, any finish that forms a film on wood can be used as a sealer. Some coatings are so good at this task by themselves that they are called "self-sealing" finishes. Other finishes are not, and they benefit from special sealers.
Shellac and oil-based finishes, (including Danish oil, varnish, and polyurethane) work so well by themselves that they do not require any special sealer under them. Some finishers prefer to thin the first coat of these materials to make them dry quicker or sand easier, but that is strictly a personal choice.
Lacquer and waterbased coatings, on the other hand, work better over sealer. The right sealer will lock in contaminating oils and waxes, reduce the number of coats needed by preventing excessive absorption, improve adhesion, and reduce grain raising, especially under waterbased coatings.
The wood also plays a part. With very dense woods, such as boxwood, you can usually omit the sealer. However, spongy or absorbent woods, like poplar and most softwoods, can benefit greatly from sealer, especially under lacquer. The sealer coat envelopes the porous wood, preventing the first few coats of lacquer from being excessively absorbed.
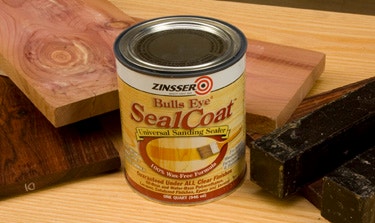
Some cedars and members of the dalbergia genus, which includes rosewood, cocobolo and African blackwood, contain antioxidants that prevent oil-based finishes from curing, but don’t affect shellac, lacquer or most waterbased coatings. Use Zinsser SealCoat or dewaxed shellac as a clear primer before applying oil-based finishes to those woods.
Applying Sealer
You can apply sealer as you would any coating, with a brush, gun, or pad, but that's not always best. After one coat, end grain and spongy areas may still be "hungry" and insufficiently sealed, while denser flat grain areas are starting to build up too much coating. There's a way around that.
Imagine if you were to submerse a piece of wood into sealer, letting it absorb all it could at the end grain or spongy areas, then remove it and wipe off the entire surface. Both more and less absorbent areas would be sated, but no excess finish would be piled up on top. While it is not always practical to submerge pieces in a vat of sealer, you can approximate that by flooding sealer on liberally by hand, then wiping it off. I use a nylon abrasive pad as an applicator, then wipe off with paper shop towels while it is still wet. Wear gloves and work small areas at a time so the sealer does not dry before you wipe it off.
The advantage of this method is that it allows end grain to absorb as much sealer as it can, but wipes any extra off flat grain surfaces that tend to absorb less. Once the sealer is dry, the entire piece is uniformly sealed, and the next coat of finish will lay out the same in all areas.
Sealer Versus Sanding Sealer
There's a good bit of confusion about the difference between sealer and sanding sealer. Sanding sealer is a specific material developed for the lacquer industry, but somehow the name has spread to things that should, by rights, simply be called sealer. For instance, the Zinsser SealCoat label calls it sanding sealer when it is really straight sealer. What, then, is true sanding sealer?

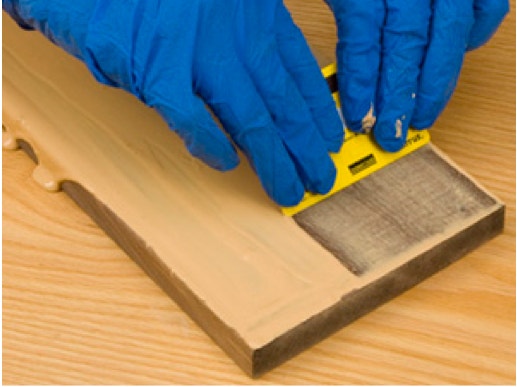
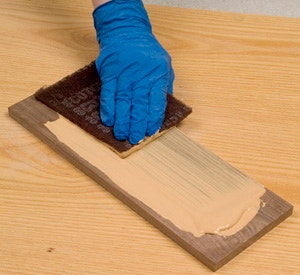
If you've ever sprayed nitrocellulose lacquer directly onto spongy wood like poplar, you know they absorb quite a bit before the film starts to build. To deal with this problem, sanding sealer was developed by adding zinc stearate, a soft, fluffy soap, to lacquer. This causes the lacquer to build up faster, sealing spongy wood quickly. The stearated sealer also sands easily (photo above) because the stearates make it softer and act as a lubricant to boot.
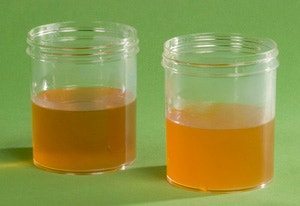
A couple of warnings about stearated sanding sealer are in order. Many people assume they must use sanding sealer under all finishes. That's not true. In fact, stearated sanding sealers are not compatible with some topcoats. Fortunately, telling sanding sealer apart from plain sealer is fairly easy. Open the can and look in. Stearated sealers are generally quite cloudy (right jar, photo below), while non stearated sealers, like dewaxed shellac and SealCoat, are clear or translucent (left jar, photo below).
Another problem is applying too much sanding sealer. Since it is softer than the lacquer that goes above it, use only one or two coats. Building up a lot of sanding sealer can make the harder lacquer above it more prone to chipping and cracking.
Because sanding sealer builds fast and sands easily, some folks try to use it as pore filler, building up coat after coat and sanding it back until the wood pores are filled. This is not a good idea because most finishes, including sealers, tend to shrink over time, and as they do, pores will show up as small depressions in an otherwise smooth finish. For filling wood pores, it is best to use pore filler.
What is Pore Filler?
Pore filler is an inert material you pack into the pores of large pore woods. Typically it contains a binder, to hold it together and to help it stay in the wood pores, and a lot of finely ground solids, such as sand, gypsum, wood flour and talc. Because it is inert, it won't shrink under the finish. Hence, once the pores are filled, the finish sits on a stable, smooth surface and the filled pores will not dimple as the finish ages.
Pore filler is an inert material you pack into the pores of large pore woods. Typically it contains a binder, to hold it together and to help it stay in the wood pores, and a lot of finely ground solids, such as sand, gypsum, wood flour and talc. Because it is inert, it won’t shrink under the finish. Hence, once the pores are filled, the finish sits on a stable, smooth surface and the filled pores will not dimple as the finish ages.
When to Use Pore Filler
It is important to understand that pore filler is optional, not mandatory, and is only appropriate in certain situations. You never need pore filler with woods that do not have large, visible pores. For instance, woods like maple, cherry, alder, boxwood, birch, beech and most softwoods, including pine, spruce, and hemlock don’t ever need pore filler no matter what finish you’ve chosen. The only woods you might want to use it with are those with very prominent pores, like mahogany, Spanish cedar, koa, walnut, rosewood, teak, ash and oak, to name a few.
Even on those woods, filling pores is strictly optional. Oak and ash, for instance, are usually done in open pore finishes these days. Although the finish covers both wood and pores, it follows the contours, allowing the texture of the wood pores to telegraph through the finish.
There is really only one situation in which you should use pore filler; when you want a glass smooth finish on a wood that has prominent deep pores. Because that is, relatively speaking, a rare situation, you will not find pore filler at most paint or home stores. It’s a specialty item sold primarily at woodworking specialty stores. Many finishers use it only on flat surfaces and table tops where pores will show most prominently.
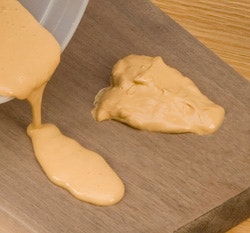
There are two types of pore filler, oil-based and waterbased, and they behave quite differently. oil-based filler gives you more working time, but dries slower. Waterbased filler dries much faster and usually sands more easily. Because of these differences, I use two very different methods with them. About the only thing the same is that they both must be stirred very well.
Applying Oil-Based Filler
Oil-based filler starts as a thick paste. You can use it like that, but I prefer to thin it with mineral spirits to the consistency of heavy cream. Brush it onto the surface, or scrub it on with fine nylon abrasive pads, but make sure you get enough on to completely fill the pores and cover the surface. Once applied it looks shiny and wet, but in a short time, which varies with the temperature and ventilation in your shop, the surface will begin to get hazy. At that point, grab a piece of burlap or jute and use it to rub the now thickened filler in a circular motion so as to pack it firmly into the pores.
When it starts getting too thick to work, or when you are sure the pores are packed, remove the excess filler from the surface of the wood. Take a clean piece of jute, burlap or a handful of excelsior and scrub off the excess filler by rubbing across or diagonally to the grain. Rubbing with the grain may pull the filler back out of the pores. Get the wood as clean as possible and let the filler cure for three days before sanding. No matter how well you wiped, there will be some dried residue on the surface. Remove it by carefully sanding with 220 or 320 grit paper until there is filler only in the pores and not on the wood between them.
Applying Waterbased Filler
Waterbased filler is both faster and easier to use. Thin it with water to the consistency of cream if necessary. Because it dries much faster, it’s best to work a smaller area at a time. Don’t worry about overlaps. If you do it properly, they won't show.

You can brush it on, but I prefer to apply it liberally with a nylon abrasive pad, scrubbing it into the pores as I apply it. Work quickly and as soon as an area is covered, remove the excess. Use a stiff piece of plastic (an old credit card works perfectly) and squeegee off all the excess. Hold the plastic at right angles to the grain and pull it in the direction of the grain. The plastic will bridge over the pores, leaving them filled, but will scrape off most of the excess filler on the surface.
Once you've cleaned the surface, let it dry overnight. As before, there will be some residue on the surface. Sand it off carefully with 220 or 320 grit sandpaper until there is no residue on the surface, and the pores are filled flush with the wood.
Which Comes First, Stain or Filler?
Whether you stain before or after filling depends largely on the look you are seeking. Generally speaking, dye stains go on before filling, but pigment stains are applied after the wood is filled and sanded. This is not a hard and fast rule, though, since when you stain will change the look of the filled wood. Experiment on scrap both ways and see which appeals to you. If you stain first, seal the wood with one thin coat of finish prior to filling.
Sealing the wood prior to filling makes cleaning off the excess filler easier and is a good precaution when applying oil-based filler to mahogany. In rare cases, mahogany can absorb oil and turn the filler gray several months after the finish is cured. Filling over sealer also lets you use colored filler to create contrast. For example, applying a dark filler on sealed lighter colored wood adds dramatic dark pores, yet retains the lighter highlights of the background wood. Seen from a distance, it merely looks like stained wood, but as you get closer, the contrast gives the wood a depth and richness that plain staining rarely affords.
Color and Clear

Filler comes in a wide range of colors, mostly wood tones, and in neutral, which is a beige or ecru color. Because of the high solids content, even neutral filler is opaque. Use filler the same color as the wood to hide the pores and create a more uniform and monochromatic look, or choose darker or lighter filler to create contrasting pores.
To create a custom color filler, start with a color that is lighter than the one you want. Often that will be neutral filler. Add small amounts of pigment. Add artist’s oil colors or Japan colors to oil-based filler, and add artist's acrylic colors to waterbased. You can also add universal tinting colors to either, but add color sparingly. If you find yourself needing too much, switch to a darker filler as your base.
Many people who want to fill pores, but did not want opaque color in them, would insist on filling pores with finish. In response to that need, several companies have come out with clear pore fillers. All of them are waterbased and are applied the same way as opaque waterbased fillers. The only caveat is that they all seem to shrink during drying more than their opaque counterparts, so don’t be surprised if you must fill the pores two or even three times to get them level.


Keep the inspiration coming!
Subscribe to our newsletter for more woodworking tips and tricks