Video: Three Joinery Jigs
In this video, DIY Creators take a look at three Rockler jigs and how to get the most out of them in your workshop.
DIY Creators gives an overview of the Rockler Doweling Jig, Beadlock Pro and Corner Key Doweling jigs, taking a look at how to use them in your workshop.
You can find more great projects and techniques from DIY Creators at their website.
Featured Tools:


Glen: Today, we'll be looking at three different jigs that I think will be quite useful to have in the shop. Out of these three, the dowel jig is the only one I'm familiar with just by looking at it but we'll still go over that one. I'll show you how to do a few joints with that. Since this one is more common, we'll run through this one first, and then we'll check out the other ones. Big thanks to Rockler for sponsoring this video.
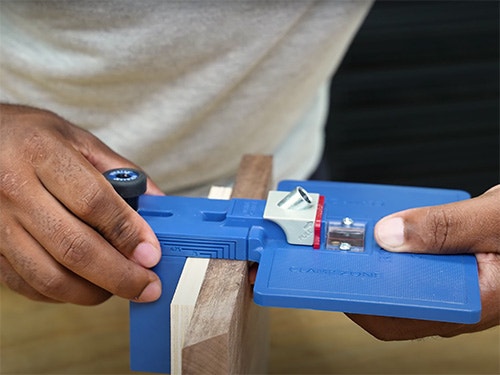
One thing to keep in mind, all these jigs are the same. No matter if it's the quarter-inch, the three-eighths, or the half-inch jig. Let's look at the front of the jig. Over here to the left, you have a depth. When you place a bit inside, you can adjust it based on the depth you need. If we look at the bottom, you'll see there's a hole here, which you can use to hang it on the backside. It's labeled as a clamp zone. As we move up, you'll see there's two holes in the top of the jig, which is spaced three-quarters of an inch part off-center.
From the edge of the jig to center of the holes, you'll see it's five-eighths of an inch. All these lines are a great indication to help you line this jig up to your work. Speaking of that, this window allows you to quickly adjust the jig to align with your reference mark. Let's say I need to join these two boards to make them longer. What you want to do is, butt them together then place a mark going across both boards. Make sure these lines are long enough so you can see them through the window of the jig. Now I'll take the jig and place it on the reference line that was here.
Now I'll make sure I'll line up whichever hole I want to, to that line. You can get dowels in different length. I usually drill the holes beyond the depth of the halfway mark of each dowel. Whenever it's possible, try to set up a test piece to do all your trial and error. Assuming you have the color set right on your bit after drilling your first hole, shift the jig over to your next mark, lock it down with the clamp and drill a second hole. While I am doing this freehand, it's best if you have these parts clamped down. It's the safer way to go about this.
Let's see how I did on the first attempt using this jig. One thing I noticed, there's a slight edge on here, and I felt like I could have did a better job with that but what I also notice is there's just enough movement in here. Once I put a clamp on, I can line it up perfectly. This demonstration's going to be a representation as if I'm doing some sort of casing and we'll line these up just like this here. We'll also do the same thing. Place a couple of reference mark on this. Now I clamp the jig onto the first piece and drill the first hole.
One thing to keep in mind here, the part I just drill will be going on top as such. To drill the other part, I need to turn the jig around and drill right into this part. I almost caught myself slipping here. One thing I had to keep in mind is you can't drill the same depth in this part as you would in this other part. Chances are if I were to drill the hole in both parts, I'd likely come out the side of this other part here. The setting that I currently have will not work for this. I need to make some adjustment. Now I need to adjust the bit so I can drive into this part deeper and then not so deep into this face.
Now it's a matter of applying wood glue and putting on a clamp. One thing I never done is try to use dowels on a miter joint. We're going to give that a shot and see if that works out. To make this happen, we'll take our two pieces of wood and put the joint together. I'll show you how to mark the lines. I've already done that and I did it with a square. Draw your first line out. Then you'll pull this towards the edge and draw your second line out. Once you have two lines, make sure the bit is set up to you're deep enough into both parts. That way you don't have to go back and redo it.
You may have noticed, but I didn't of this clamp tight enough when I drew the first hole. I can see the indication here and by looking at it, I am a little bit to the left of the line that I drew. In this case, I'll make sure to mark the next piece so it aligns with the new hole. While the second hole came up pretty good, one of the common mistake is not having parts clamp tight enough, which can make the jig shift. Look at that. I'm super excited about that.
That's great right there. That's great. I just covered three different joints that you can make using a dowel jig. If you want to use casing, butt two joints together, you can go this way or this way, same concept. If you need to do miter joints, the dowel jig works as well. One of the features I didn't mention, and that's the end stops. You can easily slide these off, reposition them and slide them back on. While this is not the only way, I'll cover one quick way to use this. This should give you some ideas.
Let's say I have a lot of joints I need to make, and I'm doing this over and over again, I can use this stop as a way to speed things up and not have to mark. Now that both parts are drilled, I can now align the two parts with dowels. If you drill both parts using the stops, you can only put this together one way. If you happen to put it together the wrong way, you'll see an offset like here. Just flip the boards around and you'll be good to go.
Let's say you want to join a larger stock material such as this, anything bigger than a three-quarter-inch piece of material, maybe inch and a half or so on.
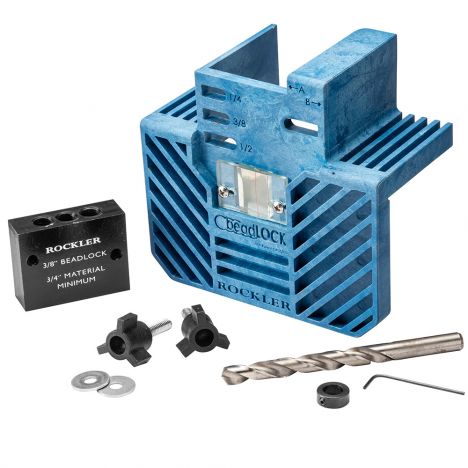
Dowels, woodwork but if you want something stronger, you're going to have to do something different. I'm going to be using a B-Lock system and we'll see what's the difference between that and the dowel. This is the B-Lock jig. This blue part here is known as the frame, and this black block is known as the bit guide. It includes the three-inch bit, an Allen wrench, and a couple of knobs. This set-up comes as a kit, but there are other assessors that you can add to this to expand it. Here are a couple of notable attachments.
There's a quarter-inch guide and also a half-inch guide. There's also a spacer kit. As shown, there are three different positions on here, a half-inch, three-eighths, and also a quarter-inch as shown in this frame, except three different drill guides. All the holes are in different positions based on the individual drill guide. To attach the guides to the frame, you need to pick the right guide and line it up to the proper holes. In this case, we'll use the three-eighths guide. We'll line up the first hole and then line it up to the three-eighths hole.
As we take a close look, you'll see there's an A indication and the B indication. Once you loosen up the three-wing knob, you can slide it to a different position. With the guide locked in place, the next thing we want to do is set the color on the bit, and I've already set this up. If you're going with a quarter-inch guide, you'll want to stop your bit here. If you're going with a half-inch guide, you want to stop this section of your bit here, not the point, but this section. The one thing I want to try to do here is to get the holes that I'm about to drill to be as center as possible in this piece of wood.
This is a three-quarter-inch piece of select pine. We're going to use a spacer and this is an eight-inch spacer. I'm going to place that here and just double-check on both sides and see if that can be as center as possible and it is. I know I'm going with this hole and this hole. I'll go ahead and insert the knobs. Then I'll set the eighth-inch spacer in place. Then I'll take the guide and sit that on that. I'll tighten this in position A, and lock it down. Now, the next thing I want to do is this reference line I have here is line it up to the indicator on the jig.
After you drill the first set of holes, the next thing you want to do is loosen up the guide and push it to the B position. Now we're going to go ahead and drill the second set of holes. All right. The moment of truth, let's see if we can get this down in there. Here's my next reference line on the second part of this. I'm going to place the jig on that and line it up to the line that I mark. I'm going to make sure that the jig is back into the A position. Then I'm going to drill, loosen it up, move it to the B position and drill again.
Right now we have the two holes cleaned out. We're going to take the 10-inch stock, place that inside. All you'll need to do is glue this joint up and you have a very strong joint here. Now, I'm going to use a thicker lumber for this demonstration. Now, I'll just try to find a center and just mark the line out. Now we're going to move the focus over to drilling directly in the center of a wider material.
The first thing you want to do is make a line, find a center of your stock. Then you can take the frame and I've already figured out what I needed. I'm going to take these spacers and just place them within the frame. By the time I put this one in, it lines up with the indication I have here. Now that I know what I need, I'll take the longer knobs and attach the guide.
All right, now that I'm almost at the end of the road, I want to make sure I put the jig in the same position in point A. Then we're going to lock it down. Now I'll take this jig and line it up. Just make sure you go down and up until you get all the wood chips out of the way. It'll make things a little easier. Now I'm going to loosen up the jig and slide it to the B position.
From my experience, it seems the harder the wood, the better the cutout is. Now I'll take the tenon stock and see. Look at that, nice fit. I have the next piece of stock in the vertical position. I'll do the same thing. I clamp the jig on the line and try to line it up as perfect as possible.
If we take a look at what I did here, this was the first one I did. It came out pretty good. The second one, maybe I got a bit too comfortable. I didn't lock it down as tight as I did on the first one. Then when I was drilling the second hole in the B position, the jig shift on me. So that's what happened, but I don't think it's going to affect what we're doing here. Let's slide this guy in and you see that went just fine. Slide this one in and that went just fine.
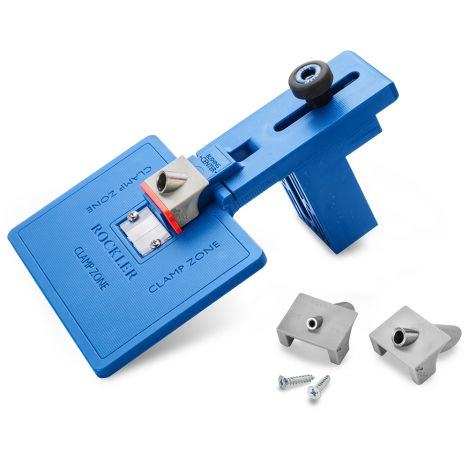
This is a joint that I'd be extremely happy with. Came out very nice. One thing that specifically set the dowel jig and the Beadlock jig apart is that there are affordable joining methods that's going to give you clean and strong joints. This next jig is perfect for anyone looking to add style and strength to their miter joints. This is the corner key jig. Over to my left is the clamping block that attaches to the drilling plate. These are the bushings.
There are three different size, eight-inch, quarter-inch, and three-eights. This red piece here is the key to securing the bushings into the drilling plate. It includes two screws to secure the backing to the clamping block, alongside that you have a washer, a hex bolt, and a knob. Let's start off by grabbing the clamping block, insert the hex bolt. Each one of these bushings slides into here just like that, then you'll want to take this key and lock these bushing into place. You want to make a separate backing for each bit.
The instructions suggest you use a half-inch piece of MDF, but in this case, I have plywood. Now I'll secure the backer board with the two screws. I cut this miter joint on a table saw, and it's a pretty good starting point. It's as tight as I can get it. Now, once you have your material, you'll now need to adjust the jig for the thickness of your material. To fine-tune the jig for precision, you'll definitely want to do that on a test piece first before committing to your final piece. Start by loosening up the knob to adjust this to the thickness of your board.
There are a few different board thickness labeled on the side of the jig. For me, the hardest part was finding the exact location for the thickness of the material. From what I can experience, the inside line here of this notch is where I want to reference from. I'll set the back edge of this notch to the front edge of this piece of wood. Then I'll adjust the backer board to make sure I fall within that three-quarter range. It's important to test this first to make sure you have a good feel for the jig and have a better understanding of it.
I feel pretty good about that so let's call it ready. Here's another decision you'll need to make. With three bits available, you'll need to pick the right one you want to use. I only have three-eight style on hand so I have to use a three-eight bit to drill all three holes. If you're planning this ahead, you can be as fancy as you like and mix the different size bits. These are extended bits so you can see a difference between regular bits and those. I know I want three holes in this joint. I'll draw three six-inch lines which is long enough to extend past the length of the jig.
If I was building a box, I'd likely glue the joint first, then drill the holes after. It'll be easier to manage that way. In this case, the joint is not glued and I just have them clamped to the workbench. Now I'll take the jig and align it to the reference mark I placed earlier. Adding tape to the bit will let me know when to stop drilling so I don't go all the way through the backer board.
It may look like I have a lot of clamps here, but there's only two holding the jig down and the others are holding the workpiece to the workbench. If I were drilling a box and the joints were all tight together, I wouldn't have to set up all of this stuff I have going on here. Because I have this setup, I'm limited on where I can drill so once I drill the first two holes, I didn't have to put this on top of the workbench and drill the final hole.
Now I need to cut down some dowels to plug the holes. Something you have to consider is trying to find the right dowels to either contrast your work or blend it perfectly. I would assume that most would want to show off the dowels and use something contrasting so that it stands out a bit more. I place tape behind the dowels to avoid cutting into the wood.
Now sand the dowels down to the surface while removing any saw marks. At this point, you can finish this off however you like. Using the corner key jig, this is a nice way to finish off a box or drawer. We are at the end of the road. I took three jigs and showed you how to make all of these joints. The more you use them, the more comfortable you'll get with them.
I can personally see a use for all three of them, but I would suggest you start off with the one that interests you the most. While this is not a project video, I really enjoyed this video because I got a chance to try these out for the first time and you were able to see. If you find it's interesting and you'd like to see more videos like this, let me know what you'd like to see me try out next.


Keep the inspiration coming!
Subscribe to our newsletter for more woodworking tips and tricks