Video: Should You Buy A Miter Saw?

In this video, Chris Salomone and Shaun Boyd take an indepth look at the miter saw and how it is used in the shop for woodworking and furniture.
Chris Salomone and Shaun Boyd cover the most common uses for a miter saw, and how to achieve the same results with other tools in the workshop.
You can find more great projects and techniques from Chris Salomone at his website.
Featured Tools:

Chris Salomone: This video is going to be about exploring the value of keeping a miter saw in the shop because that's actually one of the most common questions that we get from people when they watch our videos is why don't we keep a miter saw in our shop? Now if you're familiar with my older videos, you might remember that I used to have one back in my garage shop.
The reason that I got one initially was I just assumed that I needed one. I saw that other people had them. Over time, I realized that I wasn't really using it for that many things, and it was an inefficient use of the space. Eventually, I redid my garage. I used that space for more storage instead. What I did was reached out to you guys on Instagram and asked you for your reasons for keeping a miter saw in the shop.
What we're going to do is go over some of the most common responses that we got and show the pros and cons of having a miter saw, and then show how we achieve those same tasks without having one in the shop. If you're somebody who's considering buying one but maybe you're not sure if you need one or not, hopefully, this video will help you to make a better-informed decision.
The first thing that we're going to get into and by far the most common response that we got had to do with breaking down rough lumber. People basically felt that it was either safer and/or quicker to do with a miter saw, so let's get into that. All right, I actually have a miter saw in my garage. I went ahead and brought it in for illustration purposes. Now if you have a dedicated miter station, for the most part, I'm going to agree with the faster and safer comments, at least the faster one. If you don't, that means you're going to have to set your miter saw to cut.
The first problem that you'll notice is if you're trying to breakdown large pieces of rough stock, you're going to have to put some supports on the ends to match the height, which you can do with something like an adjustable height roller stand or some scrap wood blocks and shims or both. Now more realistically, when I'm rough cutting lumber, I'm really actually cutting in the middle. More common would be to cut off the first few inches of one end, and then start breaking down parts into oversized chunks.
The most common way that I tackle these kinds of cuts are with a circular saw. If I'm using a circular saw, I can rest my piece on the outfeed table or an assembly table. I'll set the depth of the cut to about a half of a tooth thicker than my lumber, and then make the cuts that way. Sure we'll cut into our tabletop by doing this, but I'll just replace the MDF after a couple of years. Now I happen to think that this is a perfectly safe way to make this cut, just make sure you keep your hands well out of the line of the cut.
If this scares you, first, maybe this isn't the hobby for you, or second, use a jigsaw. When I have really gnarly material, this is my go-to method. Yes, it's a little bit slower, but generally, this works because I'm usually breaking my boards down into smallish chunks. If, for example, I were cutting a 12-foot board into two 6-foot chunks, I would not do this. Instead, I'd set up something so that both pieces were supported independent from me.
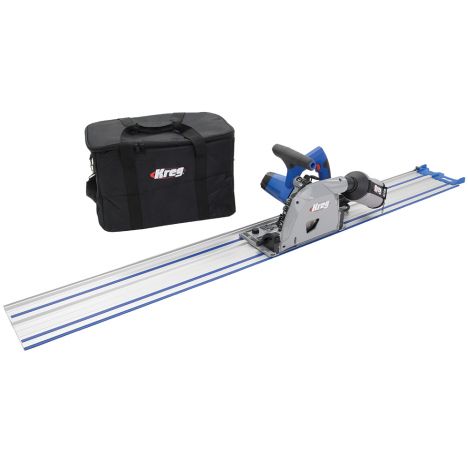
The last method that I use for breaking down stock is my Kreg ACS, which is probably the tool in my shop that most closely mimics a miter saw in terms of the way that it functions. I know you're probably thinking it seems dumb to suggest a more expensive tool in place of a cheaper one, but the ACS also does everything that a track saw can do since you can detach it from the work table, and a whole lot more as you've probably seen in other videos.
Again, the point of this video is to help people think about how they should invest in tools and where they'll get the most bang for their buck, and not simply the cheapest way to get a job done. At the end of the day, I think the question that you're going to want to ask yourself is, how often do you see yourself breaking down rough lumber? If it's something that you're going to be doing all day every day, then, yes, a miter saw in a station makes total sense. More realistically, at least for me, I found myself doing it for 20 minutes at the beginning of a project, maybe one or two times a month.
It just didn't make a lot of sense for me. I'm happy to stick with a jigsaw, or a circular saw, or a track saw to get the same thing done even if it's a tiny bit slower.
Shaun Boyd: The next most frequent response we got was about making repeated cuts and making long cuts, and more specifically, making long repeated cuts. Making repeatable cuts is probably one of the more important aspects when it comes to furniture making and woodworking in general. A table often has four legs. If those four legs aren't all the same length, we have a wonky table, and nobody wants a wonky table. Usually, that's no problem as a crosscut sled and a stop block will get us perfectly repeated cut lengths.
Let's consider a situation where the length of cut we need is longer than our crosscut sled or maybe even longer than the fence capacity of our table saw. Sometimes I have to get creative like in this situation where I used our band saw as a stop block off the end my table saw to cut the legs to length on the loft bed that I made recently, or in the situation like these stretchers on the dining table I just finished where I needed two parts that were exactly the same length. I could just clump them together to ensure they were equal to each other.
As long as I was close enough to my desired length of 64 inches, I was good to go. Similarly, if you don't have a large table saw or felt uncomfortable making this cut on a table saw, using a circular saw and a square would give you the same result. I've found that in furniture making oftentimes, the specific dimension isn't critical. It's more about the repeatability. It's the accuracy versus precision argument. In both the loft bed and the dining table, the parts didn't necessarily need to be cut to a perfectly accurate dimension, they just needed to be cut to precisely the same dimension. Sure having a miter saw in some of these situations would be handy, but honestly, the amount of times I've had to make these types of cuts to specific dimensions, I could count on one hand. Just like with anything else, there's always a way to do it with another tool.
Chris: Another response that we got had to do with the workflow order of operations problem that people sometimes find themselves in. That is, let's say that you have your table saw all set up to make a specific rip cut, and then you realize that you need cut a board to length, and you don't want to change all of the settings on your table saw just to make that one cut. Now I was actually trying to think of an example of when I would find myself in this situation and where it was unavoidable, and I couldn't think of any. The best example that I could think of is being mid-project, and then having somebody interrupt you with a cut that they needed for something else.
Anyway, I think that this is mostly a moot point as long as you're paying attention to order of operations. I know that this is a very simplified example, but let's just say that I'm making a table with four aprons, and two of them need to be 24 inches long and 2 inches wide, and the other two need to be 48 inches long and 2 inches wide. The way that I would do this is I'd be starting with pieces roughed out so that they're oversized in both directions and with one edge that's jointed flat.
By the way, maybe take that money that you were going to invest in a miter saw and get a joiner instead. Then first, I would crosscut everything to finished length, be that with a miter saw or a table saw sled, or whatever, anything. Then I would rip it to finished width. The reason for this is if you get tear-out, it's typically going to be while you're crosscutting because you're cutting perpendicular to the fibers. Ripping as your last step let's you clean up that edge that potentially has tear-out.
Let's just give you the benefit of the doubt and say for whatever reason it's totally unavoidable, and I have to stop ripping my aprons and crosscut another piece and then reset my table saw up to continue ripping. First off, I feel pretty confident that I can reset my fences to within a 30-second of an inch. If three of my aprons are two inches wide, and one of my aprons is 1 in 31, 30 seconds of an inch wide, will anybody ever know? If it would just bug me, I could just rip all four of my aprons down to 1 in 31, 30 seconds of an inch, and it would be fine.
I think the takeaway here is that, yes, these kinds of situations can occur, but for the most part, they can be avoided if you're thinking about your workflow. If they happen two or three times a year, and it sets you back 10 or 15 minutes each time that it happens, is that really worth the trade-off?
Shaun: The last topic we're going to get into and probably the most obvious is using your compound miter saw to make compound miter cuts. Now even that might be a little bit confusing. Let's first talk about what that is, and then we'll talk about how we can do it.
First things first, a compound miter cut is essentially making a cut that's both at an angle to the reference edge of a workpiece, as well as beveled or angled from the reference face of a workpiece. This isn't a super common cut to make, but it's a good jumping-off point when talking about how people utilize miter saws, and how we're able to reproduce the same cuts without one. The most simple workaround is using a miter gauge on your table saw, which Chris does fairly often. Chris, tell the people what you're here for.
Chris: Before we even get into the compound stuff, one of the really great things about a miter saw is the fact that you can dial in really specific angles. Now I'm sure that they're not all the same, but mine here has positive stops everywhere that you see the long lines, and then you can lock it in in any position at any other point between those stops. Pretty handy.
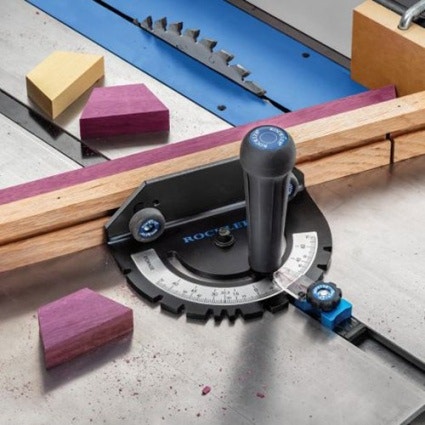
Equally handy is a miter gauge, which you can use on any table saw or band saw that has a miter slot, which I think is pretty much all of them. This one here from Rockler costs less than $100, and again, has several positive stops and the ability to lock at any angle in between the points. If you want to get super crazy, they make miter gauges as granular as having positive stops at every whole degree, and the ability to measure it to the 10th of a degree. Maybe a little much but nice to know.
When it comes to tilting the blade for a bevel, my miter saw can tilt 45 degrees to either side, whereas most table saws are only going to tilt one way, and again, usually to 45 degrees. A common use for making a compound cut would be when you're cutting crown molding. Even there, there are workarounds that we're not going to get into here, but when it comes to furniture making, it's not something that I really do a whole lot of.
Actually, I think I've only ever made one project that involved a compound miter cut, and that was for making a small wastebasket that was in the shape of upside-down pyramid with the top of it locked off. The way that I was able to make that cut was on my table saw with my miter gauge set to 7.1 degrees, and my blade tilted to 44.6 degrees. You can make this exact cut on a miter saw but honestly, I think that the setup is a lot sketchier than the table saw equivalent.
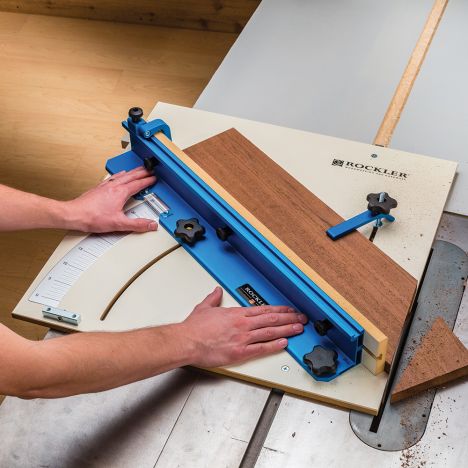
The other thing to think about, and this is for compound miters, regular miters, or just straight cuts is cut capacity in terms of the width of the board. Miter saws are usually going to max out at about 12 inches for a crosscut, and as the miter angle increases, the width of the board that you can cut goes down. Whereas a crosscut sled on a table saw is going to have about 18 to 20 inches of capacity for crosscuts, and something like this Rockler crosscut sled that can cut miters will still have about 15 inches of capacity, even when it's set at 45 degrees. That's compared to about nine inches of capacity, which is what you would have with a miter saw.
Then of course, as you start getting into track saws, which again, can be set to cut any angle and even repeated angles if you're using something like the ACS, you have a ton of capacity. Now I'm not going to calculate it, just take my word for it, but it's more than enough.
Shaun: In addition to miter gauges, and probably my most preferred way to make angled cuts is on a table saw with a table saw sled. If you've watched just about any video I've made in the past, you've definitely seen me use some type of sled. Anytime I need to make an angled cut, I prefer to set up a table saw sled rather than a miter saw, and that's for a couple of reasons.
First, I just trust a table saw cut over a miter saw cut. I'm sure both tools when set up properly, it will give a fairly comparable result, but I've just always gotten better and cleaner cuts from table saws over miter saws. Beyond that, there's some cuts that can be made on a table saw sled that would be difficult or almost impossible on a miter saw. For example, all of the joints that I cut onto my rocking chair leg parts because every edge on the individual parts were curve, using a miter saw would have been incredibly difficult, but a table saw sled made it relatively easy and repeatable.
Similarly, in a situation where an extremely steep angle needs to be cut onto a part, like on Chris's hemp wood table, the reference edge needed to use a miter saw is far too small and would make for a pretty dangerous cut. Instead, a table saw sled uses the longer edge as a reference and allows for a much more controlled and safe cut to be made. Additionally, all of the cuts I just mentioned could also include a bevel angle to make them compound miter cuts. Like I mentioned earlier, and Chris was talking about with his trashcan (Wastebasket) just by tilting the blade to the desired angle. I suppose the only time I would favor a miter saw for a cut like I've been talking about, it would be when I need to cut an angle on the end of a very long part. Again, like we've been saying, the amount of times I've needed to do that is a very small number, and certainly not enough to justify having a miter saw in the shop.
I also wanted to mention that this was intended as part of the Rockler desk challenge, which was an awesome event put on by Rockler and the guys at the Modern Maker podcast. I, obviously, got this in a little too late. It ended about a month ago but you can go check out all the other desk designs that are on there. There are some really incredible ones.
Chris: I feel like we just talk trash on miter saws for 10 minutes. Obviously, that's not the point of this video. Instead, why don't we talk about who a miter saw is good for, what they're good for, and there are two immediate things that pop into my head.
Shaun: Yes, I think we mentioned that at points in the video, but the first one is obviously a finished carpenter or someone that's working on a job site, cutting crown molding or cutting two by fours. A miter saw is a very mobile tool. Like we talked about it, it's great for cutting things to length quickly and effectively and easily. Obviously, that's a place where it's very useful.
Chris: The other one would be on the opposite end of that spectrum, and that would be somebody who's very much a DIYer and occasionally dabble into something that's a little bit more woodworking or furniture, maybe like building a simple bookcase, something like that. I think it's good for them because first off, it's great for projects like baseboards or flooring or something like that.
I think it also has a lower perceived value of-- It's just less intimidating, I guess, is the best way to put it. It's just something that I feel most people think is more approachable to walk up to, cut a piece where a circular saw is probably going to scare people, at least, in the beginning.
Shaun: Beyond that, I think the idea that a DIY or someone who wants to use a miter saw at home, and it really has no intention of moving further with woodworking, that's someone who can utilize a miter saw, and for someone who's maybe wanting to get into the hobby with the intention of eventually getting into furniture making more heavily, that's the person that I would say, "Hold off, wait on this tool." If you're someone who is going to do DIY projects at home, and that's as far as you're going to get, a miter saw makes a lot of sense.
Chris: That's essentially the advice that I could have used 10 years ago. Where the hell were you?
Shaun: Where was I 10 years ago?
Chris: Then I guess to put a bow on it, what the video has been about, does it have a place in the woodworking shop?
Shaun: Right. I think in my head, it's one of those situations where if you have a ton of space, and money doesn't really matter, it's a situation where it's like buy all the tools you can because you're going to come to a point where you'll use everything eventually. That's just how it is.
Chris: I think a fair point would be to say, if we had an awesome one always set up in our shop, ready to go, we would use it. We would find reasons to use it. We're not saying there's no reason you would ever use it, but to that point about usefulness versus space-
Shaun: Right, that is the trade-off. Most people don't have endless amounts of space and endless amounts of money, so you have to calculate that space to usefulness trade-off, and I think every tool has a ratio. I think we both think that a miter saw has a low ratio compared to most of the tools.
Chris: I would agree with that. Now here's a question. What tool has the highest space to usefulness ratio?
Shaun: A pencil.
Chris: Tape measure?
Shaun: That's the takeaway from this video is get a pencil.
Chris: Get a pencil. See you next time. Actually, one more thing. I don't want anybody to feel bad because they already bought a miter saw. That was a situation I was in. I did that exact thing. Really the purpose is, if there's somebody who thinks they need it, like I was 10 years ago, I want them to just really think about if they do need it or if that money could be better utilized elsewhere.
Shaun: Yes. Like Chris is saying, we're just two guys on the internet. We just want to show what our experience has been, and what we've learned through the tools we've used, and if it helps someone else make an informed decision, that's all we're going for here.
Chris: Two guys might even be debatable.
Shaun: It is.


Keep the inspiration coming!
Subscribe to our newsletter for more woodworking tips and tricks