Video: Precision Picture Frame Jig
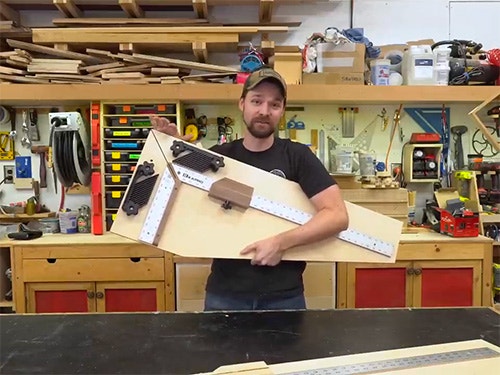
Michael Alm gets asked to make picture frames all the time. With an assist from the mind of David Picciuto, he has designed a jig that cuts them with picture perfect precision.
You can find more great projects and techniques from Micheal Alm at his website.
Featured Tools:
Micheal Alm: Hey, everyone. Michael Alm here. This week, I'm working on a picture frame sled. Picture frames are one of those things that woodworkers get asked to do all the time, it's something that is very easy to produce inside of a garage woodshop and one of the handiest tools to have is a dedicated sled for it. Three years ago, I built this sled off of David Picciuto's video and I love it.
It's an awesome design but I've also been making alterations to it over the years and I featured this in a ton of videos. I've gotten a lot of questions about it and I'm at the point where I've made enough alterations that I think that a dedicated video makes a lot of sense. What I've done is I've rebuilt the sled and changed some stuff that was bugging me about that one and I've built this. I've tested it out in the shop, it works great. I'm going to take you through step by step how it's made so that you can build one yourself.
The first step in making this jig is to cut out the base and this I'm just making out of half-inch baltic birch plywood. I like baltic birch plywood because it's nice and stable. For my scrap wood bin, I grabbed a stick of hardwood this is a stick of hard maple and I want to make sure that it's just slightly larger than the track in my table saw. With the stick of maple marked, I can then trim it to fit. I want to make sure that there's no play in this whatsoever.
I sneak up on the cut and I think I cut this three or four times just to get it so that it didn't have any play in it whatsoever and then I can mark the height and cut that out. Also, I realized that it's probably about time to sharpen my table saw blade and it's a lot of burning on there. [laughs] Once it's fitted, you want to make sure that it doesn't sit above the surface of the table saw at all and once it fits in there and it slides really nicely, it's time to attach the base to the runner.
In order to do that, I just slide my table saw fence with a speed square up to the side of it with the corner aligned with the table saw blade and then I mark out where the runner needs to be. I can then flip over the sled and draw out 45-degree angles off of those marks and glue the runner into place.
Give the runner a quicksand and a waxing just to make sure it runs nice and smoothly in the track and then I can install the sled and test the fit. It should run smoothly in the track but not be able to move side to side. I can now raise the table saw blade up and make the first cut into the sled.
The next step is to start building the guide fence for the sled and for this, I'm using a 48-inch aluminum ruler and a stick of quarter-inch plywood that is also 48 inches long. I cut that plywood a quarter-inch shy of the width of the aluminum ruler. Then I can prep to glue the two parts together. I sand the surface of the aluminum ruler first and then I mix up some five-minute epoxy and apply it to the surface of the plywood.
With that applied, I can then lay the aluminum ruler on top and clamp it down. You got to take your time with the clamping because it wants to sort of shift around on you make sure that that edge of the plywood is right in line with the edge of the ruler. If you find that you have squeezed out underneath the ruler, it's not a big deal. You can cut it away with a razor knife just as long as you haven't let it cure like overnight. I think I just waited about 30 minutes and then cut it away.
I cut this four-inch spacer block to make sure that when I screw down the fence it's exactly four inches from the front of the base of the sled. I made it four inches this time. Last time, I made it three inches because my sled was a little bit tippy and if you have a sort of small base on your table saw, you may want to extend that even more. You may want to go five or six inches because the more front-heavy it is, the more stable it is.
If you have a normal table saw you could stop right here and just cut this off cut off the excess and flip it around, put it over here. I don't have a normal table saw. I have a saw stop which means that anything conductive like aluminum will trigger the mechanism in the saw. I need to cut this back I need to cut it away. I found that cutting it back about half an inch is good and for that, I'm just going to use the chop saw.
I just set up my miter saw to cut at a 45-degree angle cut off that front edge and then I can move it down cut off the excess square at 90 degrees and then use the remainder as the opposing fence and I just want to cut a 45-degree angle on that. When I screwed down this fence the first time, I made sure that the one inch mark was properly one inch away from that pre-cut slot.
Now when I remove the screws and I cut it again, the screws line up to the original spot so that makes sure that the one-inch mark is at the one-inch position. With that established, I can set up the opposing fence and the main thing with this is just making sure it's exactly 90 degrees from the original fence. That's very important. The measurements on this side of the fence don't do anything and in fact, I may sand them off later.
Before moving on to the next step, I make 100 sure that that fence is exactly 90 degrees to the other one because if it's not, you're not going to get a good miter. From using this sled a lot and especially if you've seen the 141 frames video, this thing has been through its paces. I got a lot of tear-out on those frames early on and they were kind of like shattering and it was because it's maple, maple tends to shatter a little bit.
I decided when I redesigned this sled to add in a zero clearance insert. This is a really easy thing to do and even if you don't have a saw stop saw, you might like this because you can actually replace this insert over time as it gets worn down. With the insert trimmed out, I lined the back with double-stick tape pressed it into place, and then burnished it. It'll stay for a little while you can always pop it back up if you need to.
Another improvement that I'm making to this sled is to add a thumb rest. I found from using it a lot that my thumb got really sore sitting up against that aluminum edge. I just added in this block of walnut and it doesn't have to be walnut, it's just what I had in my shop and rounded it down. It was nice and smooth to the hand, drilled out the top of it so that it's got flush screws, and then screwed it down to the sled.
Now that the basic parts of the sled are built, it's time to move on to the shuttle. This is the element that measures out the individual pieces of the frame and makes repeatable cuts really easy. I've designed this multiple times in multiple iterations and this is the design that I like a lot.
If you want a detailed measurement of every little part on this sled, it is available on my website, but essentially what I'm doing here is trimming it out so that it'll fit around that aluminum ruler and have enough play so it slides freely.
I've left a gap in the center so that I can add in a compressible material. In this case, I'm using some scrap leather that I had around, and then I'm drilling out a hole for a T-nut to go through.
On the outside of the shuttle, I need a 45-degree angle cut and I just built a miter cutting sled, so that's super convenient. With the two sides of the shuttle made, I can start adding the leather and it's easy to trim this just with a regular knife. Then I used a spray adhesive, super 77 on both sides, both the leather and the wood, and let that tack up for a little bit, and then I could apply the leather.
Since the leather-covered up the holes that I just drilled out, I need to redrill those through the leather and then I'm ready to assemble. I just picked up this 129 piece jig building kit from rockler and I love it. It has all the parts that you can't get from regular hardware stores like extra-long T-nuts and low-profile thumb screws. Super handy to have in the shop.
The last thing to do on the shuttle is to attach a bit of sandpaper. I'm doing this to add traction to the sled itself and it's just 120 grit sandpaper that I used. Spray adhesive on again and then you just fold it over the surface and cut away the excess. The cool thing about this shuttle is that it measures the inside of the frame. That is pretty essential because you want to know the interior frame so that you know that you're making it the right size for the picture that you're adding into it. All you have to do is set the shuttle to the correct size, lock it down with a thumbscrew and then it's not going anywhere.
I mentioned before how this sled has a tendency to be a little bit tippy and you can see how it tips on the edge of my table saw. One of the ways to mitigate that is to relieve some of the weight on the backside, that's also why I added that extra inch on the front side. This excess is not necessary for this sled at all, so I just decided on this version to cut it off. Removing that little bit of excess material helped a ton, it's a lot more stable now and I feel a lot more comfortable and safer using it this way. I'm going to up the safety factor even more because I have a T slot in my table saw, so I can actually put something into that groove and it will lock the sled into place. If you have a table saw with that T slot, you may want to do this as well. I just took a spare T-bolt, that I had from that kit from Rockler and I cut off the head of it and then drilled a hole through the center of it.
I countersunk that hole and then flipped over the table saw a sled so I could cut a groove into the runner.
With that slot cut out, I can screw down the T-knot head and then slide it into my table saw track. Now it's absolutely not going to tip. The last feature that I'm going to add to this sled is a couple of featherboards. I found again on the 141 frames video that holding these parts for hours and hours can be pretty exhausting and I found that it was way easier to add a couple of featherboards in to hold your workpiece for you.
A quick way to recess these T-bolts to the underside, because you're not going to see it, it doesn't have to look at that pretty. Use the Forstner bit and a chisel to just get enough space in there so that they can slot in and they won't spin.
Now, I was able to take the sled for the first test run. In order to set it up, it's pretty straightforward, you just tighten the featherboards to correct tension. You can leave them tensioned after the first piece that you cut and then you cut off the first miter. Then you can shift the shuttle into place and rotate that board over, and I messed up. [chuckles] I messed up the featherboards in the way. I've corrected this on the plan, so if you pick up the plans, it'll all be fixed. All I had to do was shift those holes over by about two inches and then the featherboard was no longer in the way.
Okay, let's try that again. With the featherboard in the correct position, you can now establish the first miter on the left-hand side, and then flip the board over to the right-hand side and this cuts your length. This allows you to cut multiple frames at the same time that are all the same size. You could batch out eight of these sides and you are prepped for four frames. Then you can shift over the shuttle to be the opposing side length, and then cut a bunch of those.
The great thing about this is you're assured that every single time that you cut this, it is exactly the same size over and over again and you can get really accurate results. When it comes to gluing up all of these parts, the best method that I know of is the blue tape method. It's super handy. If you don't know it, basically you just put blue tape across all of the miters on the backhand side. You glue up the inside of the frame and then you can just fold the frame up on itself. The blue tape holds it in place while the glue dries, and as long as the miters are cut well, which is why we built the jig, then you don't need a lot of clamping force on this.
All right, so there it is, the picture frame making sled in action and it worked great. The miters are nice and tight, no visible gaps and it's square, so that's all you want out of a picture frame. If you're interested in making one of these for your own shop, I've got plans on my website, so feel free to go check those out.
Keep the inspiration coming!
Subscribe to our newsletter for more woodworking tips and tricks


