Video: Patterned Plywood Designs
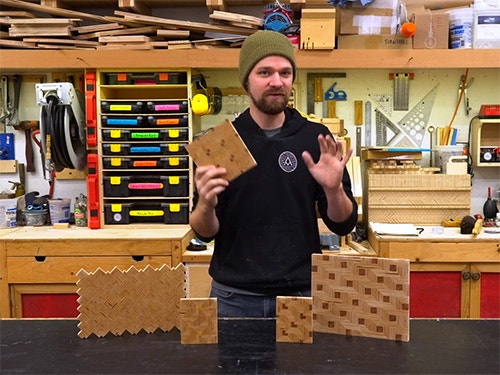
In this video, Michael Alm makes patterned plywood panels. These patterns are super easy to make and the results are really cool.
All of these panels are based on a 45 degree miter joint that then gets cut into small tiles and reassembled. Michael Alm came up with four patterns for this video: the Alpine, Descending Square, Square Weave, and Double Weave.
You can find more great projects and techniques from Michael Alm at his website.
Featured Tools:


Michael Alm: Hey, everyone. Michael Alm here. This week I'm working on a couple of new patterns out of pattern plywood. These are all based on the 45 degree miter joint. They look really complicated but they're really not. Stick around and I'll show you how to make them.
The first pattern that I'm going to be working on I'm calling the Alpine pattern because it looks like mountain peaks when it's all glued together. To start that out, I just cut a 45-degree angle on one side of my board and then I can move over my fence to two and three-quarters of an inch. The boards that you see here will yield two strips, one on each side using both of the miters.
The main thing is that we want all of these parts to be exactly the same size and perfectly 90 degrees, so I'm going to reset my table saw blade to 90 degrees, set my fence to one inch, and then rip these strips again. I made these strips a little wider than I probably needed. It left about a half-inch strip in the middle but I can use that for more patterned plywood later.
With all those strips cut out, I can then cut them down to size. I want them about 12 inches and since that board was 24 inches, I just cut them in half. With my parts all cut out I could didn't set up for the glue-up and I like to just lay out a bunch of blue tape strips on the side of my workbench and tape the miter together.
I found that the ingrain of this plywood has a tendency to absorb a lot of glue I make sure and use plenty and brush it down with my Rocker glue brush and then I could squeeze the joint together. Now, I don't want any squeeze out inside of this joint because I need this pattern to interlock. I use that same glue brush to scrape out the excess, then I cleaned that with the toothbrush.
If you've seen the hexagon pattern plywood video, you will be very familiar with this. I like to add rubber bands to these joints to hold them together while they dry and I find that works really well.
Once the glues had plenty of time to dry, I can then sand off any excess glue I find it just takes a couple of passes. This is 120 grit sandpaper, and it's just glued down to a board. Using a razor blade, I can scrape out that inside track just to make sure it's completely clear. Then I can move over to the table saw to cut these into individual pieces.
I've found that the safest way to cut these pieces into little tiny parts is to use my crosscut sled with a stop block. I like to use the Jimmy DiResta trick of taking a pencil and moving the pieces out of the way without getting your fingers anywhere close to the blade.
I was finding that I was getting a lot of tear-out on the sides of these and I think that was partly because of grain orientation but it's also because I've been using this crosscut sled for a very long time and the zero clearance section of it is not very precise anymore. I just added a little piece of quarter-inch plywood inside, cut a new track in it, and then I had a better backer that I wouldn't get that tear out on the backside. With my table saw I'm making much better cuts now, I could go through and cut all the remaining pieces.
It is just about ready for glue-up but those fuzzy edges that were on the first initial cuts were getting in the way, so I sanded those off and set them inside of my form. Now you can see how this pattern works. The cool thing about it is that this little notch here, the one that I scraped the glue out of sort of centers each individual piece and then the next row over interlocks into that row and it forms these kind of wave patterns or I like to think of it as like Alpine mountain tops.
The cool thing about this pattern is that you don't need to do a lot of measuring. There's no precision to the size that I made this. If you made it a little bit longer, it might change the look of the pattern a little bit but as long as all the parts are exactly the same size, they should interlock just fine.
With all the pieces in place, the last thing to do is to clamp it. Just one note is that these clamping blocks, I added packing tape to the outside of them so they wouldn't accidentally get glued to the panel. The next day I came back to my shop and remove the panel from the clamps got ready to sand.
There it is, that is the first pattern and I am super happy with that. Not only does it look good, but it was also very easy to make. I was also looking at the excess pieces that I had leftover and I think with some minor alterations I can make them into a totally different pattern.
For the second and actually the third pattern that I designed this week, I'm adding a little bit of hardwood to it just to add a little contrast and make it pop a little bit. We've got some extra pieces of mahogany and some extra pieces of ash leftover from old projects and they need to be used for something. Taking those strips and the glue-ups that I had from earlier, I'm just adding these pieces in with a little bit of glue and some clamping pressure.
After giving the pieces plenty of time to dry, I unclamp them and got ready to cut them into parts. When I cut those strips, I made them a little bit oversized so I could bring them over to the table saw after glue up and trim them down to size. This just makes sure that the pieces are perfectly square and that the pattern will line up really nicely.
Much like the previous pattern, I'm going to cut those strips into individual pieces. I didn't move my stop block for this, I just left it exactly the same spot. It's set to about half an inch. You can set it wherever you want, depending on the thickness of the panel that you need. I like to set it maybe just a little bit fatter than what I want because I know that I'm going to remove some material when I go to sand it.
Now here comes the fun part. The cool thing about these pieces is you can arrange them however you want. There's lots of different orientations. I just played around for a little while and found the patterns that I liked the best.
I really liked this descending square pattern. The cool thing is with the different colored woods, I can mix and match them to create some contrast. When I was designing this pattern, this is the one that I had in mind, and it's background and foreground squares that weave over the top of each other. I'm going to stick with that one and I think I'll do one with the descending cubes in both the ash as well as the mahogany.
Getting set up for the glue up. This is even easier than the previous one because basically, these are just a bunch of squares the main thing is trying to keep track of the pattern as you go. It's really easy to lose track of them. I actually messed up one on this pattern and one on the other one. It's good to set them up beforehand and slide them into place as you're doing your glue-up.
I use the same mold to glue up both the ash and the mahogany panel, but I put a strip of wood in between the two of them, so I could use the same clamping pressure, but I didn't have to worry about them being glued together permanently.
All right, I'm going to wait for these to dry, and while they're doing that, I'm going to work on another pattern. For the final pattern, I wanted to challenge myself, and for that, I went to some graph paper and sketched out a design that I thought it would look pretty cool. In order for this design to work properly though, it needs to be pretty precise, and it has to be exactly the same size as the plywood. I've basically set it up as units, so every unit is 18 millimeter by 18 millimeter which is the same as the thickness of the plywood.
I typically work in imperial measurements, but in this case, since the actual plywood is 18 millimeters thick, it made a lot of sense to go over to metric. The first long strip is five units wide, which means it's 18 times five, which equals 90 millimeters. My first cut was at about 92 millimeters, so I adjusted my fence and shaved off that outside edge so that it was exactly the right size.
I made four of these strips and two of those will be used to make some smaller pieces as well. I reset my table saw to 90 degrees, and since these are two units wide, I use two pieces of plywood to get the space in between the table saw blade and my fence.
The final element to cut is one unit wide, so I just used one piece of plywood, locked down my fence and I made this one out of more of that scrap mahogany. In order to speed things up a little bit, I decided to pre-prepare a section of the pattern with this glue-up but it ended up being a little bit tricky.
As I was applying the clamps, things sort of started to slide around, and it was really hard for me to get the parts locked into perfect alignment. I cleaned out the joints and let it sit overnight, but I ended up having trouble in the end.
Well, that didn't work very well. It is not square. It's pretty important that this stays square. I think what I'm going to do instead is going to cut it up into individual pieces and then assemble the pattern. I may be able to use this end because that looks somewhat square, but this end is unusable. With the stuff that I have remaining, I'm just going to cut them into half-inch slices, and then I think that will be just fine. I can build it from there.
With all the parts cut into individual pieces, I can now assemble it and this assembly was definitely the hardest among all the different patterns that I did this week. I had to keep referencing my drawing to make sure that I was doing it right, and it's hard to build off of because it doesn't really have a flat side. So I just built from one corner and worked my way out.
Once I had as many pieces assembled as I could, I started cutting down the scrap pieces that I had remaining so that I can get a nice flat side. If I don't have that, I won't be able to get a lot of clamping pressure on this panel and it may shift during glue-up. In order to cut those pieces, I just use the pencil method again on my crosscut sled. If you don't feel comfortable cutting these small parts on a table saw, that's totally fine. There's other hold-down methods. You could also use a band saw or a handsaw. There's a lot of ways to cut these parts.
I'd found from the previous glue-ups that I a couple of times had accidentally hit the pattern with my elbow and it would slide around, and since this one is so much bigger than the other ones, I wanted to make sure I was keeping track of the pattern as I went. I set the completed pattern up above me and just brought individual pieces down as I went along the process and this worked great. This was a great way to keep track and I just went along like a typewriter and filled in all of the blanks.
After the panel was dry, I could remove it from the mold and then add in all the little extra bits around the border. I left these off because I was worried that they were just so small I couldn't cut them safely on the table saw so I cut them a little bit long, glued them in and then I could trim them to fit on the crosscut sled. With that, all of the panels are done. The only thing left to do is to sand them up.
Well, I am super happy with how those came out. They look awesome all sanded up.


Keep the inspiration coming!
Subscribe to our newsletter for more woodworking tips and tricks