Video: Making a Spline Jig
In this video, Michael Alm builds a spline jig and demonstrates how to use it to spline a miter.
This jig can be built in less than an hour with plywood scraps and works on any table saw or router with a fence. Splines reinforce miter joints and they look good too. I use them in my shop on picture frames and decorative boxes.
You can find more great projects and techniques from Michael Alm at his website.
Featured Tools:

Michael Alm: Hey, everyone. Michael Alm here. This week I'm working on a spline jig. A lot of viewers have requested this ever since I put out the picture frames basics video, and this is a super handy jig to use for all sorts of spline miters. Things like boxes, picture frames. There's lots of different uses for this. I wanted to point out that this one is specifically to be universal. Originally, I used it on this table saw, my old table saw, which has a funky fence that doesn't really allow you to go over the top of it. In the end, I really like this design. Stick around I'm going to show you how to make this. I'm also going to show you how to make the spline for it and get a nice tight fit.
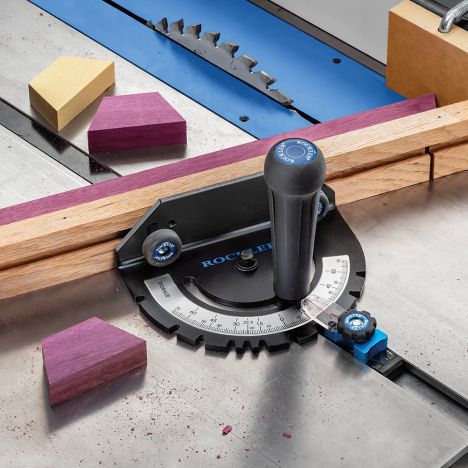
This is a great project to use up your plywood scraps. That's what I'm doing here. I'm just using a couple of pieces of Baltic Birch plywood at three-quarters of an inch. I'm cutting them down to seven inches wide. I tip my table saw to 45 degrees, and then I can get out my miter gauge. This is the Rockler precision miter gauge, and it has a stop fence built into it which is really convenient for this because I'm going to be cutting two of these sides. I set it at about 10 inches and then I pass it through the saw.
Just like I said, I'm going to be cutting two of these sides. For that, I'm just cutting it on another board. I'm going to be using the other half of that miter for the supports. I tilt my tablespoon blade back up to 90 degrees and I can slide in my crosscut sled. I clamp on a stop block to my crosscut sled because I want to cut two more pieces that are exactly the same. This is using the remainder of those other boards that I cut before. I bring those pieces over to my workbench and I also brought in a piece of half-inch plywood, happened to already be seven inches wide, so I didn't have to rip it.
I'm not going to keep the screws in this, but they're going to act as clamps in the meantime. Before adding glue to the equation, I wanted to make sure that everything was fitting properly. I added in the screws and then did a quick dry fit. It looked right, so I could disassemble it. I like to mark my sides just to make that when I'm in the middle of the glue-up I don't mess up which side goes where and make sure that the screw hole still align. From there, it is a pretty straightforward glue up just to add glue to the seams and screw the blocks into place.
After adding glue to the two center panels, I can then insert those. I still have that center mark on in there. I just eyeball it, set it down, and then I can go over and grab a couple of squares to make sure that it's strued up. These are set-up squares that I made myself out of scrap plywood. They're super easy to make but they might deserve their own video at some point. I've had a lot of questions about them, but just make sure if you're using something like this that you covered in packing tapes so it doesn't stick to the jig. I added on a couple of clamps and then nailed off those back edges, so it held up while I waited for the glue to dry.
The last element to add to this is a little side support panel. This I just make out of quarter-inch plywood. I glue it directly on and nail it. Now, I want to make sure that I'm not putting any nails close to where the table saw blade is going to cut through. For that bottom edge, I'm just going to add some clamps. After the glue sets up, I can remove the clamps, remove the screws. and the jig is done. That's how to build the jig. As you can see there's not a whole lot to it. It's pretty straightforward, so now let's get into how to use it.
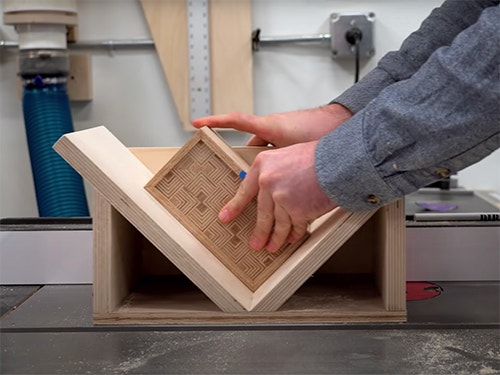
I've got a couple of projects over on my workbench, picture frame, as well as a box. They're going to be perfect for this. Let's take this over to the table saw and test it out. One thing to keep in mind when you use a jig like this to cut splines is that you want a nice flat cut. I'm going to swap out the blade for a blade that I know has a flat grind on one of the teeth. You can see that front tooth right there has a flat grind on it, and that's going to make a much better glue surface for your spline. The first piece that I'm going to spline is the picture frame.
You could see why you need splines in this because it's just not a very strong joint. It's not a very wide joint, and so the spline is going to add a lot of strength. I raise up the table saw blade just inside of the joint. I'm fine with it going through a little bit. It's going to add a little more strength having a bit more of that spline inside of the joint. Then I can set the width for the splines. Now, you got to keep in mind that we've added a quarter-inch to the side panel here. That's fine, I just have to make sure and add a quarter-inch when I'm setting up the fence.
I can still use the measurement on the fence, just adding in that extra quarter inch. I'm setting this spline at a quarter inch in from the edge of the frame. I set my table saw fence at a half-inch and then did a pass-through just to make sure that everything was moving through smoothly. With all that setup, I'm ready to pass the frame through the sled. Now, you'll notice that this is a pretty simple operation. I'm just pressing it firmly against that side panel. I'm passing it through the saw blade and then lifting it up. I'm not going to back it through the saw blade.
Once I have all four sides cut, I can flip the frame around and then reset and cut the remaining four. You don't have to change the setup at all. You just cut all of them with the same setup and that way they match on both sides. The splines for the box are going to be very similar, except for I'm going to put a center spline in. I'm going to show you how to do that. Also, I'm going to make sure that this blade does not pass all the way through that miter because if it did, you would see it on the inside. I once again set up the fence, adding in a quarter inch for that side panel.
Then it's just a rinse and repeat of the previous process, just on a smaller scale. You can see once again I'm pushing up against that side panel. That's key to make sure to get nice clean cuts, and then I'm going to flip it around, cut it on the opposing side. As I mentioned before, I want a spline in the middle because the top is going to be a lid and I want that to be splined as well as the base. For this, I've got a scrap piece of plywood that I'm just testing my cuts out on before I actually cut into the real box. I can align that up with my drawn piece.
As you can see, I was way off on my first attempt so I gave it another shot. This is the nice thing about it. You can just make as many cuts as you need to get it centered up. Now, there is another option of just flipping it from one side to the other. This will result in a perfectly centered notch, but it won't necessarily be the same width. You have to weigh your options. I just went with measuring and centering it and it worked great for me. Now let's make some splines. For this, I like going into my scrap bin, finding whatever's about the right size and then I can go back over to the table saw.
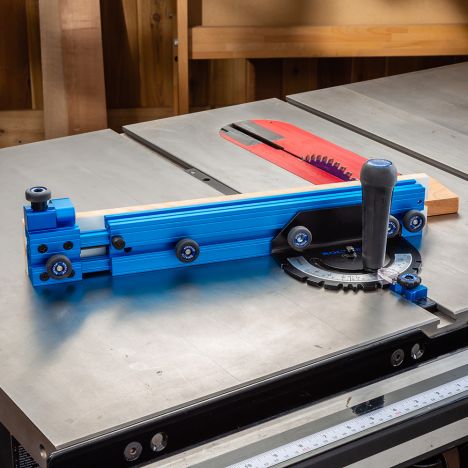
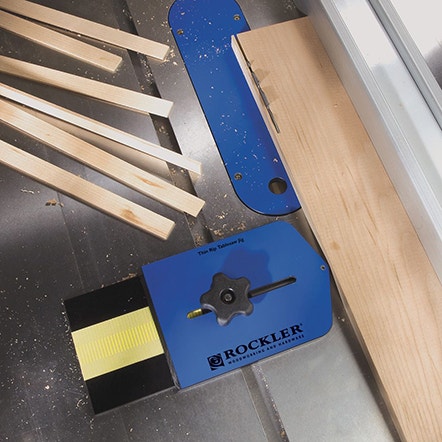
I like this thin rip jig from Rockler. It is a really convenient jig for this. You can use-- I've used feather boards in the past for this as well, but this jig is just a little bit more accurate. I can set it to the right size. It's got a roller bearing on the front edge and what I'm setting it to is an eighth inch, which is the same width as my table saw blade. When cutting thin strips like this, you don't really want it to be up against the fence because it can get kind of squirrely. It's good to set up some sort of jig to allow yourself to scoot it to the side after it's been cut.
The nice thing about this is you just move your fence over so it lines up with that jig, and then you can cut another strip and it's exactly the same size. I take that strip and then I go over to the bandsaw and trim it down. I just like to trim a whole bunch of these more than I need. I keep them in a bin so that next time I'm making spines I don't have to make them all over again. With all the splines cut to length, I can do some dry fits. I like to dry fit them just to make sure they're not too tight. If they're too tight, I'll sand them down, make sure that it's just a slight pressure fit. If they're too tight, they're going to swell with the glue and you won't be able to get them in and get them seated all the way down into the joint.
The glue-up process from there is pretty straightforward, I just wipe the glue into the joint and I don't really need to put glue on the actual spline itself. I found that this is plenty, just press the spline into place and work your way around the entire frame.
I'm sure a lot of you are curious whether I'm going to do a full build video on this pattern plywood tee box and I am, it's going to be the next video that comes out, so make sure you hit that subscribe button and that notification bell. When it comes to trimming the splines, my preferred method is the pull saw. It takes a little bit of practice to make sure that you don't cut into the side of the frame. You can use the bandsaw, you can use a router table to trim these. This is just what I like the feel of, I find that I get less tear out this way. The box was a little bit harder to trim, I've got to be pretty careful not to bump into the splines on the other side.
Also, one thing to keep in mind when you're trimming the smaller side, once you've trimmed the first side, then you trim the second side, they can crack and actually chip out of the corner. What I like to do is tip the saw back as I'm cutting, cut away the front edge then cut away the back edge, and end your cut in the middle of the spline. As you can see, these splines that are left behind, I leave them a little bit proud because they're really easy to knock off with about 120 grit sandpaper and then I can go over the top of that with a palm sander and clean them up.
The frame obviously gets cleaned up the same exact way. The only thing that I will mention is that because I cut the splines all the way through, I had to go through with a chisel and clean up that inside. It's really quick to do with a sharp chisel. You just want to make sure that you don't have those leftover bits inside the frame because then your picture or your painting may not fit very well.


Keep the inspiration coming!
Subscribe to our newsletter for more woodworking tips and tricks