Video: Making a "Now Playing" Record Stand
In this video, David Picciuto creates a stand for displaying his record album art.
David Picciuto designs and builds a quick and simple woodworking project, making a display stand for the currently playing album on a record player.
You can find more great projects and techniques from David Picciuto at his website.
Featured Tools:


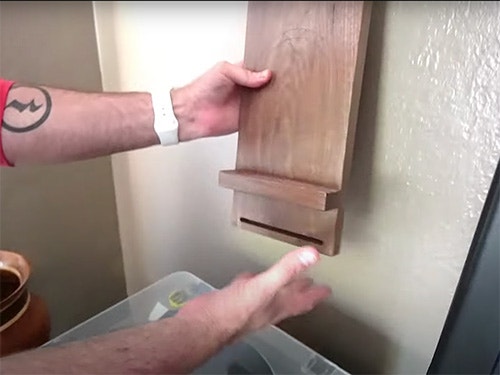
David Picciuto: Hi, welcome to Make Something with me David Picciuto, and today, we're going to make this Now Playing record stand and it's got some killer features you're going to want to stick around and see. Check it. Here on my turntable, I want to build a Now Playing record stand. Currently, we just throw it behind the record player, but there's these cables in the way and the record can easily fall behind.
I don't want to mount anything to the wall and I want the record to sit up above the record player. I think we can take a thin board that slides underneath and pokes out through the back. We can build a back piece that fits around this with a little ledge on there that the record can sit on. That back piece when not in use, I don't want just sitting here visible, so I figured it could be removable, and then hang upside down.
The plan is to have that back piece slide on here, it tilts back, holds the record. Let's go down into the shop and make this. Eric, you ready? We have this piece of one-eighth-inch plywood that I'm going to veneer with this walnut veneer that I have right here, and then we'll cut it down to size. Will this be a curly walnut? We're just going to use some contacts cement, slap some on this guy, slap some on this guy.
All right, we get that contact cement a little bit of time to dry and get tacky. If all goes well, this should just bond right to it. Here we go. I think I'm going to want more plywood. I got this piece of walnut from my local hardwood dealer. Love walnut. Love walnut, love working with walnut. Let's cut the back out of the solid piece right here.
Now that I have my backing board, I want to cut a little slot in here for this to fit through. I have a straight bit here in my router and I'm going to use these feather boards as stops, so I'm going to flip them upside down and I'll be able to use that as a stop as I move back and forth between them. You don't want to cut the full depth in one pass, that's just too much pressure on that router and router bit.
We're going to come up about halfway through, and then we're going to raise the bit all the way up, and then do a second pass and go all the way through. Center it a little on there. Make a couple of white lines.
Now I want my slot to go slightly on each side of the line, so we'll just cut right here along here. We're going to plunge slowly onto the bit, run it one way, and run it the other way. Well raise the bit, and then we'll...Yes, look at that. This is perfect.
This will sit underneath the record player, this will slide on the back here. Now we just need to create a little lip here for the records to sit on, I don't know, coming out about an inch or so, and I'm going to cut little grooves in that so the record has some grip. I wanted to be able to hold more than one record because a lot of times when I'm deejaying, partying, playing records, I get lazy and I don't always want to put the records away, so I could set one record here, play the next record, set that on top. I wanted to hold a few records. Is it okay if it just holds a few records?
I had this little V-bit here that I'm going to use to carve some grooves on here to give the records some grip. Let's set this up on the ramp. That is a 45 adapter on one side, and since this can be reversible, I'm going to put my tattoo on the other side and this is a tattoo of a quarter rest. It shows my love of music.
There it is, a quarter rest. All we're going to do now is glue this in place. I'm going to use wood glue and CA Glue. The reason I'm using both is because CA glue dries real fast and the wood glue dries real strong and I can just move along with the project and get some finish on here. Get this guy finished up and done. Just hold that down for a minute and let CA glue do its job. Do your job. There we go. Now it's time for a little REM.
We'll grab the record and we'll stick it on there. This can go back a little bit. Perfect. Now the record can't fall through. It's got a nice little resting home. If I want to put more records on there, it'll hold a few. I like that. If I'm not playing records and I don't want to see this, I can flip it upside down and hang it on there and it's completely out of the way. You see that? You got that on camera, Eric? Can you see that? That's your hand. Yes, you can't touch it.
What I want to know is how would you make this different? What would you do to improve this or how could you make this more stylish? What design changes would you make? Leave comments down below and let me know what you think. This is version one, so maybe with some of your input, we can do another version.


Keep the inspiration coming!
Subscribe to our newsletter for more woodworking tips and tricks