Video: Making Half Blind Dovetails
Need an easier way to cut your dovetail joints? David Picciuto has a solution.
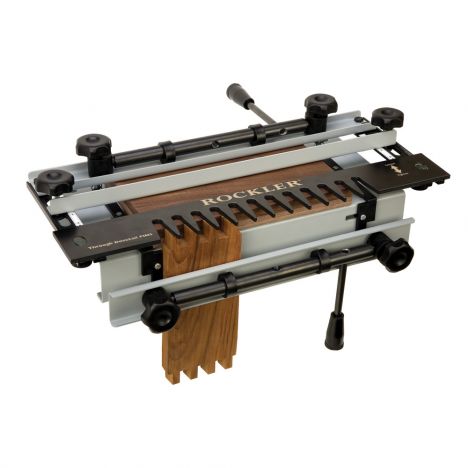
In this video, David Picciuto demonstrates how to use Rockler Complete Dovetail Jig to cut half blind dovetails.
You can find more great projects and techniques from David Picciuto at his website.
Featured Tools:


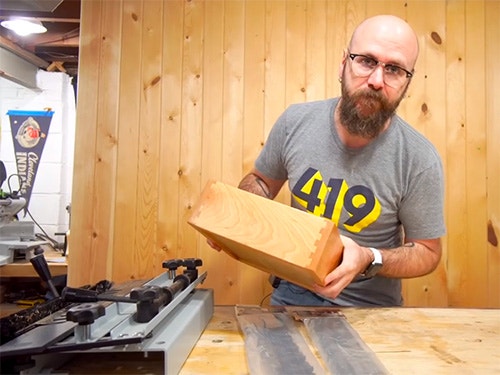
David Picciuto: Today, I'm going to show you how to use a dovetail jig to make half-blind dovetails. This dovetail jig cuts for different kinds of dovetails, full through dovetails, half-blind dovetails, offset dovetails, let's see what else we got, rabbeted half-blind dovetails, and regular box joints. Today we're going to do a traditional half-blind dovetail so let's get started. We're going to secure this to the bench here. I cut my sides and the front back on the table saw already and it's important that you label everything to ensure that you cut everything in the right order.
I have my front back and the two sides. I'm labeled my corners one, two, three, and four. I also want to mark an arrow up on the inside of each piece. Included with the jig was a 14-degree dovetail bit and the guide bushing. I've installed that in here and now we want the bit to be 9/16 inches above the base. This jig has these two stops on both sides and we need to set them for repeatable cuts. We're going to bring our board in here, and we want to center the fingers on this board so we have the same amount of pins and tails on each one. We're centered there. I'm going to slide this stop over here. We look good and I will tighten that down.
Now, we have to do the same thing over here on the other side so we'll move that over and we want to be about right there. Looking good. We'll tighten that down. I have my drawer laid out. This is the front and this is the left side. I'm going to take the left side, inside out, and then put that into the left side of the jig, up against the stop that we put in there and I will clamp this down.
Now, I'm going to take the front inside out, position this joint, number one to one, up against the stop and up against the front piece. Now clamp that down. I'm going to reposition this guy so it's nice and flush and clamp that down nice and even. Both pieces are up against the stop, left joint on the left side. When we cut the right joint, we'll use the right side of the jig.
Once again, it's really important that the inside of the side is facing out and the inside of the front is facing up. Now we need to set this template to the right depth and there's a handy little chart in here that says where it needs to stop. We have 3/4 inch half-blind dovetails and so we need to set it to B. We'll tighten that down. If you're always using 3/4 inch stock and you're always cutting half-blind dovetails, then you'll never have to move this. The last thing we need to set is the stop bar here which will stop the router from cutting too deep.
We have 3/4 inch thick material, and so we want to use the full depth. If you are cutting thinner material, you need to move the stop bar closer and there's a formula that you can use to set that distance but we have three quarters so we're just going to push this all the way back and we are ready to cut our first joint. I do have the optional dust collection system hooked up to this to my short vac. I have a dust mask and some hearing protection.
We will cut from left to right and this bushing will follow along the fingers here. Now we can take these boards out. Once again this is our front and this is the side and they will go together just like that and there we go. If it is too tight or too loose, you can adjust that by moving your bit up and down. Once again, this is the front, we're going to cut the right side. I'm going to take the right piece inside out, put it into the right side of the jig, and clamp that down.
Back over here. Take the front, inside out, inside up, slide it into the jig and clamp that down. Then I will get this aligned so it's nice and flush up against the stops. Now we're ready to cut this joint. There we go. Now we're just going to repeat the process on the other side. This is the back. This is the left side. I'm going to take the left side facing up. Insert it into the left side of the jig. Take the back inside out, clamp that down.
Again this is the right side. Going to go into the right side of the jig, inside out. Clamp that down, take the back piece, inside up, clamp that down. To finish this box, how about we go and cut a groove in the bottom here and insert a plywood bottom. I'm going to lower my blade so it's actually lower than the dovetail. We'll cut a groove along the bottom. As long as the blade is lower than that dovetail, it won't come through the other side.
I'm just going to move my fence over. Oh, about a quarter of an inch. If it doesn't fit, what you can do is nudge the fence, run everything through again until you get a nice good fit. It's always best to cut it too big and then nibble away till you get the right size. I don't glue the plywood in the bottom, I just let that free float. This will make a very, very strong joint. Cool, we'll let that dry. I'm going to take a wet paper towel and wipe out the glue on the inside there.
Don't forget to sand the inside of the pieces before gluing up, it's much easier to sand before clamping.


Keep the inspiration coming!
Subscribe to our newsletter for more woodworking tips and tricks