Video: Making an End Grain Knife Throwing Target
In this video, April Wilkerson constructs an easy-to-build target for throwing knives.
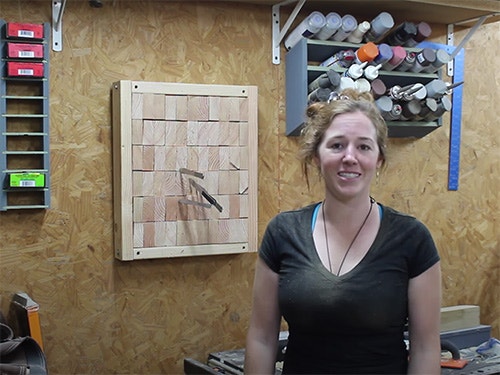
April Wilkerson enjoys throwing knives from time to time, but it's destroying her workshop door. So she builds this simple knife target with dowel supports that make it easy to change out broken pieces at any time.
You can find more great projects and techniques from April Wilkerson at her website.
Featured Tools:


April Wilkerson: Occasionally, I get asked why there are knives sticking out of my shop door, and it's because whenever I'm taking a break in my shop, I occasionally like to throw a hand of knives. However, it's not going to take long for me to completely ruin this door, so this week, I want to take the time and build an end grain throwing knife target.
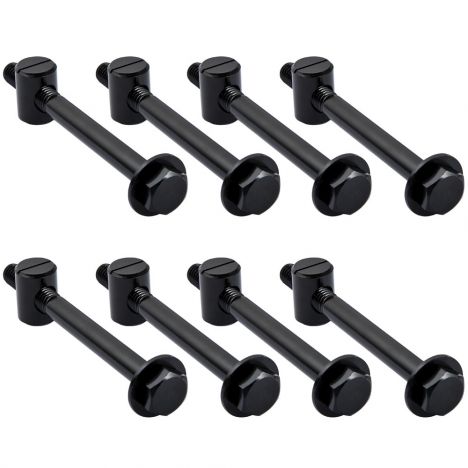
Let's see if I can stick this one. Yes. That's fun. This entire project is made from two-by-fours, and I do have a set of plans on my website that includes how to build a stand for it. The first thing I did was cut the link the two by fours that will make up the frame. Now, instead of using screws to attach the frame, instead, I'm going to be using some cross-style hardware, and I'll show you how they work in just a few minutes. I took the frame pieces over to the drill press so that I could start drilling the holes in the side of the boards to accept the cross style hardware.
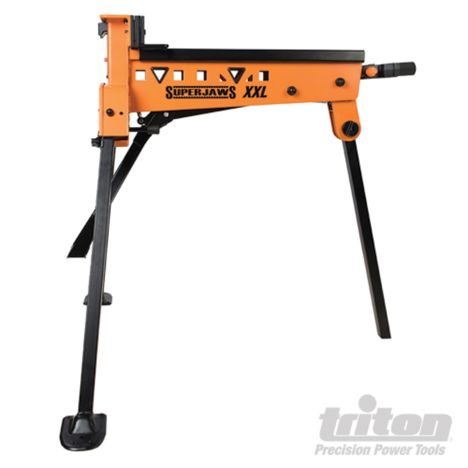
Then for the holes that needed to go into the end grain, I use my super jaws to hold it in place and used a drill, making sure that I was drilling these holes as straight as possible. I drilled down until I intercepted the hole that I previously drilled at the drill press. Then once I hit it, I went ahead and drilled about half an inch deeper. With the holes drilled, now let me show you the hardware. This is the cross style hardware here, and it will be inserted into one of the boards. Then in the adjoining board, I will push through a bowl and thread it directly into the cross style.
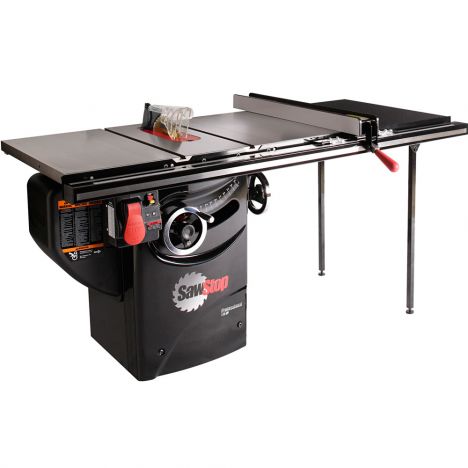
This will not only create a very strong butt joint, but it also allows me the ability to assemble and disassemble this frame multiple times without mushing up any of the holes. Once the frame was built, I grabbed some more two-by-fours and started working on making the inside. Now, I ran these two-by-fours through my table saw first to give them a nice square edge so that they'll sit flat against one another inside the frame.
Then I went to the miter saw, set up a stop block, and started cutting all of my pieces. Let me tell you about the direction I'm going in and why. Most throwing targets use glue to hold all of these centerpieces together, and then they also have a back on the backside. However, I really want to get away from that for two reasons. I don't want to back on it so that I can use the front side and flip the target around and also use up the backside before having to replace all of the pieces, but then whenever it comes time to replacing all of the pieces, I don't want to have to replace every single row if only like the middle two or three are chewed up.
What I've designed is using a dowel which I intend to thread through each row of two by four so that I don't have to glue everything together, and then they're just supported by the outside frames. Before moving forward, I did a dry fit just to make sure that all of these inside pieces were cut to the right size, so that they were a nice good friction fit. Now keep in mind that you could very easily simplify this project just by gluing all of the pieces together like a standard target. I just thought of this whole threading dowel idea and wanted to give it a try to see if it would simplify replacing the inside pieces later on. Once I saw everything was a good fit, I moved it all over to the drill press to start drilling the holes.
Now it's going to be really important that all of these holes be placed at the same mark on all of these pieces, or they won't line up properly. To make this process go a little bit quicker, I put together a jig made from scrap boards that I could then clamp down to my drill press where all I would have to do is place one of the inside boards into the jig, make sure that it was touching both of the makeshift fences, and then drill my hole. Total my target has 66 boards. Of course, it took a little bit of time to drill the 66 holes, but with this jig, it went nice and simple and afterwards they all lined up perfectly with one another. After all the holes were drilled, I cut the dowels to the size they needed to be, and then started threading on my pieces.
Once all of the kebabs were prepared, then I counterbored a hole in one of the sides of the frames, so that I could then take the kebabs and align them to their position inside. I'll tell you, I was really surprised at how well they all fit together, but it's still definitely not as tight as if you were to just take all of these pieces and glue them together, but I do think it will drastically cut down on the replacement process in the future, because with this, I'll be able to remove an entire row, thread on some new two by fours, and then just pop the row back into place. Then with the side having hardware that can be attached and detached very quickly, I should never have to replace these frame boards.
It's a lot more work upfront for this type, but I think in the long run, I'll be happy I did it because it'll give me the front and back of the target to be able to use up before having to replace any, and I won't be locked in to having to replace the entire center. Now, for hanging it, I decided to put on a French cleat, I put a cleat onto the bat, found a few studs on my wall, and attached another cleat to hang it on. This was really exciting for me because it was the first time that I was able to get some good distance away from my target, but I think having something like it, throwing at a target, or even a dartboard in the shop is great to have around.
It's just nice to have something to do while taking a break, or maybe to vent some frustration. Darn it. All righty, that's going to be it for this one. Big thank you to Rockler for supporting my channel. If you'd like to find any cross-style hardware, then I have left you a link in the description of the video. They're great hardware for any application where you're going to be assembling and disassembling something without tearing up the hole. Also in the description, I have left you a link to the plans if you want to build your own end grain target, but yes, I'm going to call it quits. I'm going to get to practicing.


Keep the inspiration coming!
Subscribe to our newsletter for more woodworking tips and tricks