Video: Making Edge-Grain Patterned Plywood
In this video, Michael Alm shows how he makes patterns in the edge grain of his plywood.
Michael Alm demonstrates the technique for creating patterned edge grain on his plywood, a technique that is easier that it might initially appear.
You can find more great projects and techniques from Michael Alm at his website.
Featured Tools:


Michael Alm: I make quite a bit of plywood furniture in my shop. Whenever I make a furniture piece, I have to think about whether I want the exposed plywood edge or to cover it up with edge banding. That got me wondering if there's actually a third option. That's what I'm going to be working on this week to see if I can make a decorative edge, make it look like exposed plywood, but a little bit fancier. Let's give it a shot.
Those of you familiar with the channel will know that I make a whole bunch of patterned plywood. I take the edge grain of plywood and I glue it up into various different patterns. That's what I'm going to be starting with today. I'm working on a chevron pattern as my first test. That involves just cutting a whole bunch of strips out of Baltic birch plywood.
The chevron pattern is going to be on a 45-degree angle. I like to push all of my strips onto that 45-angle, strike a line with a speed square. That way, I just have an indication. This doesn't have to be super precise. It just saves on the material. Those ends are going to get cut off and you might as well maximize the amount of yield out of this blank.
I'm gluing up the face side of the plywood because I want the edge grain to be exposed. I've tipped all of them forward. I'm going to lay out all of my glue with a roller and then tip them back onto themselves being mindful at that 45-degree angle again. Then I'll clamp them up.
Well, I have to say I was a little worried about the amount of squeeze out on this blank. I really didn't get a lot. I like to see a little bit more because I'm going to be cutting this into tiny pieces. I probably should have put more glue on, but we'll see how it goes when I cut it into strips.
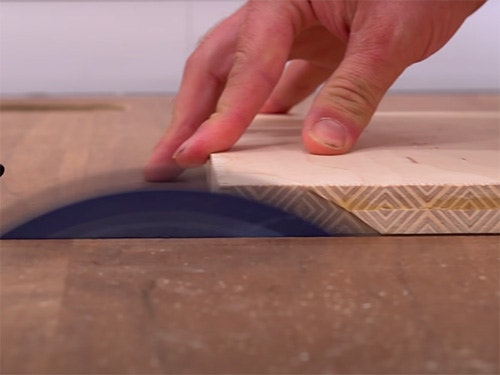
The first cut I'm going to make on this blank is with my track saw and that same speed square. Again, if it's not perfectly 45 degrees, doesn't really matter. The pattern will still match up. You can actually go at any angle that you want. I've seen people do them at 60 degrees and they look really cool too. This is just what I chose. Then I can start passing the blanks through the table saw. I'm cutting a half an inch wide, and so far, they're holding together, which is good.
With all my strips cut, I can lay them out on my clamps. I just flip over every other strip, and that forms the chevron pattern. If you want these to match up really well, just make sure that the ends are aligned, so those pointy bits on either end, if they line up, the pattern will line up great.
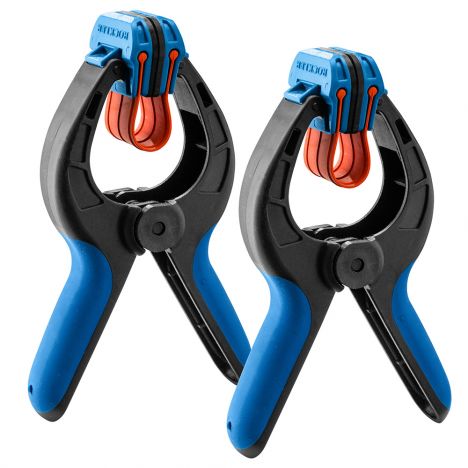
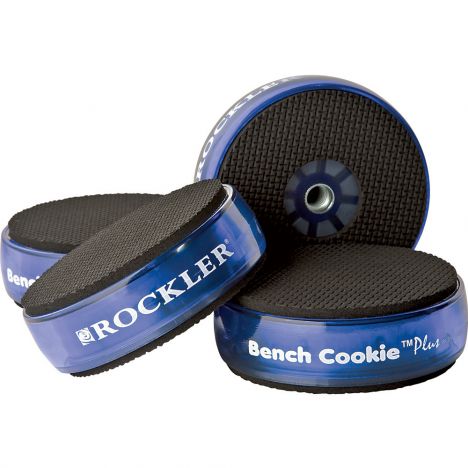
When I was going to do the glue up, I realized that I didn't have quite enough room inside my clamps. I thought for a second about setting them down to the side, but I, fortunately, have a set of four-foot-long short foot clamps. I get questions about these clamps a lot because I use them a ton in my shop. I've had them for a number of years. They're made by Rockler, and they're great. I had the Harbor Freight ones before and those were a good temporary solution, but they started to bend and warp. These ones have held up awesome. I'll post the link down below to where you can find them.
I had much better squeeze out on this go-around. That's about what I want. It's just a little bit above and a little bit below, so I feel pretty confident. I have noticed that when you glue up that, the second glue up, it absorbs a lot more glue, so a lot of times I'll do two coats.
I squared off one edge and then ripped a strip. I'm not going to rip the whole blank apart at this point because I really don't know how this is going to go. This is all just an experiment. This is the first one and it looks pretty good. It's about an inch tall and half an inch wide, a little bit wider than the plywood that I want to line. I'm basically going to resaw this from here. I'm using my bandsaw fence set at three-sixteenths of an inch. I'm going to see how it goes, see if they fall apart or hold together.
I know that may look like a little bit of a fail, but it's actually pretty good. That's better results than I was expecting. I was worried that I didn't have enough glue in that initial glue-up. There's definitely some that are breaking, but most of them are holding. These are actually pretty fixable. I can use just some CA glue and glue them back together. I'd say I'm really happy. This is really good. I did notice a bit of chatter right here. I might make these a little wider so that when I sand them down, I can get rid of that chatter. Yes, this is looking pretty good. I'm going to experiment with making them a bit thinner. See what happens.
These are at three-sixteenths, and I'm going to try and do them at an eighth-inch. They may just fall apart, but it's worth experimenting, well, while I've got the blank to work with. I ripped the second strip a little bit wider than the first one. Then I made it a little bit thinner, so it should, if I have got that chattered edge, I should have been able to sand it out. This way, I can see how thin I can go. I don't think I want to go much thinner than an eighth-inch because I don't think it's going to glue up very well, but an eighth-inch would be perfect if I can pull it off.
Oops. Whoops. Whoops. That's a fail right there. [laughs] I cut it on the wrong side. All right. Well, these work. Well, I completely messed up that first strip, so I got another one, and I wanted to get a full test to see how many strips I can get out of a single blank.
Well, that's pretty fantastic right there. That is six pieces out of this one piece right here. This is an inch thick, so that's great. I even think that I can get rid of some of this chatter on the edge by working on my zero-clearance on the bandsaw, but there's just so much potential here. I'm going to test it out on a piece of plywood, but I also realize that if you flip it back and forth, you can get the diamond pattern, which is like that. This would look really cool as edge banding in and of itself. You can just use the diamond pattern like that. Oh man, there's so much potential.
Meanwhile, I decided to test out some zero-clearance options. I think what's causing the fuzzy edge is the fact that my zero-clearance insert, my bandsaw, is pretty used up. I'm trying this hack that has worked for me in the past where I put a thick piece of tape right up against the blade and it's like an improvised zero-clearance insert. Unfortunately, this didn't seem to do much at all. There were still some pretty noticeable fuzzy edges, so on to Plan B. I found a piece of plexiglass lying around in a scrap bucket and I thought this might work a little bit better.
I think that's about as good as I'm going to do. I can't seem to get the fuzzy little bit to go away completely but they're a little better with the plexiglass, so I'm going to run with that and just batch a whole bunch out.
I am thrilled with how that looks. I was a little worried that the eight-inch would be super thin and would get wobbly, wouldn't clamp up nearly as well but I haven't seen any of that. There's no voids along this edge, and it just looks great. This gets me excited. I've got a couple of other ideas of things that I can do. The main one is to do the diamond pattern on the edge as opposed to just the Chevron and I think it's going to look really cool. One thing I'm going to do is bump it up to three-quarters of an inch so you can see more of that pattern. Let's try that.
There is that piece that I messed up earlier and it turns out that it's the perfect to make two strips that equal three-quarters of an inch. I just went ahead and ripped that piece down to size. Since it's going to have to face these pieces into each other, I wanted to make sure that they were very flat and that they didn't have any fuzzy. I sanded them up on my sanding board. They are very fragile, so I have to be pretty careful.
Sanded. I had enough to wrap around this piece of plywood if I cut all of them in half, so I measured them out and cut them with a chisel. It just looks awesome. It looks so good. I'm very pleasantly surprised by this, and I can just think of a million projects that I can use this on in the future. One thing that I know that people are going to ask about is this exposed edge, you've got the plywood edge here. I think I've got a solution for that too. Veneer, I'm going to try veneering a panel. I've seen people do this before. John Peters has done this on his channel, where he'll apply the edge banding and then veneer over the top of edge banding. It's a really smart way to get a seamless look. I'm going to give it a go.
I'm going to be using contact cement to attach the veneer to the wood. It works really well. You basically just spread it on, wait for it to dry and then stick the two pieces together. It is incredibly toxic make sure you wear a respirator.
Once the contact adhesive has had about 15 to 20 minutes to dry, it's good to go and then I can apply it to the veneer. You need to be really careful with this, the instance it's stuck, it's stuck permanently, so I just roll it out and then use a scrap piece of plywood to burnish the edge. I've rounded over the front edge of the plywood it doesn't scrape into it, but it does apply quite a bit of force.
The veneering works great and I ought to be more pleased about that. This has got much potential. I've actually already started a piece of furniture made with this stuff because I was excited about it. That will be next week's video. Make sure you're subscribed, big thank you to Patreon. Patreon supporters, you guys are the best. I really appreciate it. If you want to join the Patreon, there's a link over here. If you want to see more pattern plywood videos, I've got a full playlist over here. I'll catch you on the next one.


Keep the inspiration coming!
Subscribe to our newsletter for more woodworking tips and tricks