Video: Lathe Stand With Pull Out Grinder
In this video, April Wilkerson makes a simple shop workbench that is great for a lathe but could also be used for a variety of other shop needs..
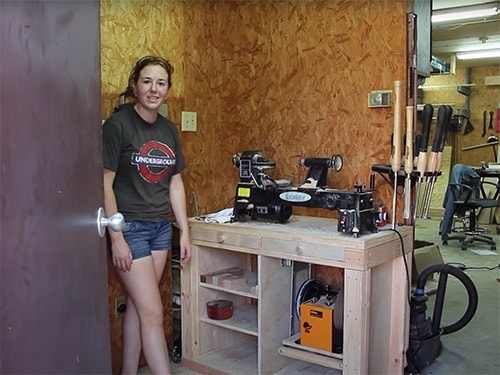
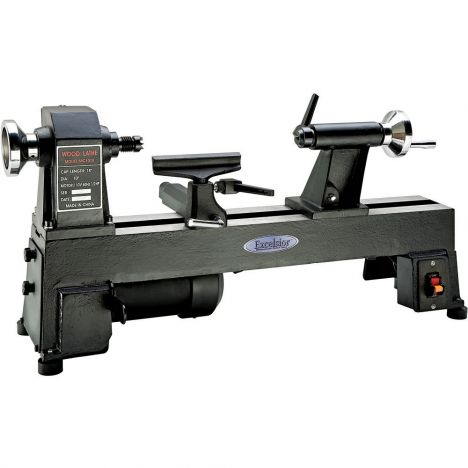
April Wilkerson builds a lathe stand that is 44" wide, 20" deep, and 32" tall. It includes storage space and a pull-out shelf for a grinder.
You can find more great projects and techniques from April Wilkerson at her website.
Featured Tools:


April Wilkerson: I am really enjoying having a lathe in my shop. However, it can't stay on this workbench. I'm going to take the time this week to build a dedicated lathe stand. I wasn't going for anything fancy for the stand. The frame is going to be made from some simple 2X4s and everything else, all the flat surfaces, from plywood. The first thing I did was set up a stop block at the miter and cut all of my 2X4 pieces to size. I'm using lap joints for the joinery method for the frame. Just so I wouldn't get my cuts mixed up, I like to mark my boards where I'll be making the cuts.
To actually make the cuts, I'm using my table saw with a temporary fence and then I also put in my dado stack just to make hogging away this material go much quicker. Once I had all of the pieces cut, I started gluing and screwing them together. Of course, once I had one side done, I would just repeat the process on the next. Okay, so that's one side and then two side. I went ahead and doubled up on the material for the frame because when people found out I was building a lathe stand, the number one advice I got was to build it stout so that would not move around whenever I'm turning.
On the back, I made the top stretch one solid joint but on the front, I saw that there was enough space to add two drawers. Before attaching the front support, I lined out some marks on where I needed to cut the openings to have two drawers and I did this very quickly at the bandsaw. Now, if you're taller than me and can build your bench taller, then you can actually repeat this for the bottom and have two drawers on the bottom as well.
All right, with the frame built, I moved on to breaking down my sheet of plywood with my track saw, first starting off on the floor then moving up to my workbench whenever they were more manageable size pieces. I'm going to be using dados for the joinery method for all the plywood pieces. I put in my dado stack and cut them all at the same time. Then I started adding all the pieces to the frame, starting with the bottom platform, and then moving on to the center divider.
I designed that so that the sides would be closed in because I wanted the left cabinet space to be used for blanks and this way they won't want to fall out the side. Then, just to break up the huge amount of space, I threw in two dados for shelves and I didn't make these shelves go all the way forward because I didn't want my knees to constantly be running into them. This made it a little bit tricky getting them in but at this point, I try to move quickly before that glue set up on that center divider so that I could tilt it out and then just hammer it in place once the shelves were seated in the dados.
Okay, so the left side is for storing materials but the right side is meant for storing my grinder. I love the idea of having the whetstone grinder close by the lathe since it's constantly needed to sharpen tools. I found these mixer lifts that are typically used in a kitchen for those kitchen-aid mixers. They have a 60-pound weight capacity and with my grinder only being 30 pounds, I figured I would give it a shot. I mounted both brackets in the cabinet.
However, the brackets don't stop whenever they're vertical. They actually swing back. I didn't want the brackets poking out the backside of my cabinet so I just ended up installing a hard stop and it worked great. Then it was just a simple matter of attaching a deck to the two brackets so that I could set the grinder on. Needless to say, I was super happy with the results. I did end up taking off the rubber feet from the grinder and mounting it directly to the shelf. Just for aesthetics, I came back with a filler piece to fill in these dados.
All right, now that the cabinets were done, I attached the drawer slides, as well as made a few drawers to attach. Now, again, I'm limited on how tall I could make the bench so the drawers are shallow but they do fit a lot of the turning accessories that I have. I made sure to mount the drawers before adding the top just so that I would have a little bit more room while installing those slides and drawers, but then I can come back and glue and attach the top on. I went ahead and doubled up on the top. I don't know if it's really necessary but I figured it couldn't hurt.
Just to make it look a little nicer, I came back with some pine one buys as trim. Once the top was completely finished, I got some face frames for the drawer fronts and I used hot glue to temporarily attach them then once it dried, I moved to the inside to attach it with screws. Now, I installed some step-down casters which allow me to step down and engage the casters to make the workbench mobile. However, when I need it to be a stationary workbench, then I can simply lift up on the lever to disengage the casters. I don't anticipate needing to move the workbench that often but I do like having the option.
I wheeled it in place and started loading it down. I added a circular tool rest that attaches to the bed of the lathe and I added the very few turning blanks that I actually have but I do anticipate my collection will grow. Then I was able to test out the grinder. I was really impressed with how well the setup works. It's a slow-speed grinder but still, you don't see any vibration. It didn't feel unsteady. I was really happy with the height that the grinder came out to be. It's very simple to not only pull out but also put right back away. Yes, overall, I'm very pleased with it.
However, one modification I did was tap two holes in the front of the levers so that I could add one single handle across both. Now, something to note is these brackets do have the option of coming with a soft close feature. I can see that being really useful especially with the whetstone. I think that's going to complete this build. I think having the lathe stand here in my shop can be really beneficial.
I'm having this partitioned wall here because not only is it going to prevent dust from getting into the majority of my shop but also it gives me tons of hanging space to store things but then again this area here is what I had intended for that as well. I can either put pegboard there or just run in some screws and use it for storing things as well. Then, of course, drawers for storing accessories, and shelves for turning blanks, even have some room underneath the grinder.
A big thank you to Rockler for supporting my channel. Of course, if you are curious about anything that I used in the course of the video, I have logged the links below and if you want a set of plans to build your own lathe stand, then I have a link to those as well. I hope that you enjoyed the video and I will see you next time.


Keep the inspiration coming!
Subscribe to our newsletter for more woodworking tips and tricks