Video: Kitchen Drop Leaf Table
In this video, David Picciuto makes a simple looking, but challenging drop-leaf kitchen table.
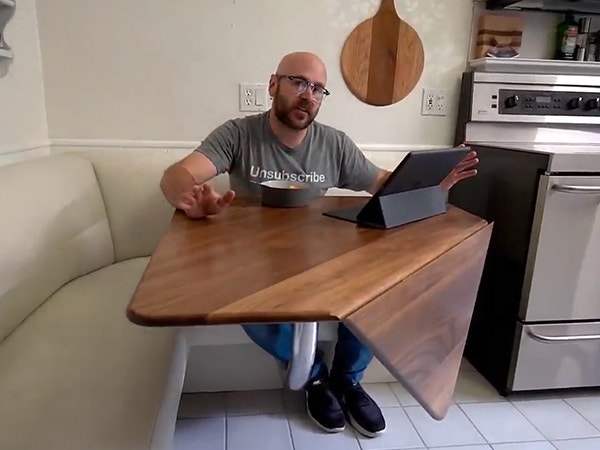
In this woodworking tutorial video, David Picciuto replaces a round laminate kitchen table with a square solid walnut table that has a drop leaf on one corner. David uses drop leaf hinges and a match set of router bits to make the rule joint.
You can find more great projects and techniques from David Picciuto at his website.
Featured Tools:


 Rockler Phenolic Router Table with Pro Fence and Basic Stand
David Picciuto: Welcome to Make Something with me, David Picciuto. Today we're going to make this kitchen table with a drop-leaf using a rule joint and hinges from Brusso Hardware. This looks like an easy project but we ran into a few challenges along the way. Check it.
This is our kitchen and it has this cool restaurant-style booth in here, but it's got this round table that doesn't really fit the space and it blocks access to the kitchen. What I want to do is I want to replace this round table with something square. I went to my local Home Center and got some of this insulation foam here and made a square template that would fit the space. It's even got the little drop leaf here to allow access into the kitchen. Instead of a typical table where the grain runs along the edge, I think I'm going to have it go from corner to corner this way. Let's head on over the shop and get started.
To get started, I'm going to rip all my boards to width, cross-cut them to length and then glue them up. I have all my boards here in this diamond pattern. The reason for that is I'm going to have the table go this way, so the grain is not running parallel with the edge. If I just glue this all up I'm going to have inconsistencies along the top. I don't have a sander big enough to do this. Nobody has a sander big enough to do this. What I'm going to do is I'm going to take the Festool Domino and I'm going to put some dominoes in there and that should help line everything up when it comes time for the glue-up.
Eric: Can we move that can?
David: No. Actually, it's collecting leak from the pipe up here.
Eric: Oh, cool.
David: Hashtag real life. Time to put some biscuits in here. Just remove all this excess glue. We have our glued up board here all sanded flat. I'm going to take our template from before to help me kind of align where I want this to be. We're going to take a jigsaw, we're going to cut this all the way around and then we'll probably take a circular saw to this so we get a nice straight cut.
I round it over both sides, gave it a little bullnose profile there. I'm going to cut off the part that's going to be the leaf right here. You can see my pencil line on here. I have a straight edge clamped down to there. I'm just going to take my circular saw.
This is a set and as you can see, they match up perfect. We'll do one bit on one side, one bit on the other side, and then when the board comes up, they meet nice and flush and it has this little curved beautiful little drop leaf action thingy. Check it. I have the bit in my router here to cut what's called the rule joint. I have a piece of plywood underneath here for the bearing to ride up against. Then on the leaf part, I have another bit mounted in my router table and we'll cut that next.
Two things. One, I forgot to put my dust mask on and it makes a mess. Second, is you can actually run this all along the top and have that as your decorative profile, but I'm only going to have it on the hinge here. Let's move over to the router table, wipe off my crotch, and do the leaf.
Okay. This time I forgot to turn the dust collection on. I'm a moron. I'm a total moron. Sorry, Eric. That fits perfect. Nice and flush up top. The one thing I didn't think about, making all kinds of mistakes today, I didn't even think about this. When you push that in, my ends don't meet up now. If that's flush, this is not. I actually have to cut this off, round it over, and fix that.
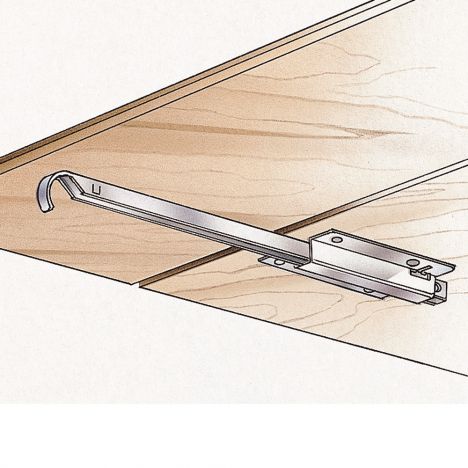
There's no frustration or adjustment after the install. The hinges performed as expected every single time. Think about this, how long did it take to make your last cabinet or box? Why not finish it with hardware equal to your efforts? Brusso has been making high-precision hardware for over years in the USA. Their entire line comes in solid brass or stainless steel at brusso.com. Brusso Hardware provides high-quality, American-made woodworking hardware for furniture, cabinets, boxes, and more. Learn more about their hardware at brusso.com. All right guys, let's get back to this project and finish it up.
I need a little bit of space between the boards. I'm just going to put up some tape in there. That just makes sure that they don't rub up against each other. These actually are going to go this way. Not only do we have two more to set out so this sits flush, but then we also have to route a little deeper right here where the actual hinge goes. If you notice here's my cut line and here's my pencil line, so far up to this point I'm doing it the correct way.
Now, I'm writing out the groove for the barrel of the hinge. Not on the pencil line, but on the cut line. The wrong place. Now, the Brusso hinges come with a steel screw that you use first then use the brass screws because brass is a brittle metal and you don't want to break off your nice brass screws into your project. Now I'm just going to cut another piece that's the exact same size as a base that this is going to screw into. That way, the screws have a little bit more depth.
All right. I glued this piece on there that's going to attach to the base. I got the finish on here. Now, it is time to attach the hinges which got a really, really good fit in there. At this point, I still don't realize that the hinges are in wrong. All right. Let's remove these clamps.
After I got the table installed, I realized my huge, huge mistake. I have the hinge in this way. It actually goes in this way with the longer part of the hinge on the moveable leaf. That puts the pivot point right at the top of the rule joint. This is clearly stated in the simple instructions that come with the hinge. This part that I routed out that's all fine. It's just the part that I routed out for the hinge should have been up here more. I'm going to go ahead and leave it this way because I already have the groove routed for the hinge in there and it actually shows off part of the hinge when you had the leaf down and I'm okay with that. I'm going to leave it like that, and I think exposing the hinge looks cool.
I put five coats of polyurethane on here, really thin coats. There's no other finish that I would use except polyurethane because it's a kitchen table and it's going to take a lot of abuse.
All finishes are food-safe once fully cured. Any kitchen table that you buy is covered with lacquer or polyurethane and in its wet form, yes, it's toxic to you but when it's completely cured, you can eat off of it, you can lick it, you can do whatever you want with it. Remember, folks, we are all makers. As always, be safe, have fun, stay passionate, and Make Something. Will you cut while I finish this bowl of cereal?


Keep the inspiration coming!
Subscribe to our newsletter for more woodworking tips and tricks