Video: Eight Tips for Making Sliding Doors
In this video, Chris Salomone goes over, in-depth, step-by-step, how he makes sliding doors for various woodworking projects.
Chris Salomone makes both simple and complex types of sliding doors and how to make them. Both are functional and anybody can make either, and without any hardware!
You can find more great projects and techniques from Chris Salomone at his website.
Featured Tools:

Chris Salomone: If you've seen many of my past projects, then you know that sliding doors are a feature that I include in a lot of projects that I build, and there's a lot of reasons why. First, as you may have guessed from the title, when compared to something like regular hinged doors or drawers, they're less expensive, especially if you do it the way that I'm going to show you which doesn't require any hardware.
Next is, in a lot of situations, sliding doors work where hinged doors or drawers wouldn't because of space limitations. A good example of this might be something like this bed that I built, where on one side, I was able to use drawers, but on the opposite side, which is really close to a wall, they wouldn't fit, so I used sliding doors. Third is because a lot of times, again, especially when compared to hinged doors, I just personally think they look cooler.
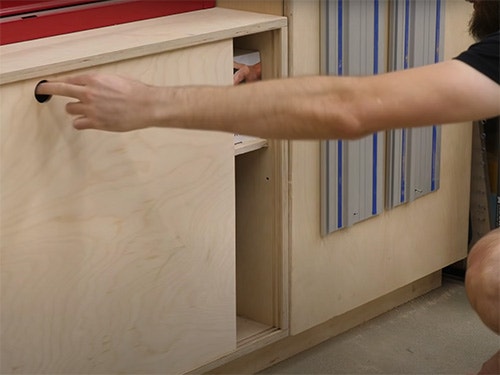
Take this console, for example. I basically split the cabinet up into thirds. This section has two drawers, and this section has sliding doors. I just think that two hinged doors this long and narrow would look kind of goofy. Now, obviously, that's subjective, and you might think differently, but something that I think we can all agree on, at least, hopefully, after this video is over, is that sliding doors are really easy and quick to make. Let's get into it.
Funding for Foureyes Furniture is provided in part by supporters on Patreon. If you want to find out how you can support the show, check out the link in the description. Whenever I make sliding doors, they always fall into two categories. I'm going to call them full-width grooves and tongue-width grooves. Full-width grooves would be, as the name would suggest, whenever you make the groove wide enough for the entire panel to sit in it. Tongue-width grooves, on the other hand, have a narrower groove that only a door's tongue or rabbet sits in.
By the way, even though we're calling these, for example, door-width grooves, the groove should actually be wider than the door. I recommend about 1/16". That's a good compromise where it should be tight enough that you won't have a ton of slop, but loose enough that the door can slide, no problem. Okay, so the first thing you have to think about is which version you'd want to do. There's some benefits and drawbacks to both. With full-width grooves, the benefits are that they're just a little easier. That's because you don't have to cut a tongue on the door, so it's one less step.
Because there's no tongue, there's a bit less math involved in figuring out the perfect sizing. Let's start with the full-width version because that's the easier of the two. Then once you get your head wrapped around that, we'll have a really good base for jumping into the tongue-width version. All right. Actually, regardless of which type you're doing, the first thing that we need to do is cut the grooves that the sliding doors are going to go into. There's two ways that I always make these grooves: on a table saw or using a router.
I would say that probably about 80% of the time that I cut these sorts of grooves, I end up using a router. That's because it's just a little bit more versatile. Let me explain. Pretty much the only situation that a table saw is going to work in is if your grooves span the entire length of your piece. A good example would be this cabinet. If your sliding doors only span part of the cabinet, that means that you need to cut a groove that stops partway through the cut, and a router is going to be better. Something like this cabinet where the sliding doors are only in this portion of the piece.
All that said, even when the doors span the entire length of your piece, there's still going to be times that you still wouldn't want to use a table saw to cut the grooves. That's because, depending on the type of joiner you're going to use, you might end up exposing them in the final piece. Something like a mitered carcass, that's fine, a table saw will work. Something like a cabinet that uses rabbets would also work, but the rabbets need to be deeper than the grooves that you're cutting.
Whereas, something like a cabinet with butt joints wouldn't work, unless you join the panels this way instead, which is kind of ridiculous. It won't work. Unless you're fine with seeing them exposed on the sides. For shop furniture or something, that's fine, but for a piece of furniture, I'd probably look for a better solution or use a router so that I can just stop the cut underneath my side panel.
An easy way to think of it is if the grooves can go the entire length without causing a problem, table saw or router is fine. If the groove needs to stop, go with a router. Now you know what tool to use, and we can go ahead and start cutting them. This is pretty straightforward. If you're using a table saw, just set your fence so that the groove is inset to whatever distance you want it to be. You can make it wider than your blade curve by either adjusting the fence to make multiple passes or by using a dado blade to cut a wider groove.
If you're using a router, you could do essentially the same thing by using a router table, but more often than not, I think it's easier to just use a handheld router with a fence guide. If you have one with a plunging base, that's even better. By the way most of the time. You'll be cutting grooves at multiple inserts so that you can put two or more doors in the cabinet, which slide behind one another. Obviously, there are some variables, but I wouldn't go any less than a quarter of an inch between my doors. Otherwise, this piece might start getting frail. Later in the video, we'll talk more about how you can keep a wide gap here, but maintain a tight gap here between the doors.
The next question is, how deep should your grooves be? This is where things start to get a little bit tricky, but, luckily, it's a pretty easy trick. That is, the grooves you cut into the top need to be deeper than the grooves that you cut into the bottom. That's so that the door is able to be taken in and out after the cabinet's been assembled. Now, I suppose, technically, you could forego this and just install the door while you're assembling your cabinet, and then they'd be trapped there forever, but that would be pretty bad for a bunch of other reasons that we're not going to get into.
Anyway, the question that you're probably asking is, how deep should you cut them. What I usually do is 1/8" deep for my bottom grooves, and 3/8" deep for my top grooves. If you like millimeters, let's say 3mm and 9mm. Then for the doors themselves, you'd want to cut them so that this dimension was equal to the distance from the bottom of the bottom groove to the inside face of your top panel, plus a little. Let's just pretend that we're working with a 10-inch opening. This distance is 10 1/8". I cut my doors another 1/8" longer than that, so 10 1/4 inches.
Now that you've got that, let's move on to doing the tongue-width version, which, like I said, is definitely the harder of the two. That said, if you follow the workflow that I'm going to layout, you're going to see that it's really not that hard. You might be thinking, "If it's harder at all, why should I ever do it?" The simple answer is that it's really just a nicer, more elegant approach.
The way I see it, there are three main advantages to doing it this way. The first advantage is that you can use thicker doors without needing thicker grooves. Say, for example, you wanted to use 3/4" thick doors. Well, a pair of 3/4" thick grooves running the length of your piece just looks ugly compared to a pair of 1/4" grooves. The second advantage is that they operate more smoothly because there's less material on the bottom of the door sliding around inside the grooves, so less material, less friction, smoother operation. Third, and this gets back to earlier in the video when I mentioned this material that you need to leave between your doors.
Well, using a tongue or rabbet will allow you to keep this ridge thicker and stronger while being able to minimize the distance between the actual doors themselves, which again, just looks nicer. All right, so those are the benefits and why I think you should seriously consider doing it this way. Like I said, it is more challenging. I've got lots of animations and drawings and footage prepped, that I think will really show that this technique isn't that hard.
All right, so assuming that you've never done this before, it's going to sound pretty technical at first. If it does sound confusing, I highly encourage you to rewind to this spot and watch it maybe two or three times. I feel confident that if you do that, it's going to all start to make sense. Let's stick with that example of a cabinet with a 10" opening and a bottom groove that's 1/8" deep and a top groove that's 3/8" deep. The first thing that we need to do is determine how wide our door panel needs to be. I highly recommend starting with it oversized and following this order of operations to get a good fit. We'll start off by figuring out what the distance between the grooves is. For us, that's 10" + 1/8" + 3/8", so 10 1/2".
We'll start by cutting our door to 10 1/2" wide. With the doors cut, next, I'm going to take the offcut and mark a line at 3/16" and set my blade to match that height and this is going to establish the length of the tongue on the bottom of our doors, and since we know that the groove that it sits in is 1/8" deep, this means that the shoulder of this cut will sit 1/16" above the opening. I'm going to dial that in on my scrap piece, going back and forth to my cabinet to get it to the point where it's sliding easy. Remember, you don't want a super tight fit on this.
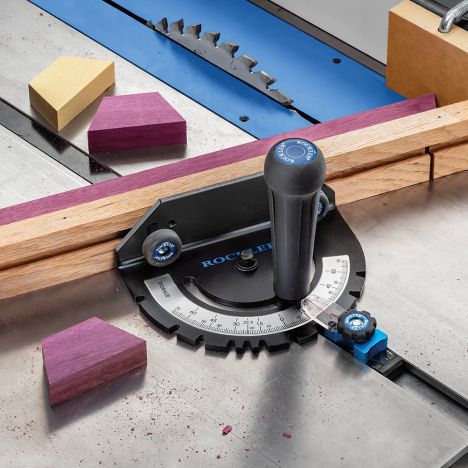
Once I'm happy with the sliding action, I'm going to cut this on the bottom of my doors. Oftentimes, when I do this, after taking the initial cut, which determines my tongue width, I need to adjust my fence out to clear away the extra material. Also, whenever you're cutting pieces vertically on a table saw, like you see me doing here, I really recommend using a featherboard. I use this one from Rockler called a Double Featherboard, I think, because you can stack them up taller, which is really useful on larger panels.
With that then, next, we're going to make a mark equal to the size of our opening up from our bottom shoulder. For us, that was 10". If we were to cut the shoulder for the top tongue here, it wouldn't fit, and this is really similar to the concept that we already covered on the full-width groove doors but, here, the critical dimension is the distance between the two shoulders, and that needs to be such that we can insert the door by getting it deep enough into the top groove that when the shoulder hits the inside of our top panel, the bottom tongue is high enough to clear the inside face of the bottom panel and lean into the groove.
Now, I could go on explaining this more and more, but I kind of feel like the more I talk about it, the more confusing it sounds, so, really, here's the important part. From that mark that we just made at the top of the door, measure another 1/4" below that, and this is where you're going to establish your top shoulder. Now, you might be thinking, "Why not save a step, and instead of measuring up 10" and then down 1/4" from there, just measure up 9 3/4", and you're totally right, but the reason I described it this way is because the idea of a 10-inch opening, first off, is just hypothetical. In reality, it's probably going to be some arbitrary amount, and I just thought that describing it this way would kind of help to drive the point home.
Regardless of what the opening of your cabinet is, what you would do at this step is physically measure that distance, then subtract 1/4" from that. In other words, Shoulder Distance = Cabinet opening - 1/4", and not necessarily 9 3/4". In order to set up the table saw to make this cut, we want to measure the distance between our new mark and the top of our door panel. Then I'm going to mark that onto another scrap piece and dial in the blade height and fence setting again, making sure to test fit while doing that. Once I'm happy with it, I'll make the cut on my actual doors, just like we did when we made the bottom tongue.
Now, if we try to install our doors, it still won't fit. That's because you'll remember that when we initially cut our panel, we purposefully left it slightly too big. Right now the tongue on the top of the door is just a little bit too long. The shoulder is in the right place, the tongue is just too long, and, actually, if you go to install it, you can see exactly how much longer it is than it needs to be. We just need to trim it enough that the bottom tongue can clear the panel. Rather than measuring anything here, I just set my table saw's fence to take a tiny rip off of the top tongue.
I recommend airing on the side of too conservative of a cut and just go back and forth a few times until you get a good fit. Once you do, you can leave your fence in position to cut the top of the rest of your door's tongues. There's still a few other things to show you, but while this is fresh, let's quickly recap. Essentially, what we did was work our way up the door. We know how big this gap was, we cut the door to that size, we cut our bottom tongue so that it was a 1/16" longer than the bottom groove was deep.
We transferred a mark onto the top of our door that was equal to the distance in the opening of our cabinet, and we made a mark 1/4" lower than that and made that become where the top shoulder starts. Then we trimmed the length of the top of our door so that we could physically install them. Again, it might sound kind of confusing, but it's honestly pretty easy to do.
Also, if you like diving deeper into woodworking topics like this, I really encourage you to check out our plans. We work super-hard on them to take complex builds and make it all really digestible so that anybody can build them. Honestly, what you just watched was as close to his heart and technical as this stuff really gets. If you can watch that three times and wrap your head around it, even in the slightest, then all of this stuff is possible. If you're interested, check them out, we'll have links in the description, as well as the link to an example chapter.
All right. A few minutes back, when I was talking about the advantages of doing this technique, one of the things that I mentioned was that you'd have the ability to keep the ridge in between your doors thicker and stronger while making the gap between the doors themselves smaller, and that's really easy to see in this drawing here. As you can see, the shoulders will actually overhang your groove a little bit, and the thicker that your doors are, the more than they can overhang.
Rather than this gap having to be greater than the width of your ridge, it can be less than the width of your ridge, and, actually, if you use rabbets instead of a tongue, the gap gets even smaller. If you wanted, you can actually make the rabbets mirror one another and you could get the gap to become zero. I wouldn't do that, though. Actually, something else that we haven't touched on yet is the ideal thickness for these doors. Typically, I aim for anywhere between 1/2" to 3/4", and what I used to ultimately settle on the thickness is how big the doors are.
For something like this piece, where the doors are only about 9" x 20", I'm going to go closer to 1/2" thick. If I was making a really large door, I'd probably skew more towards 3/4". 1/2" thick doors should be thick enough to feel robust for most small to medium-sized doors, but the larger your panel is, the more chance that there's going to be cupping that could become an issue. In fact, if you look at this shot, you can see that my panels were fairly cupped but it wasn't enough to visually notice in the finished piece, and the operation was still really nice, so I'm fine with this.
On something like these doors, which were bigger, you can see that I opted for a frame and panel door, which will be easier to keep flat. It kind of comes down to size and preference, but it's just something good to know. Something else to think about, which we haven't covered yet, is ideal door length. Obviously, this is a lot less technical, and there's not really a wrong length, but one tip I have is to aim for a tiny bit of overlap. Using the Pico console as an example, yet again, what I did was make each of these doors long enough that it would completely cover the vertical partition. If they're both closed, there'd be about three-quarters of an inch of overlap. That shouldn't have any drawbacks functionally, but aesthetically, it's going to look nicer because even when viewed from an extreme angle, you're not going to be able to see between the doors and into the cabinet.
Another tip, or I guess this one's kind of more of an option, is considering if you want to cut grooves into your side panels. If you do, you'd basically just match whatever you did on your bottom panel, and the purpose here is to essentially hide any gaps if your cabinet and doors don't share the same angles because any little gap can be hidden in the recess. That said, if your doors and cabinets are square or, at least, they match, I'd probably skip these grooves.


Keep the inspiration coming!
Subscribe to our newsletter for more woodworking tips and tricks