Video: Custom Pool Table Light
In this video, April Wilkerson upgrades her home's game room with a custom pool table light.
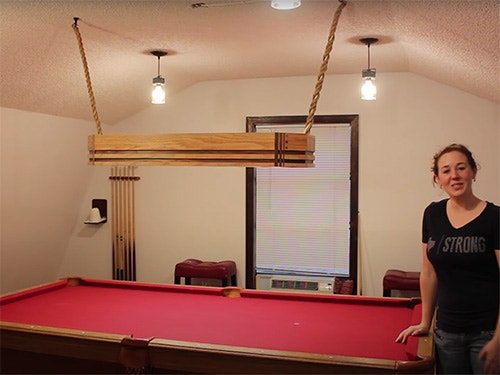
April Wilkerson was never happy with the pool table light she had hanging in her game room, so she upgraded with a new piece made from oak, walnut and sturdy rope.
You can find more great projects and techniques from April Wilkerson at her website.
Featured Tools:


April Wilkerson: I don't think that this is a space that you've yet seen. This is our pool table room. We purchased this lamp when we first moved into this space, but me and my husband, neither one of us really like it. I think this week I want to try to tackle making a billiards lamp. This is one of those projects where I'm just going to play around with it and hope I come up with something I like. Let's give it a go.
For this project, I'm going to be using oak and walnut. A buddy gave me this bundle of walnut about three years ago, and I've been hanging on to it. The only thing I needed to purchase for this project was one by six oak. I started by taking everything to the miter saw and cutting it to rough length. I'm going to be staggering the oak and walnut. Whatever I do with the oak, I also do to the walnut.
Then I took all my pieces over to the table saw and cut them to the exact width that I wanted them. Then I moved on to the glue-ups where I just staggered the oak and walnut. I would put it in clamps and use a rag to get the majority of the glue squeeze out. The shape I'm going for is elongated octagon. I have six small sides and two of these long ones.
While the panels were drying, I moved to the pool room and started taking off the old, outdated hardware. I got rid of the light fixtures as well as the ceiling fan and the old lamp. I picked out some new lamps that I thought would fit the space well, then wired them in and tightened them down.
Once the panels were done drying, I took them out of their clamps, then ran them through the thickness planer. Not only to get them nice and smooth but also to take down some of the thickness to cut down on some of the weight. Then I use my table saw to square up all of the edges.
For these walnut inlays, I wanted them to be recessed. I thought it would be much easier to do the glue-up with them all at the same thickness, and then put a dado stack in my table saw and run the piece over it to create that recess look I was going for. I'm really happy with the way that this turned out but you do need to have the dado stack exact for it to turn out correctly.
I thought it looked good so I went ahead and did all of the others the same. After getting those cut in, I decided to add three vertical stripes on four of the end pieces. I would cut all four at the same time, then change the dado stack out for something thinner and then repeat the process. Then I can grab some scrap walnut and cut them to size to act as an accent. I did take my time cutting these because I wanted them to be a nice snug fit.
Then I ran all these pieces through my thickness planer so they would sit flush. Now I did have to tape the two smaller sizes together so they could safely go through the planer. Once they were down to the right height, I test fitted them to make sure I was happy with it but then glued and clamped them in place, using a damp cloth to get the majority of the squeeze out and a damp Q-tip to get into the nooks and crannies.
After letting those dry overnight, I clamped my belt sander to my workbench and smoothed the ends down flush. Then I decided to add some circle accents. I set up a jig at the drill press where I'd be able to drill a hole, move it over to my next mark and drill the next hole, move it over, drill the next hole. This ensured that all four pieces with these accent holes would all come out looking identical.
Then I purchased some plug bit so that I could make some accent plugs out of the walnut. I first drilled them at the drill press and then used the band saw to cut them out. Then I glued and hammered them into place. Then once the glue was dried, I used a pull saw to cut them down flush.
Now on to making the mitered cuts. I used my table saw for this. Using a miter gauge with a stop block for the smaller pieces, and a temporary fence attached to the miter gauge for the two longer pieces.
To reinforce these miters, I'm going to be using biscuits. I first laid out the boards and made the marks on where the biscuits needed to be cut in, and then I use my biscuit joiners to cut them in. I moved everything to the ground to give it a dried test fit. I was very relieved when everything fit great. [laughs] I just assembled everything out of glue and then put it all back together. This is where I called in reinforcements so that I could add two ratchet straps around the entire thing to hold it together overnight. I went ahead and added wax paper where the straps contacted the wood because I wasn't sure if it would bond or not.
After letting that sit overnight, I took the straps off, took the wax paper off, and I'm really happy with the way that it turned out. I did a lot of sanding and chiseling just to make sure that everything looked nice and spiffy, and then I set it upside down and cut a top out for it. Then I gave everything three coats of shellac, sanding in between with 220.
I wasn't a fan of the chain, so I decided to go with this hemp rope instead with some simple mounting hardware anchored to the side. The old Bud Light lamp was eight pounds, and this one came in at 10 and a half pounds. I think that's really good. I reused the lamp from the old fixture and I just mounted that inside of this cap. Then I threaded on some more hardware onto the rope and started playing around with where I wanted it hung.
This is a little bit different of a project than what I normally do and I really enjoyed it. I love being able to replace things that we bought with things that I've made. Now I'm sure most of you don't need a billiards lamp, but hopefully you'll be able to take at least a method or a technique that I used during this project and apply it on a project of your own.


Keep the inspiration coming!
Subscribe to our newsletter for more woodworking tips and tricks