Video: Building a Speed Boat without Plans in 5 Days - Part One
In this video, Michael Alm and Jason Hibbs join forces to attempt to build a speed boat in only five days. Without plans.
Michael Alm has never built a boat and Jason Hibbs has only built one. In part one, Michael covers the design, making all the ribs, making and installing chines, building the dash, nose, and transom.
You can find more great projects and techniques from Michael Alm at his website.
Featured Tools:


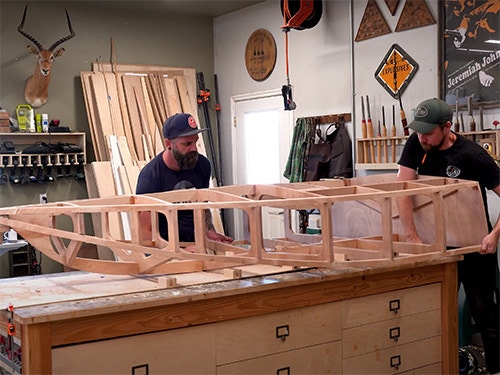
Michael Alm: This week, I built the coolest thing ever. I joined Jason Hibbs of Bourbon Moth down in Oregon and we decided to try and build a boat in five days. This is completely crazy, for context Jason has built one boat and it was just a couple of months ago. I built a model sailboat five years ago. We found images of this thing called a cocktail speedboat and after looking through a couple of them, we felt we could build one ourselves, little did we know how much work we were getting ourselves into. We didn't have any plans and the hardest thing about building something like this is just knowing where to start, so we basically just winged it. It's pretty good. It feels quite right.
I want to stress again that Jason and I have no idea what we're doing but figured the best way to get some measurements was just to make some template. We took a couple of pieces of quarter inch plywood and shifted them around on the shop table until it looked like a boat. Once it did, we started taking measurements and figuring out where we wanted to put the ribs.
Since we don't have a lot of extra time on this build, we really just had to keep moving forward and guess at stuff and and see if it worked or not because at this point we really didn't know. It's one two three four panels and then our top panel.
Jason Hibbs: Should we just get this it'll be here the same day as the motor.
Michael: It might make things easy.
Jason: I'm all for getting the stuff to do this right.
Michael: Especially if you're going to keep the boat, we're at the point...
Jason: Well, I know we're at the point where it's like if we do this well enough then it would actually be a cool thing to have.
Michael: It'd be a fun little thing to have. As you can tell Jason and I were starting to get a little confident even with just this little template made. We realized that we had to order at least a motor for this and we also found a steering mechanism online that would get here in time. Really, we just checked amazon, found the only motor that would arrive in time and the only steering mechanism that we could get so we were going with that.
We settled on six ribs throughout the boat plus a transom panel which is the back of the boat. We're starting with the transom panel and setting up an arc that will follow across all the rest of the ribs.
From looking at pictures online, we noticed that there's this upper arch on the transom and the next rib up from there, so we replicated that and just made this template real quick to trace it out. Then I'm cutting into the grain with my knife just to make sure that I don't get any tear out from the saw because this is actually going to be a final piece of the boat and it's actually going to be seen. We're starting with the finished piece and then we'll use this one as a template for the rest of them.
The plywood we're using for this is called Okoume plywood, it's made by tiger ply, we got it from the nice people at the hardwood center in Albany, Oregon. It's a marine grade plywood with a full veneer on top, it's completely voidless. The cool thing is it looks like mahogany so it's going to finish really well. Big thank you to the hardwood center, if you live in the Willamette Valley, go check them out and tell them we sent you.
Doing the math we realized that we have enough material out of this three quarter inch sheet of plywood to get all of our ribs out of it. We just started cutting them, we cut them all at the same height to make it easier on us and we gave the same arch across the top of each panel.
With all seven panels cut out, we could then use the transom as a template to route the curve across the top of each panel. We rough cut them with the jigsaw and now we're going back and refining them with a templating bit on the router table.
After a little bit of head scratching of how we're going to assemble this thing and keep it nice and neat, we came up with this idea of using a scrap piece of quarter inch plywood putting a center line on it and then lining up each panel to their respective center lines. We just glued a couple blocks on with some CA glue and used a couple of boards and spacers to make sure that each panel spaced out correctly. Honestly this simple jig proved so useful that I don't really know how we would have built the boat without it. As we got all the ribs into place, this is really the first time that it started looking like a boat.
Jason: Dude, I like that
Michael: Dude, it looks awesome. That's so cool. Then it looked even more so once we nailed on a bit of trim. We're using this trim to find the angles of our bevels, we know that we need to bevel the sides of these panels so they meet up neatly with the plywood that's going to run across the top of it. We also ran a center line through it that we can find exactly where our bow is. Cut these pieces of trim on that line and get them to meet up in the center.
Jason marked the angles with a ruler and then we pulled the whole thing apart again, removed all the nails and then ran them through the table saw to match that angle.
I nailed on the trim but realized pretty quickly that the bow needed to be trimmed again so Jason took care of that. We shortened it up so that it would meet really nicely in the middle and didn't have any weird flair to it. Not bad.
Once the trim was looking nice and even all the way along, we could start working on the bottom of the boat and this is pretty complicated, there's a lot of compound angles and honestly again, we're just guessing at it. I'm sure a boat builder has a good way to calculate this stuff, but we just did it by eye and cut it and cut it again until it looked right. At about ten o'clock on the first day, we ran out of idea.
Michael: Part of me is like what if we just notch out like originally we were thinking in our heads, the bottom of each one of those ribs. Try and run like some sort of chime and run a chime and then just shape it by hand.
Jason: Part of me is like what if we just notch out like originally we were thinking in our heads, the bottom of each one of those ribs. Try and run like some sort of chime and run a chime and then just shape it by hand.
Michael: It's not that crazy of a curve.
Jason: We could easily do that with plywood.
Michael: On the second day we had a lot of energy, we were ready to go. We had made a game plan the night before, and we knew exactly what we needed to do. Jason started routing out some channels so that we could put essentially the spine in the boat, I have no idea what the actual term for this is, but a structural support on the top and bottle that's going to link all of these ribs together.
Meanwhile I started laying out all the cutouts for the ribs, I wanted to relieve as much material as possible but keep it structurally sound so I just used my bi square and a couple of panels and a roll of tape and got it so that I felt it looked about right from images that we'd seen on the internet. It's coming quick.
Once Jason had finished all the half laps, we could test fit a piece of three-quarter inch plywood to form that spine and to mimic the curvature of the boat, we just taped up a scrap piece of wood and measure up from the bottom of the boat. Jason cut that panel, while I continued marking out the ribs.
We use the off cut and a couple of extra measurements that we took to raise up that cut and just sneak up on it until it fit really well. To cut the opposite side of the half lap, I just cut a bunch of boards and we spaced them out in between each rib, and then we can measure up from the rib to find the line where we needed to cut the half lap in. To trim these out, we decided to keep it nice and simple. We just used the jigsaw.
Jason: That's pretty good.
Michael: With the bottom spine sorted, Jason started working on the top one, while I started cutting out all of those ribs that I'd marked earlier.
Jason: Perfect timing. Croissant sandwiches.
Michael: After lunch, Jason was ready for a test fit of the top spine. The boats' upside down right now. We tested it out expecting to have to refine it a couple times, but it just fit great.
Jason: That's really good. That's ridiculous. That never happens. It looks dead-on.
Michael: With that homemade Jason Hibbs croissant sandwich energy coursing through our veins, we started making lots of progress. I cleaned up all of the ribs, made them nice and rounded over so that it'd be smooth on the inside of the boat and Jason cut all the chine notches so that we could tie the whole boat together.
While Jason worked on that, I started making these little add on blocks to go in between all the different ribs, so that there'll be a little more surface area on that main spine, also give us more surface area to nail into when we go to put on the plywood skin.
Jason: Good. Give the audience a nice view of what it looks like. Beautiful.
Michael: Template routing was super handy throughout this build. It's probably one of the easiest parts of this was, that we could just glue these on and then template route them off and it looked really nice and smooth when it went back in. At this point, we were ready to finally start gluing pieces together permanently. For this we're using a product called Thixo, it's made by TotalBoat and it's really cool. It's a two part resin, but it mixes in the tube so it just comes out like caulk. Saved us a ton of time. We were able to really get this boat together purely because of the Thixo. If we had to hand mix all this epoxy, it would have taken forever.
As we moved along. We just check to make sure that each corner was at the same height, roughly off of Jason's table. That was enough to keep it from getting a serious skew. I wasn't able to notice any sort of issue after we got the whole thing glued up.
Jason: Yes.
Michael: Nice and skewed up. We just made this out of two strips of half inch plywood, it was bendy enough to do it. We originally planned on doing it out of hardwood, but there was no way we can get the hardwood to bend properly. We just stuck with what we had and used more of this plywood and it worked awesome. We were able to bend it around the curve really easily, and it felt super strong when we're done.
We left the very front of the chines wild. We didn't glue them down to the nose. We weren't quite sure what we were going to do with it, but we knew that we didn't want to glue it in at this stage because we probably want to reinforce the front end of the boat.
Also, I've never seen anyone use a nail gun to build a boat. I don't know if that's a cardinal sin of boat building, but it made it really easy and quick. I can't really see the harm in it. Maybe they'll rust over time but everything's coated in epoxy. If we had time to clamp this all up, we would have, but this is a five day boat build. Of course, a shout out to the Rockler Bandy Clamp coming through in the clutch again. It was perfect for holding these chines together.
Day three was basically refinement day. We just sanded the boat a ton, made sure that everything was fitting up really nicely because we had to prep for skinning it the next day. We wanted to make sure that there weren't any weird bulges or areas that the plywood wouldn't adhere to well. We didn't really have a plan at the end of the day on day two of what we're going to do with nose of the boat, but Jason came up with this idea to put a solid wood block in there so we could tie the chines to it and give it some strength at the very tip of the boat.
We could also now cut out for the cockpit. We saved this until this stage just because before the glue up, we couldn't really see the lines in the boat. Now that we could, we could guess at it and make sure that it fit us really well.
Jason: I think that will work.
Michael: It'll work. I trimmed up a couple pieces of okoume plywood to be stitched in where those ribs were hanging free and also give a place for the deck of the boat to be tied into. The motor?
Jason: I'm assuming so.
Michael: Right on cue, the motor showed up and it was perfect timing because we needed it to move forward. We also got the steering mechanism which is going to make building the dashboard a lot easier. One of the things we found out is that the motor needs about an inch and a half thickness in the back to hold on to. Jason quickly fabricated this little panel to go in the back and beef it up a little bit. We also cut out some tabs so that those pieces that I just cut will have a place to sit and it'll make them really nice and strong.
Now that the Thixo on the bow had had plenty of time to set up and cure, I started peeling off all of the tape that we had added on to hold it into place, and then sanded it up. I sanded off the nose of it, and then realized that it was going to take me way too long to sand the chines down into the point so I used a knife and a Japanese pull saw for that. The knife just gives it a little bit of a line to ride while I'm cutting so I don't overcut in any direction and this worked out really well.
Once I got the chines rough cut, I could then go back with the rotex and sand it all the way down to that point. A nice thing about plywood is you can see the layers as you sand through so I could keep checking the layers and making sure that I was getting an even sand all the way across.
Now that we had the steering mechanism in the shop, we could design out the dashboard. This made it fairly easy. We just basically followed the instructions to get the sizing and the holes. Jason cut it out with an angled cut on the band saw to match the angle of the deck. We're going to glue the decking on top of the dashboard so that it's all nice and integrated and that'll make it really strong.
Jason: Another tip bites the dust.
Michael: We had to flip the boat over to cut the nose. This was really cool because it's the first time we actually felt the weight of the boat. It was either super light or Jason is very strong.
Jason: Gentle.
Michael: The nose piece was easily taken off with a pull saw, and then we were ready to skin the boat with plywood.
That is about the first half of the build and little do we know there is so much left to do. We still have to put the plywood skin on the outside of it. We still need to put all of the mechanisms to steer it, and make sure that the motor works, and we got to put it in the water which I promised you. We do put it in the water and we get to see all of that in the next build. That'll be next week.


Keep the inspiration coming!
Subscribe to our newsletter for more woodworking tips and tricks