Video: Building an Expandable Pedestal Dining Table
In this video, Shaun Boyd designs and builds an expandable restaurant-style table.
Shaun Boyd tackles a testing marathon build of a table for a friend's restaurant. This build included plenty of interesting techniques including turning, cutting veneers, router inlays, segmented rings, cutting circles, and more!
You can find more great projects and techniques from Chris Salomone (and Shaun Boyd) at his website.
Featured Tools:

Shaun Boyd: One of my favorite parts about woodworking and furniture making is being able to constantly step out of my comfort zone and try new things. Today I'm making this pedestal dining table and doing my best to expand my skills.
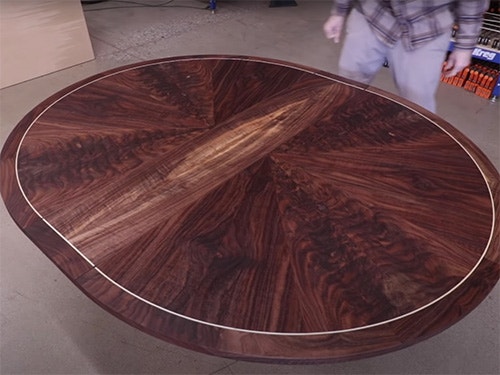
Really quickly before we get into it, I wanted to mention that during this time of uncertainty I feel very fortunate to keep working and doing what I enjoy while still being responsible under the given circumstances, but I know a lot of people don't have this luxury so I hope everyone can at least take a bit of time each day to get in your garage or your backyard or even a room in your home to create something no matter how small it is. That being said, today I'm making something big and so far I've started to break down my lumber and get it ready to cut into slices for my tabletop. Let me explain, the tabletop is going to have this pizza slice pattern.
: I needed to cut a couple of thick wedges to 22 and a half degrees which is just 360 divided by the number of slices I wanted. Those could then be resawed into veneers. I also chose two boards with significantly different grain patterns because I wanted each slice to be book-matched and alternating around the tabletop. My process here is I would essentially cut a veneer on the bandsaw then plane that face smooth again and then cut another veneer and just repeat that until I had what I needed.
With all those ready to go, I then turned my attention to the table base. The base is going to be a turned pedestal and I decided to stack a bunch of layers to build up the blank. I was able to get a pretty good idea of what I was going to need by modeling it like you can see here. With everything calculated out, I started by chopping up a couple of boards, then milling everything so I could glue up each layer to get the width I needed.
From there I ran them all through the drum sander to get them flat and to equal thick nigh. Then the last thing to do before gluing them all together was to cut off the corner so that turning it would be a bit easier. With the blank glued up and dry, I could start turning it which was a slow process most likely because I'm more or less don't know what I'm doing when it comes to turning, but there's only one way to expand your skills.
The base was pretty much done at this point so I could go back to working on the tabletop. I first needed to join the edges on all of the parts to make sure I had no gaps for each book-matched slice.
With each slice ready to go, Chris and I can glue them to the substrate, which is Baltic birch plywood. We glued them and pinned them in place with a couple of Brad nails at the ends as that part would eventually be getting cut off. We also used our fancy new veneer press to get even clamping pressure across the entire panel. With each half ready to go, I started to work on the inlays on the tabletop. I knew there would be some gaps between each slice as getting the angles perfect is difficult. I could have erred on the side of going slightly too big with each one so that each half went a bit more than 180 degrees but I decided to inlay some thin strips to cover any discrepancies. I initially wanted to make them maple to add a bit of contrast but the client wanted to keep it subdued so I used walnut.
At this point, I could finally cut each half into a semi-circle using a circle cutting jig. With those cut out, I then cut a small rabbet around the edge of the table to inlay a maple strip and to get that little bit of contrast that I was just talking about.
The last part of the tabletop was the outer edge and this would give the look of the tabletop a bit more weight, as well as cover up the plywood edge. To make this I essentially made a segmented ring around the entire table. I started by cutting up some chunks of walnut to rough length then setting my jig to 15 degrees and cutting each segment to final length with the angle on both ends.
With each ring glued up and sanded flat, I then went to work on shaping them to fit the table. I attached each semicircle to my work table with double-stick tape, then set my circle cutting jig to match the outside radius of my inner portion of the tabletop and started cutting.
With each of those ready, I could attach them to the inner portion of the tabletop, and to do this, I used a combination of glue, pocket screws, and Chris. From there, I added some edge banding to the straight edge of each half and I did this to cover up the plywood, which would really almost never be seen, but to also protect that top edge, which I was worried would be prone to chipping with the table being opened and close pretty regularly. I then trimmed the edge so everything was even and added some dominoes to keep the two halves aligned.
With everything finally together as one circular tabletop, I could cut out the center to eventually add a plug, but for now I used a temporary one with a hole drilled into it so I could cut the final outside circle around the entire table.
All right, as you can see behind me, that's essentially where I am now. All of the parts are just stacked on top of each other. I have a bit more to do before I can call this one done so I'm going to go ahead and let future Shaun take it from here. Welcome to the future. I know I might look a little different, but I started wearing my glasses. Oh, and the table's done so things are looking up but to get to this point, I had a few things left to do so let's get back into it.
With the two halves of the table fully shaped, I could glue in the center plugs, which I did late one night and tensions were a little high. [beep] From there, I added a bit of a chamfer to the underside of the tabletop as well as the top edge of the foot of the base.
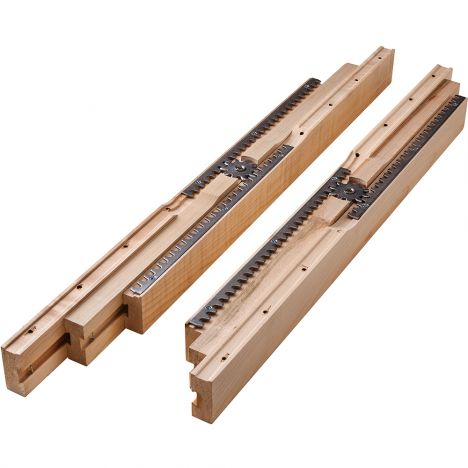
I then did the final sanding, which I did with the tabletop fully assembled so that I would sand all of the sections of the table in plane with each other. Finally, the last part to be assembled was the extension mechanism, which I got from Rockler and I'll put a link to that in the description, but it worked great and was pretty easy to install.
This table is actually going into my childhood friend's restaurant near my hometown. Once we're all able to venture out into the wild again and if you ever find yourself driving down the 101 in California, stop in at Bell's Restaurant in Los Alamos and tell them Shaun sent you. You can sit at this table and eat some amazing food made by amazing people. I'll put a link to them in the description as well. All right, stay safe everyone, and thanks for watching.


Keep the inspiration coming!
Subscribe to our newsletter for more woodworking tips and tricks