Video: How to Build Boxes for Furniture
Building boxes and cabinet making for woodworkers at an intermediate level.
In this video, Chris Salamone goes over some tips and tricks for how he builds boxes that are going to be incorporated into furniture projects. In addition to building a pair of mitered boxes, for a modern furniture project (one from plywood and one from hardwood), he also talks about box making in general, that will hopefully benefit you regardless of what style of woodworking you're into.
You can find more great projects and techniques from Chris Salamone at his website.
Featured Tools:


Chris Salomone: Desks, credenzas, coffee tables, dressers. Something that so many pieces of furniture share in common is that they're based around the ability to build a good box. Today, we're going to cover everything that you should know about boxes from A to Z, and I'm going to walk you through my process for building them on foureyes.
All right, so this is a big topic, and it's inevitable that I'm going to miss something that you would have liked to see me talk about, so I'm just going to base it off of my experiences and my thoughts, and because of that, it's probably going to be slightly biased towards modern or minimalist furniture since that's predominantly what I build. That said, I think that a good place to start is with joinery. Again, here, there's more types of joints than I could ever possibly name. I think that about 99% of them are just some variation of the five that I am going to talk about.
Those would be butt joints, rabbet joints, mitered joints, box joints, and dovetails. My first tip would be this, pick the types of joints that speak to you and focus primarily on those. For me, that happens to be mitered joints and rabbet joints. That doesn't mean that you shouldn't try making dovetails or that dovetails can't be your go-to joint. Again, just pick what will work best towards your end goal and focus on that. I'm probably not going to get deep into dovetails. That said, if you want a great resource for all things dovetail, check out Jonathan Katz-Moses's channel. He's got a ton of videos and tips and tricks that deep dive into that world. I'll link him below.
Okay, so as it pertains to modern or minimalist furniture, I would say that the king of all box types is the mitered box. There are a few different reasons for that. I would say that the biggest two are, it's the best or most seamless for whenever you want to have that look where the grain is wrapping around the edge of a box. The second would be that if you're using plywood, and you want to cover up the plywood edges, you're going to only have to worry about four edges, as opposed to eight that you'd have to cover up if it were butt joints or rabbet joints, not counting the back edges of course.
I guess that leads into what is probably the biggest question for when it comes to building boxes for furniture. That is - hardwood or plywood? Rather than talking about it in theory, why don't we just get into building some boxes. Rather than telling you what you should pick, I'm going to go through the process of building a pair of identical boxes, one out of plywood and one out of hardwood. Hopefully, this will be something that you can think back on as you make your decisions from project to project. I'll try my best to point out some of the key factors that can help you make those decisions.
Starting with hardwood, one of the biggest and most obvious drawbacks is that it requires a decent amount of work just to get to what is the starting point with plywood. That would be making some panels. One of the first deciding factors might be do you have a jointer and/or a planer. If not, do you have access to pre-milled lumber. If the answer to both of those is no, plywood might be the way to go. But if you do, making nice panels is pretty integral to making a nice box. I'm not going to deep dive into that process, but essentially, you would have to joint your material flat, plane it to an even thickness, joint one edge, cut the other edge square in parallel, and then glue up some panels.
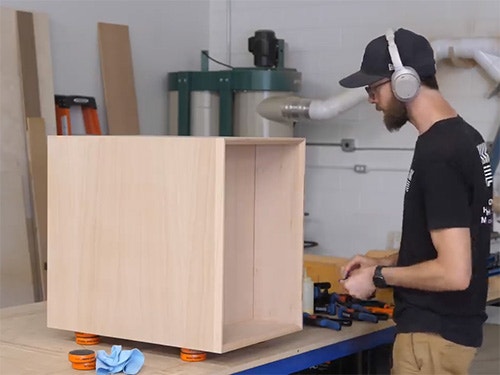
After doing all of that, you'd be ready to start making your box. Now, with plywood, obviously, it's quite a bit less work, but you still have to examine your sheets to make sure that you're getting your show faces from the best part of the wood. Actually, let's quickly talk about the box that I'm going to be building here, just because I think that that'll help to see it in the context of the larger project. This box is part of a desk that I'm currently building for a set of plans. The desk itself has a few options, the main one being to build it where the box is attached to one of the legs, or to build it where the box is separate.
Another big variable with the desk is that you can opt to build it where it'll sit up against the wall or where it can be in the middle of a room, which means that it needs to look good from both sides. That means that the box also needs to look good from both sides. On the front side where a person would sit, the box is going to get three drawers. Then on the back side, which might face a doorway where a person could enter the room, there's going to be some adjustable shelving where you could display some objects. Okay, that's probably enough context. That said, if you want more information about the full video plans, I'll have a link to our website in the description.
Back to the plywood. If you're going to want that wraparound grain look, you're going to want to think about where your panels are coming from. In this drawing here, the dimensions aren't really important. What's more important are the labels on the bottom that illustrate which piece will become the top, right, left, and bottom to achieve that look. Now, if you're doing this with hardwood and you want that wraparound look also, you're going to have to do the same thing. You could either glue up a large panel that you then split into smaller panels, or glue up a bunch of individual panels, keeping track of which pieces will go where during the glue up phase.
Okay, regardless of which way you decide to go, at this point, you should have four oversized panels, and you can start cutting bevels in order to make your mitered box. If you're using the hardwood, you'd set your blade to 45 degrees and cut a bevel onto one edge of each of your four panels, then measure and mark out your desired length and cut the other side. Personally, I like to make the second cut in two passes. First, leaving the panel about a 16th to an 8th of an inch long, and then making a light pass to finalize it. If you're using plywood, a good trick is to set your blade just barely past 45 degrees, so just like a 10th of a degree.
The reason for this is if there's any error and you're not going to be dead on 45 degrees, especially with plywood, you'd rather be slightly past 45 degrees as opposed to slightly shy of it. What that'll do is cause the gaps to be on the inside of the miters rather than on the outside. Here's an extreme illustration where we're setting the blade to 5 degrees off instead of just 0.1 degrees. You can see what's happening. Having said that, the process for cutting the bevels is exactly the same on plywood, where we're going to cut one edge and then take two passes to finalize the length of the panels.
Okay, so whenever we initially made our panels, they were both too wide and too long. When we cut the bevels just now, we finalized their length, but I think it's best to wait until after that to finalize their width. The reason for that is that you might get tearout especially on plywood. If you do, it's most likely going to happen while you're cross cutting. The next step would be to set your fence to your desired width, and then rip all of your panels with your blade set to 90 degrees. Okay, there's only a few more things that are specific to building your box out of hardwood versus plywood.
I want to talk about those now. That means that we're going to get a little bit out of order here. Then after we do that, we'll talk more about things that have to do with just building boxes in general, regardless of the material. The first of those things would be how to handle the front edges. For example, on the desk, one of the repeating themes are these chamfered or beveled edges. The top has them, the drawer faces have them, and the box is going to get them on the front and back sides as well. That said, there's all different edge details that you could possibly want to put on your box.
When it comes to plywood, there's two ways you can do it. That's putting your hardwood edging on before the glue up or after the glue up. If you decide to do them towards the beginning before the glue up, we would have to back up to when our panels were oversized and before we cut the bevels. What we would have done is glued on some hardwood edging at this point. In this case, it would have been a one inch by three quarters of an inch strip of hardwood on the front and back edges of each piece. Then, we would have sanded or routed them flush with the plywood faces, and then we could have started the process of cutting our bevels.
In other words, how do we done that, we'd be exactly where we are with the hardwood version right now. For the detail that we want on this box, we'd measure it out on one piece, and then cut it along each edge of each panel. Then, we could move on to the glue up. Personally speaking, I prefer to do the hardwood edging before glue up method when I'm using really thin strips just to cover plywood edges. If I'm doing something like this, where it's more of a design detail, I prefer to attach it after, which I'll demonstrate after we glue up the box.
Cutting the holes is pretty universal, so it doesn't really matter if you're using plywood or hardwood, and cutting the dados for a box like this is pretty universal as well. That said, cutting the center panel that'll go in the dados isn't. Well, not completely at least. In either situation, you'll figure out how big your center panel is by measuring your horizontal and vertical distances from the inside of the bevel to the inside of the other bevel, and then adding the depth of your dado times two since there's one on each side.
Let's say that the measurements were 17 and 24 inches and your dados were a quarter of an inch deep. Well, you know that your distances were 17 and a half inches and 24 and a half inches, so technically, out of plywood, you could cut your center panel exactly that big and you'd be ready to glue up. That said, I wouldn't. I'd cut it slightly undersized so that it doesn't get in the way during the glue up, and that would be that.
With hardwood though, you definitely want to make your panel a little bit undersized, especially across the width as it could potentially expand, and if it doesn't have any room to expand within the dados, it might cause the joints to break apart. With hardwood, I'd back it off by about a quarter of an inch across the width and then maybe an eighth of an inch across the length.
Okay, gluing up. This is another part where there's countless options and ways that you can go. Again, I can't possibly cover them all, but the most simplistic version would be the tape method. Basically, what you'd do is line your pieces up edge to edge and face down in the position that you want them, put a bunch of tape on the seams, flip them back over and put some glue in, and then just kind of fold it all up.
You might be thinking that this is going to make for a weak joint, but trust me, it'll be strong if you do it right. I've done this on boxes that are significantly bigger than this one which carried a lot more weight and it's not a problem. Actually, if you did want to make it this way and then add some reinforcement after the fact, you could wait for it to dry, install some dowels. That would work.
You could also cut in some splines. Honestly, there's a lot of different routes you could go, including using everybody's favorite tool, the Domino. If you do though, what I would suggest is to cut one side of each mortise to fit the Domino and the other side of the mortise wider. That'll make it easier to get everything together and just give you some wiggle room to make sure that the edges of your panel line up when you're gluing.
Honestly, in my opinion, the benefit of the Domino doesn't really have anything to do with strength. To me, really, the benefits are, one, it's kind of an extra set of hands to hold things in position while you're gluing up large panels, two, it helps with alignment, and three, it gives a physical reinforcement for before the glue has dried that allows you to use a lot more clamping force to close up any gaps, pull things square, and so forth.
Something else to mention about gluing boxes together, and this is regardless of what type of joinery or material you're using, is that getting square or 90-degree corners is kind of the whole game I guess. This becomes increasingly important if you're going to be adding in drawer boxes and doors and you're trying to get those nice even gaps. If you feel like you're constantly off, there are a lot of various jigs on the market.
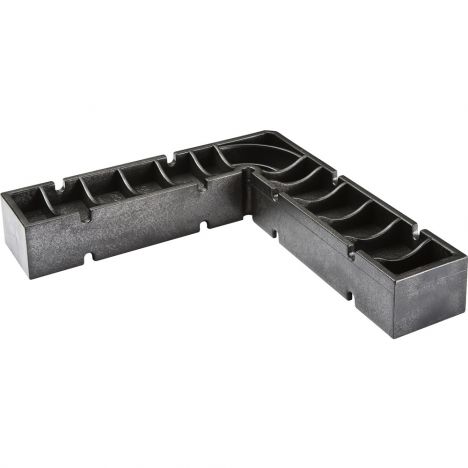
I have these Clamp-It squares from Rockler. These can help quite a bit. They're going to make every joint always perfect 90 degrees, but they can definitely get you closer and allow you to add pressure in directions that would otherwise be difficult. Also, not unlike the Domino, both kind of act as extra sets of hands for putting large panels together.
Okay, for fun, we decided to test what it would take to break this box which doesn't have any reinforcements. It's just bevel cuts that were glued and taped together, no clamps. Granted, this is pretty unscientific, but here it is with about 300 pounds of wood and 150 pounds of Sean on top of it. No problems there. Here, we tried hitting it with a dead blow hammer along a face. Here, with all of the force focused on an edge. Again, no problem.
To get it to break, we ended up tossing it in the air a few times, and finally, it broke along the joint line taking some wood with it. Bottom line is it's pretty strong. Also, generally, if you're building a large piece of furniture that's going to have a lot of weight on top of it, there's a good chance that you're going to have one or more vertical partitions in it and really that's going to carry most of the weight and transfer it down into whatever your base structure is.
Okay, now let's jump back into the whole hardwood edging on a plywood box thing. We already covered how you could do it before the glue up, but like I said, you could also do it after the glue up. Let's take care of that now. The biggest benefit, in my opinion, for doing it this way is that any gaps that are in the plywood edges of your box are going to be independent from any gaps that are in the hardwood edging of your box.
Remember we aired on the side of cutting our bevels so that if there was any gap, it was on the inside of the miter. Well, if we had successfully done that, then the only place it would be noticeable would be on the front edge of the plywood. Now, we have the opportunity to hide it. That said, it can be a fairly tedious process as you have to work your way around each piece fitting them all in perfectly.
I guess the biggest tip I can give here is make your strips slightly thicker than your plywood, and then aim for having them flush with the inside of your cabinet and proud on the outside. That way, you can route or sand them flush afterwards. If you have them proud on the inside, it can be hard to get to them and you'll have to use a chisel to make them look nice.
Okay, so that pretty much takes care of building the two boxes. I guess, finally, I'd like to leave you with a few more thoughts and opinions to help you decide. If nothing else, I hope that I've at least illustrated that either plywood or hardwood is a viable option and both will work. That said, I think one of the key factors that people will use in helping them decide is cost. Most people would also probably assume that the cost of plywood is cheaper.
What I would say is that sometimes that's true, but sometimes it's not. Now, obviously, the species that you're using is going to play a factor in that, but another factor that you might not consider is size. For example, the box that I built for this project is roughly 20 board feet and it's made of beech, which costs about $3 per board foot. That's about $60 in material. For most species of plywood, you can buy it in less than a full sheet, which for furniture-grade material, costs about $80 to $110.
Basically, the smaller the box is, the more likely it is that hardwood is actually the cheaper option, and the bigger you get, the more likely it is that plywood becomes the cheaper option. Another factor that you should think about is durability. By durability, I don't mean strength. I think that we've seen that plywood is plenty strong, but rather, more how it will hold up to everyday use.
One area where hardwood is going to have an advantage is that it's pretty much homogeneous all the way through, whereas with plywood, you have a thin veneer that if you ever sand through that, you're kind of screwed. If you can imagine the piece that you're building is going to take a fair amount of abuse and possibly need to be refinished every once in a while, hardwood.
Also, still sticking on the topic of durability, another thing to consider is how durable it'll actually be in the shop while you're working on it. That's not to say that I drop kick my hardwood pieces into place and throw them around, but it does add a little peace of mind knowing that I can set it down a little bit more hard or spin it around and not have to worry as much about getting a little scratch in it or nicking a corner or whatever. It's just a lot more durable and easy to fix any little shop accidents that might happen.
Another factor to consider is thickness. That's from both a construction and an aesthetic point of view. With hardwood, you're going to be able to get whatever thickness of lumber you want and mill it to whatever thickness you want, but with plywood, obviously, you're going to be stuck with whatever thickness are available to you. That said, there are workarounds, being able to build face frames and so forth, then it's not that big of a deal, but still something to think about.
The last big consideration would be wood movement. With hardwood, it's going to be more likely to move than plywood is. In general, I don't think wood movement is that big of a factor. I think most people's consideration for wood movement is drastically blown out of proportion. That said, hardwood will move a little bit and depending on how you're using it, it could present problems, whereas plywood is pretty much not going to move at all. Here's an example of how that can affect a project. Take something like this dresser. Full plans are also available on the website, by the way. Link in the description. Anyway, it's made from hardwood. To attach the base to the cabinet, we use these figure-8 desk top fasteners, which will allow for the wood to move. If this were made from plywood, you could pretty much just screw it right through the underside of the apron and into the cabinet and it would be fine. Again, not saying that it's a huge deal, just something to consider.
Okay, so doing this little side-by-side comparison, I don't know if it made it sound like I was biased towards hardwood. I'm definitely not, but I kind of felt that way as I was saying it. I don't know what the truth is, maybe it's that hardwood is a little bit better than plywood in a lot of little ways, whereas maybe plywood is just a little bit better, or a lot better, than hardwood only in fewer ways. I don't know. The point of the video is not to tell you what you should pick for every situation, but rather just to give you some information and some things that you can think about for when you're faced with those decisions to help make it not such a hardwood-- hard one. Sorry, not make the decision such a hard one. I'm not biased. Noice.


Keep the inspiration coming!
Subscribe to our newsletter for more woodworking tips and tricks