Video: Better Built-In Cabinets
In this video, Chris Salomone redesigns a set of built-in cabinets.
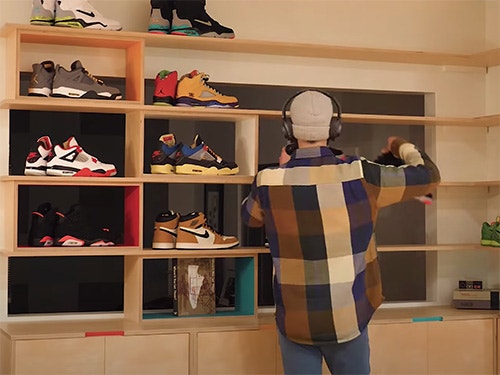
Chris Salomone was never able to fully utilize his living room, due to the awkward shape of the room. This project focuses on making custom built-in cabinets and shelving to handle the space, which will hopefully make it look and function more nicely.
You can find more great projects and techniques from Chris Salomone at his website.
Featured Tools:


Chris Salomone: As you can see, we're in the middle of a living room renovation, and that's going to be for a completely different video, but in this, we're going to focus on doing some built-ins into this dumb little niche that we have in this room. Here's the idea.
I'll probably get more into it in the living room remodel video that I'm still working on, but for the purposes of this video, the only important things to know are whenever they did construction here in the '70s, they bumped out where this room ends by about three feet, creating this weird little curve that looks into the room that they had it on. It's always been really underutilized by us. I decided to put something in here that would give us a lot of storage, and hopefully, make the room look nicer. What you see me drawing here is what became the final idea.
That said, I went through a lot of ideas before I settled on this one, things that were more furnitury, things that were more like a traditional built-in, weird things where shelves were suspended from the roof, things that were more open, a lot of ideas. I ended up really liking the idea of keeping it open, but that posed the problem of long spans with no support.
I played with metal inlays, doubling up the thickness, and a few other ideas that I'll probably use later, but nothing was really clicking for me for this particular build until I had this idea, which was basically to put some cleats in the curve that I can paint to match the wall and then supporting the other side with these modular boxes that I can paint bright pops of color to match the handle detail. All right. That's probably enough background for now. Let's just get to building.
Now, obviously, what I'm building here is going to be highly specific to my particular situation, but I still want this video to have some value beyond just entertainment. I hope that, that can come in the form of maybe giving you some ideas for things that you can do in your situation, whatever it may be. I'm also going to try to give some more macro tips or takeaways, or just things that I did or would do next time that don't have to do with any specific situation, but rather just built-ins or even just large plywood projects in general.
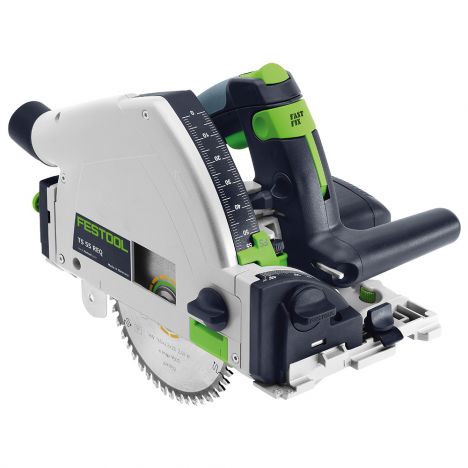
As you can see here in these shots, we're just breaking down sheets of plywood into oversized chunks. My favorite way to do this is using a track saw to make the initial cuts, getting everything broken down into smaller sections, and then I can start yielding my individual pieces on the table saw. A question that I get a lot when it comes to honestly, any woodworking project, but these kinds of projects, in particular, is do you use some kind of software to generate a cut list? I do, but not any kind of fancy plugin.
I model all my projects in SketchUp before I build anything, and there are plugins that you can use to auto-generate cut lists, but here's why I don't use them. First, unless you're running a cabinet shop, it's probably not really going to save you that much time. I do maybe one project like this a year, and to manually figure it out, takes me maybe 10 or 20 minutes so it's not really a time-saving tool for me.
Second, a lot of people like to use them because they can help you to batch your cuts in the most efficient way possible to cut down on waste. For me, my main concern when it comes to efficiency really has less to do with how much material I'm using, and a lot more to do with minimizing inconsistencies. For example, I used eight sheets of plywood on this project, and if I were more efficient, maybe I could have gotten away with seven, probably not, I don't even know.
When I'm laying out my initial cuts, I'm really paying more attention to things like, where my parts are coming from. For example, the doors, I want all of those to come from one piece, and I want the grain to run in this direction, which is perpendicular from the more common way that you would cut them. The reason for this is so that the grain will continue from door to door across the front of the piece once it's all assembled. Now I'm sure there's ways that you can do that in the software, but who knows.
The other, and probably more important thing that I'm paying attention to are things like similar dimensions between pieces. For example, my vertical partitions/side pieces to make sure that my boxes come out as square as possible, I really want to finalize their dimensions at the exact same time because they need to be the same. That means one table saw-setting and cutting them all at the same time. This is just one example of that. The same would be true for the bottom panels and the back slots, the aforementioned doors and the list goes on and well, actually it ends there.
Anyway, that's what I'm doing in this time-lapse here, basically just breaking down everything that I'll need in order to make my four cabinets, and then cutting all of those pieces to their finished dimensions. That's also the reason that I'm bouncing around with pieces a lot because I'm essentially trying to minimize the number of times that I adjust my fence setting. I'm not going to touch any of my other parts at this point, as it already gets confusing enough with 30 pieces lying around, let alone 60.
With all of my pieces cut to size, next we can start putting our cabinets together. To do this, I'm going to be using a combination of pocket screws and regular screws. To cut all of my pocket holes, I'm using this updated version of Kreg's pocket hole system. This was actually my first time using it right here on camera. While I wouldn't say that there's anything wrong with the old version, they've definitely added some really nice features to this new one.
I don't want to turn this into a review video, so check out my Instagram if you want more information on that, and I'll make a highlighted story. In any case, with everything drilled, the last thing to do before assembling, was drill some shelf pinholes. Since I'm not really sure what we're going to be keeping in here, I use this Rockler drill to drill the same five identical holes into each cabinet, and then with that done, we could assemble.
At this point, our boxes are done and we can start attaching things together. We're going to go ahead and get the three-front facing boxes all nicely aligned, and then use screws to attach them. On the skinny cabinet, the face is perpendicular. I'm going to attach these little mounting plates along about half of the front of the top and bottom of the cabinet. You can see here in this animation that will use those plates to attach to the cabinet to the others. We're going to wait until it's actually at the house to do that since attaching it now will just make things really hard to move around.
I'm also going to use a Forstner bit to drill out a few holes for cable management. The way that it is in my house, we have an outlet that's pretty much in the center of this middle cabinet. I need to put a series of holes that lets me run an extension cord from the center cabinet, through the right cabinet, and into the skinny cabinet where I can attach it to a surge protector, but as luck would have it, my coaxial cable comes through the floor of the house here.
In the living room renovation video, I'm going to be running that along some baseboard, and then so that we can feed it through, I'm going to be putting another hole in the bottom of the skinny cabinet. Then, finally, I'll have one more hole in the top-back corner, which I can use to plug in the electronics, and then we can plug it with one of those cable management grommet things. All right. While we have everything attached, we can go ahead and take a couple of measurements so that we can cut our top and four shelves to size.
Here we can't quite finalize everything as it's going to need some fine-tuning when we install. Basically, we can rip almost everything to its finished width, and then we can cut the long part of our L-shaped shelves to their finished length, but we're going to have to leave the ends of the shelves long for now by about two inches. We're going to leave the cabinet top long on both ends at this point, as well as a bit too wide in the short area. I'll explain that more as we go to install everything.
Really the only thing that we're focused on here is making sure that the width is correct and that the front edge is flush with our cabinets. All that said, we'll glue up each L-shaped assembly, and then once the top is dry, I'm going to mark out a few spots on the top where we can cut a little notch for our door handles. To do that, I just made myself a quick little template out of some MDF, and then clamped that in position and routed the shape four times. I'll show how these work with the doors in a minute.
For the actual doors themselves, we're going to start off by grabbing another piece of plywood and ripping it to the finished height of the doors. Then we're going to crosscut that strip into four sections, which will yield our seven doors. At this point, the pieces would look like this and we're labeling everything so that we can keep track of their positioning. Then we'll take a couple of measurements off of the boxes so that we can rip out each individual door to give us the exact sized gaps that we want, which is 1/16 of an inch.
Going back to the way that the doors work, next we are going to set up a router with a Round Nose Bit, and we're going to cut about four inches in along the inside top edge of each door. The way it's going to work after everything is assembled, is we'll end up where the notches in the top reveal this negative spot where you can get your fingers into and pull the door open. The only outlier here is that we're going to need to cut a few inches further in on the door that goes in the perpendicular cabinet.
The last thing that we needed to fabricate before we can get to the installation, were these four boxes that are going to act as half of the support structure for our shelves. I started off by ripping a few strips to 10 inches wide and then cross-cutting 8 of the pieces to 11-3/4 of an inch long, and 8 of the pieces to 20-1/2 inches long. To assemble, I'm going to be using pocket screws again, as once everything is in, it's going to be hidden by the tops and the bottoms of the shelves so you're not going to see anything.
That said, before I actually assemble anything, I'm going to go ahead and roll on a few coats of paint.
With a few cuts, we've finished on everything, we could finally get to the install. I was filming that whole time. At the house, we started off by getting the toe kick into place and then putting the cabinets in. You can see that we purposefully left the cabinet that goes in the nook about half an inch smaller than the opening. Then we used a couple of clamps to hold the cabinets in position while we screw them together. Here we're paying most attention to making sure that the corner where the two cabinets meet is as close to 90 degrees as possible.
Next, we set our top into position and marked out where we would need to cut it to get it to fit perfectly. That said, we had to cut it about 3, 8, 7 inch shorter that because the wall has this huge bulge in it, which would have made it impossible to slide in if we cut it to fit any closer. In addition to that, this corner is a slightly acute angle, so we had to trim a bit off of the back edge at a taper until we get the best fit that we could.
Actually, you could see in the shot, we have both of the corners lined up really nicely, but the wall's concave, so there's a gap in the middle. To get that right, you could either scribe a line, and then cut a gentle arc on the back, but I'm going to do some moldings which are covering the living room renovation video that will be out soon.
At this point, we could finally attach our top to our cabinets. Everything is looking good except for this end, which we had to leave long since we weren't sure where we'd be cutting the back until we got it in here. To take care of that edge, we're going to be using a router with a flush-trim bit. I have to do a little bit more sanding and wipe on some poly here later.
Next, we could reattach all of our door hardware, and get those put in and adjusted. We did this a little bit before, but you really have to wait until this point to finalize anything, since things are going to move around a bit when you get the cabinets into their final position. Next, we could start installing all of the shelves. In this shot on the right side of the frame, you can see a little plywood runner which is what the first shelf would sit on. Basically, I build the boxes to be 11-3/4 of an inch tall, and these runners are 1-1/4 wide.
I also cut myself a spacer piece that was 10-1/2 inches wide or in other wide words 11-3/4 minus 1-1/4. Then I could just set that in position, attach the runner on either side, attach the box, set the shelf in position, and then do the same thing again working my way up until everything was attached. We also had to cut each shelf to fit the cove, since we had left them long initially and we also had to cut that same taper on the back edge just like we did for the top to deal with the acute-angled wall.
Now, aesthetically, something else that I had to consider was the fact that everything could be seen from both sides, so we decided to build the top of the cabinets 3/4 of an inch lower than the opening. That way the inside of the bottom panel of the first box would sit flush with the opening. We also staggered the boxes so that the inside edges align to act as a column from the top to bottom, and the entire box assembly sits so that the inside faces of the boxes closest to the edge would sit flush with the face of the opening in the wall.
Initially, I thought that I was going to have to attach at least one of the shelves to the wall with an L bracket just to keep it from being able to pull away, but I was surprised by how rigid everything was. I decided to skip that for a cleaner look, and if it becomes a problem, I can always add it later.
The last things that I still need to do on this are to add some trim, add some molding and paint the shelf supports to match the walls.
Keep the inspiration coming!
Subscribe to our newsletter for more woodworking tips and tricks