Video: Barn Door Dog Crate and Entertainment Center

In this video, DIY Creators builds a multipurpose dog crate that can be used as a TV stand.
Treat your pet like family with a comfortable dog crate that doubles as a piece of home decor. Glen from DIY Creators explains how in this project video.
You can find more great projects and techniques from DIY Creators at their website.
Featured Tools:


Glenn: What's up guys. Right now, we have this as a pet crate. My biggest issue with this is not attractive, no matter where you put it, but I know how to fix that. I'm going to be building a dog crate that doubled as a home entertainment center that you can blend into your space. There's so much work involved in this project and thanks to Rockler for sponsoring this video. We're going to make it happen. Let's do this.
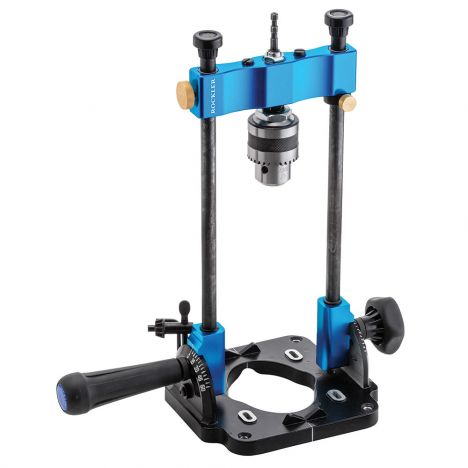
I need to make two side panels for the crate, and these need to be identical. To ensure that I'm going to clamp everything and mark it all at the same time. Once I've marked the first two-by-four, I use the speed square to carry that line across the rest. Now I need to place an additional line going across the existing line. This line should represent the center on each two-by-four. I have a lot of holes to drill here and in order to speed through these with the accurate depth, I'm going to be using this portable drill guide.
I want it to have some sort of rails in dog crate. This way the dog can look out. I look for all sorts of solution but the first idea I came up with for these was half-inch rebars. I wasn't that excited about the texture on the rebar, but it was something I was going to live with. I ended up siding with the conduit because it was lighter, easier to cut, and it was smooth. After cutting a number of these, a screw clamps seemed to be the best solution to hold the pipe as you cut. I made all of my 90 cuts at the miter saw and for the angles, I set those up and marked them in place, and then I used the handsaw to cut these.
These angles were not exactly 45 degrees so I felt like lining them up and making the mark seem to be the quickest solution here. Now that I have all the parts cut to size to build a sliding barn door, I mark the location to drill the pocket holes. I know I had to pay close attention to the angled part so I started by building the frame first. I used an assembly square to hold the joint intact as I installed the screws. With the frame closed up this angle part should fit nicely./p>
My suggestion is always mark pocket holes before you drill them, especially when you're dealing with odd angles. You want to make sure all your pocket holes fit the inside and they can stay hidden. Now you just go through the same pocket hole drilling procedure, and we'll be right back to assembling this frame. This frame actually came out pretty good. It's not warped or twisted. If your workspace is completely flat and you're using clamps as you're assembling it, you should have similar results.
With the pack holes facing up I'll apply wood glue this side of the frame. Now I'll place the plywood panel on the doorframe and nail it in place. You can get away without a nail gun here, but you'll have to just place weight on top of this. The back and bottom of this crate is made from three-quarter inch plywood. Due to the size of this dog, I needed two, I used a circular saw to cut the plywood down to a manageable size and you don't need a table saw for this. The same cut can be made with a circular saw. Now I use the remaining parts of the plywood, cut those down to create the panels.
Before attaching the back to the bottom, I lay a bit of wood glue in between a joint. Then I'll secure that with pocket hole screws. The plywood panels I just cut will fit into these dado slots in the two-by-four. After making a couple pass, I should have the proper depth for this slot. I'm going to shift my attention to building the panels. There's three of these, there's a large one that's going to go on the front side of the panel, and then there's going to be two identical one that's going to go on the side. After applying the glue to the channel of both two-by-four, I'm going to take the plywood place that inside the two-by-four, and then take the other two-by-four and rest it on the top.
Now, I'll double-check that all the parts are aligned to each other and use clamps to lock those pieces together. The pipes here are not as clean as they could be, so I use 120 grit sandpaper to sand these down, and doing so would also prep the surface for paint. Before assembling all the parts, now it's a good time to go ahead and sand down everything. There are a number of ways to join these parts together. You can use traditional screws. You can use pocket hole screws. You can use biscuit joiner, and you can also use dowels. Throughout this project, I will be using a number of these options.
For this section of the project, I'll be using dowels. Once I have everything lined up the way it's supposed to be assembled, I'll use a square and mark a line going across the two parts that touches each other. Now I'll line up the guidelines on a dowel jigs to the ones I marked. Clapping the jig to the two-by-four will lock the jig in place and prevent it from shifting as you drill. I'll repeat this process over and over again until I'm able to drill all the holes, but focus on one panel at a time, and if it helps go ahead and mark the panels on both sides so you know which part realigns once you get ready to assemble it. I use 3/8 dowels here but I feel comfortable with just about any size.
Before assembling I'll apply wood glue to the areas that needs to be joined. This will be the side panels and the dowels. If you're building this or something like it, always dry fit before you apply glue and you want also have everything you need next to you. As you apply the glue, you can continue to just put it all together like a puzzle. If you don't own a lot of clamps, band clamps are something you cannot go wrong with. Based on my experience, these do a great job with squaring things up, but I always double-check just to make sure things are aligned and squared. They work great for a number of application, but in my situation here, the middle is a weak point it may not have the best clamping pressure to it.
The clamps I have here do not open wide enough to clamp this panel. In this case, you can put two of them together. I'll set this off to the side, allow the glue to set up and get started on the next one. I made a lot of changes throughout this build and one of them was this top. Originally, I was going to join a number of two-by-six together to build a top out. I switched from that idea to using plywood. This is a three-quarter-inch oak plywood. Now I wanted the thick look on the top. Instead of using two sheets of plywood and laminating them together, I use the cutoff to build a perimeter going around the top, this way I can give the illusion that the top is this thick.
With this idea, I save from buying a new sheet of plywood, and I also keep the weight down. With the glue applied to these parts I then use a nail gun to nail these on. Keep in mind this is going to be hidden, so you can also use screws to secure these. To hide the plywood layers in the top I used a piece of one-by-two oak. As long as I have all the parts align with each other, I'll use a brad nailer to nail the trim on. I added the joint to give a clean look going around the top.
Now everything is ready to be assembled, and I'm going to start by attaching the sides first. To attach the sides, I use pocket hole screws to ensure that I have no visible fasteners. Building each panel separately and then putting it out together was a different approach for me but I actually like this concept. Just like the side panels, the bottom is secured to the front panel for your pocket hole screws. To join the front panel to the sides, I'm going to use screws, but I use a dowel rod to keep the screw head hidden.
First, I drill the hole big enough for the dowel to sit. Then I'll drive a screw into each hole and into the adjacent two-by-four. Now I'll force the dowel into the hole and cut it off. I spray painted the rods black this way in the final product, they will stand out. I sanded the top down using 120-grit sandpaper on the first pass and I came back over that once more with 220 grits. That removed all the swirl marks.
When I use a softer wood like pine, I typically go with a pre-stained conditioner. Normally, that prevents body blotched areas in the stain. When working with wood like oak, I've had good results skipping pre-stain conditioner. I'm using a hickory gel stain, and you can apply this with a rag or brush. I rather use a brush, it's just a faster way of applying this. The minute I finish my last brush stroke, I get a clean rag and remove the stain. I apply the same thing to the door and although it's a different wood, the tone may be a bit different than it is on the top.
Before painting, I've got some prep work to do and the first thing I'm going to do is tape off the rods. I use the orbital sander to clean up the dowels and sand down the entire crate. When using dimensional lumber, these are not perfect. I went around and marked all the areas that needed some additional attention, areas that had knots, chips, holes, cracks, and cuts on it.
I used wood filler to fill in those visual imperfections. I'll be spraying the crate and for this, I'm going to be using a pure white water-based paint. This is a two-in-one paint and primer mix and although you can use whatever paint you want, the paint primer mix is good to go right on the bare wood and this also helped me speed up the process. I'm using Rockler's HVLP Finishing Sprayer and you've definitely seen me use this in the past. I actually like the sprayer because of how simple it is to use and clean and it's one of the reason why I want to spray more things.
At this point, I put on two coats of paint and from here on out, I'll be putting this all together. Right now, I have the crate upside down. This way I can drill all the holes for the casters. The bottom is only made of three-quarter-inch plywood and I don't want the hardwares coming through on the inside. Luckily, I have insert nuts that doesn't go all the way through three-quarter inch plywood. Using this drill guide, take all the guesswork out. Once I line it up to the location, I just drill. Adding casters to this project was an idea that came during the build. I think the casters will make it easy for anyone to move this.
They are locking casters which is great. Wherever you decide to place this, you lock it in place and it never moves. At this point, I'll install the barn door system. I added the hardware to the door then I installed the track to the front. For the time being, I added the stop to the track and I'll fine-tune this part later. The top will not be installed until this gets to its final destination. The top will be secured with these small brackets along the side and the front. I plan to secure the backside with pocket hole screws. This way the brackets are not visible from the front looking in.
Finding a way to lock this door was the most challenging part for me but I ultimately settled on a surface bolt. I'll use two of these surface bolt placing one on each end. This way I can lock it in an open position and lock it in a closed position. This bolt kit comes with two different keepers, a surface keeper, and a mortise keeper. With the current setup I have, neither one of these will work so I have to make my own. I had a scrap piece of flat bar aluminum that I used. I drilled a couple holes in it then use a file to shape it. After that, I cut it to size and then filed off the corners to make it safe.
Now I'll drill two holes in it so I can mount it to the bottom of the crate. To make this blend in and don't look out of place, I need to paint it. I made a quick holding arm and attached a universal shell hook to it. This way I can hang the plate off of it. As a way to secure this plate, I'll drill a couple holes and then install the threaded nuts. This is the quickest solution I can come up with as a modified keeper. It's strong enough to keep the door closed and best part about this is it's out of the way.
It's placed in the middle so it's always under the door. If you lock the door close, it's under it and if you lock the door open, it's under it. At the moment, we decided to not put a handle on here. This is something that can be done at any point. The more we use this, the better we'll know. I found a damaged box of laminate flooring which I negotiated down to $15, not needed, but it works.
I think the flooring is a great touch to this pet crate and most importantly, it's easy to clean. The design of this crate should keep the shedding hair on the inside. One way to make this fit like a piece of furniture in a room, add some LEDs to it. My daughter loved this and wants one for herself, just what I need, more work, but before we turn this over to Thor, we're going to enjoy this.
When you have a pet, it's part of your family. They require their own space and oftentimes you don't have that space to give up. One unique way is to blend them into the things you already have such as the home entertainment center. This is a simplified version when you think of an entertainment center, but you can get creative and add all sorts of storage in this. You know what works best for you. All right guys, there you have it. Not bad for pet crate, huh?


Keep the inspiration coming!
Subscribe to our newsletter for more woodworking tips and tricks