How to Make Wood Veneer Sheets With the Caul Veneering Technique
Most woodworkers who start experimenting with veneer quickly face a dilemma. They need to cover a surface wider than the capacities of their clamps but they don't want to purchase a costly veneer press. Don't fret; try caul veneering. It's cheap, easy, effective, and adaptable to most of the situations you'll come across.
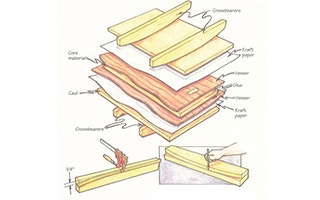
Caul veneering is a simple idea consisting of two easy to make wood devices known as cauls and crossbearers. Cauls are pieces of 3/4" particle board cut slightly larger than the core that's being veneered. Crossbearers are long pieces of hardwood with a slight arc cut on one side. When used together these devises transfer clamping pressure to the center of the core, across the veneer, and then out to the edges. This technique eliminates the chance of trapping glue pockets between the veneer and its core. To form the arc, clamp a thin wood strip to the center of an oak crossbearer and bend the strip so it's 1/4" from the edge at the end of the board. When the crossbearers are clamped onto the cauls they evenly distribute pressure over the entire width of the veneer.
Prepare the Veneer and the Core
Using the techniques described in my previous two veneering articles Splicing and Joining Veneers and Veneer a Drawer Face, splice and join your veneer sheets together, and cut the particle board core to its finished dimensions. Always remember that when you veneer you need to create balanced panels. This means you must apply veneer to both sides of the core, keeping the grain running in the same direction so that the finished panel won't warp.
Making the Cauls and Crossbearers
After much experimentation I've come to the conclusion that oak makes the best crossbearers. Cut your crossbearers l 1/2" thick, 2 1/2" wide, and 36" long (or longer if you anticipate the need to clamp wider veneer). The number of crossbearers needed depends on the length of your veneer. You'll need a set of two crossbearers at each clamping position, and enough to space the sets at 4" intervals along the length of the veneer. Cutting uniform arcs on the crossbearers is critical so they evenly distribute pressure across the width of the veneer. Draw the large radius of the arc by tracing along a thin flexible strip of wood clamped at the center of the crossbearer and held back 1/4" from the edge at both ends, as shown in the image above. Cut away the waste and sand the sawn edge smooth. Use this finished crossbearer as a template for cutting out one more crossbearer. Clamp these two crossbearers together at the ends with their arched edges facing each other. Look at the joint between the crossbearers to see that there are no gaps and that pressure is being applied over their entire length. Make any necessary adjustments, then use these first two pieces as templates for laying out the. arcs on the rest of your crossbearers. Cut out the remaining crossbearers and sand them to match in pairs. The two cauls are cut from 3/4" thick particle board, and are made 1" wider and 1" longer than the core being veneered. Clamp the crossbearers at 4" intervals and space additional clamps around the perimeter of the assembly to hold the edges.
Gluing the Veneer to its Core
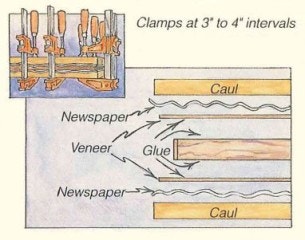
When faced with clamping large sheets of veneer I use a slow setting glue, like white glue, to give me more assembly time. On smaller areas I prefer to use yellow glue for its fast drying qualities. Have everything ready before you begin, including tools, glue, newspaper, clamps, cauls and crossbearers, and an extra set of hands if you've got them. Pour glue onto one side of the core and on one sheet of veneer, and use a 3" or wider paint roller to spread the glue to an even coat. Position the glued veneer on the core so there is an equal amount overhanging all the edges. Place a piece of kraft paper on the face of the veneer, then set one caul on top of the paper. Flip over this assembly and repeat these steps to glue the remaining veneer to the other side of the core. Clamp a set of crossbearers across the middle of the cauls and apply clamping pressure until the crossbearer ends touch the cauls on both sides. Check to see that the veneer sheets haven't slipped out of position. Working toward the ends of the veneer, clamp on the remaining crossbearers at 4" intervals. Place additional clamps between the sets of crossbearers near the edges of the cauls and use more clamps across the ends of the cauls at 4" intervals. Look at the joint between the veneer and the core to see if glue is oozing out its entire length. If there are dry spots, that probably means there's not enough clamping pressure, so add a few more clamps and turn the cranks a little further to bear down on the crossbearers. After allowing the glue to cure overnight, remove the clamps, crossbearers, and cauls. Next, peel away the kraft paper, trim off the overhanging veneer edges and sand the faces of the veneer smooth. Now you're ready to use your veneered panel for whatever project you've planned.


Keep the inspiration coming!
Subscribe to our newsletter for more woodworking tips and tricks