Using a Small Scale Dehumidification Kiln
Saving money by drying your lumber may not be the answer for every woodworker, but the basics shown here demonstrate that it is within the reach and skills of the average person.
If you intend to kiln dry lumber from a green state, right off the sawmill, you will need to be well-versed in airflow rates and follow a detailed drying schedule. Drying lumber too quickly can lead to deep end checking, warping and case hardening. Case hardening is a defect caused by the outer portion of a board drying quickly, while the inner portion dries more slowly. This can create internal stress in the lumber that is released when sawing. If severe enough, the lumber can develop honeycomb cracks throughout.
If you intend to kiln dry lumber from a green state, right off the sawmill, you will need to be well-versed in airflow rates and follow a detailed drying schedule. Drying lumber too quickly can lead to deep end checking, warping and case hardening. Case hardening is a defect caused by the outer portion of a board drying quickly, while the inner portion dries more slowly. This can create internal stress in the lumber that is released when sawing. If severe enough, the lumber can develop honeycomb cracks throughout.
However, if you kiln dry hardwood lumber that has already been air dried, the process is much more forgiving. Most species of hardwood lumber can be safely dried this way, once the moisture content is 20% to 25% or less. The fact is, most of my stacks of lumber air dry to 15% moisture content before entering the kiln. I hope that the sawyer coated the ends of the lumber with Anchor-Seal® or oil-based paint when it was green. This slows the end-grain drying and limits the severity of end checking.
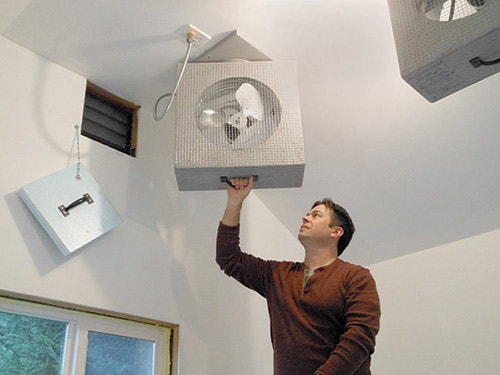
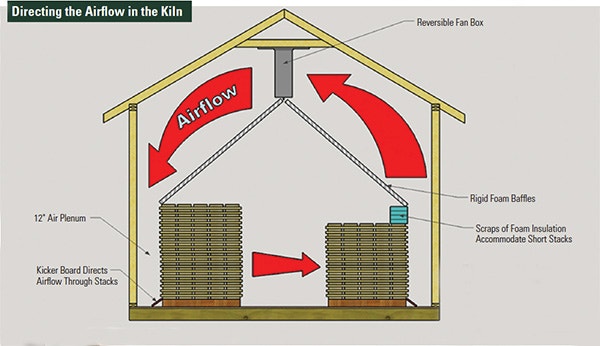
Attic fans are a perfect way to provide airflow over the stacks of lumber. They are normally mounted in the gable of household attics, and they are designed to be used in high temperature environments. My kiln uses four ceiling-mounted fans, each rated for 1,600 CFM. For single-stack kilns, stationary fans are adequate. With two-stack and three stack kilns, it is better to have reversible fans to alter the direction of airflow mid-cycle. This prevents "dead spots" inside the chamber that experience limited airflow.
Instead of using expensive electrically reversible fans designed for commercial kilns, I came up with a simple hardware solution. A lazy Susan with 180˚ detents mounts the fan box to the ceiling. I then manually rotate the fan boxes halfway through the drying cycle. Also, since heat rises, ceiling-mounted fans have the added benefit of circulating the warmest air over the lumber.
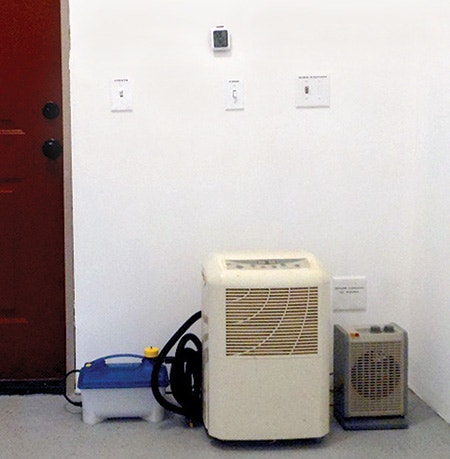
A household dehumidifier (DH) removes moisture from the kiln chamber. By setting the relative humidity (RH) on the dehumidifier, you can control how often it runs. A higher humidity setting will run the unit sporadically to maintain that RH. A lower RH setting will call for the DH to run more often. There are two ways to remove water from the DH unit, and they both work well. The water tray can be removed and emptied manually, or a hole can be drilled through the wall of the shed to pass a drain tube. This will allow the DH to drain automatically without you needing to enter the kiln. I prefer to empty the water tray manually and record the volume of water collected. This gives me a secondary method of tracking the drying process, using both water volume and moisture content (MC) readings.
A small electric heater supplies auxiliary heat to maintain adequate kiln temperature. In smaller kilns, the heat generated by the fans and DH motor is sufficient to maintain temperatures in excess of 100 degrees. In larger kilns, the heater may be needed in the latter part of the drying cycle. For all kiln drying schedules, a heater should be used to sterilize the lumber and kill any insects that may be present. For a kiln temperature of 140˚ F, sterilization takes three to five hours. With a 130˚ F kiln temperature, sterilization will take 10 to 12 hours (Dry Kiln Operators Manual, 1991). These figures hold true for lumber up to 2" thick. For sterilizing thicker lumber, additional time is required.
Select a heater with an adjustable thermostat and a tip-over shutoff. This will allow the heater to cycle on and off automatically, according to the kiln operator's setting. A heavy-duty 1,500-watt space heater works fine.
A Typical Cycle in a Shed Kiln
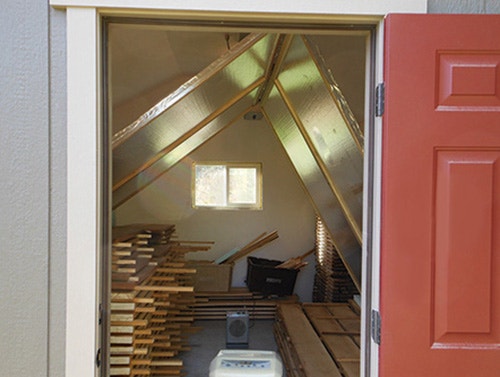
Loading the kiln begins by rousing my sons and letting them know I’ve planned a day of work. After a short period of grumbling, they join me to lay down wood blocks for the first layer of lumber. I like these "starter blocks" to raise the lumber a few inches off the floor. I either use some cedar 3" x 5", or 4" x 4" stock. The starter blocks should be as long as the stack is wide.
Each layer of lumber is separated from the next by a series of "stickers" or spacer sticks. The stickers are uniform in size and usually 3/4" or 1" square. Milling the stickers square is advantageous over a rectangular cross-section, because no matter how you place the stickers they will form a level stack. Another common sticker size is 1" x 2", and these work fine as well.
Place a sticker at each end, and every 16" along the stack for 4/4 stock. Sticker spacing can be increased to 24" apart for 5/4 or thicker hardwood. Align the stickers over the starter blocks on the first course. Then align each subsequent layer of stickers over the last. This helps keep the lumber straight during the drying cycle; in fact, improper placement of stickers can permanently deform lumber. The thinner the stock, the more critical sticker placement becomes.
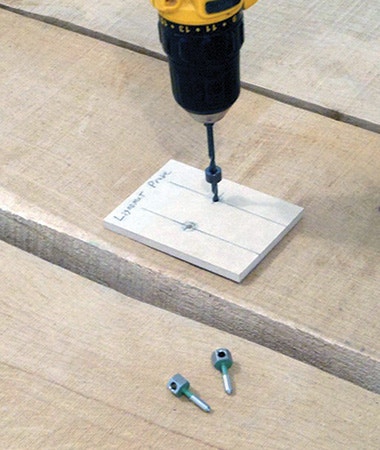
Place some sample boards in the stack that will be easy to pull out for moisture testing later. Once all the lumber is stacked and stickered, place baffles over the lumber. The baffles direct airflow over and through the stack and prevent the top layers from drying too quickly. My four main baffles consist of sheets of 1" Styrofoam™ insulation. I made a simple frame from plywood strips and attached the insulation sheets to them with screws and fender washers. This makes lightweight baffles that can be easily moved and repositioned.
Apply foil tape to the edges of the main baffles to help protect the Styrofoam™. My baffles hang from T-bar assemblies mounted to the ceiling. The T-bars are made from 1/2" galvanized pipe and are attached to the rafters with threaded pipe flanges. To hang the baffles, simply attach hooks to the plywood frame. I found that brackets for mounting rigid metal electrical conduit work best. Select 3/4" conduit brackets for hanging baffles on 1/2" galvanized pipe.
If your lumber stack is built on starter blocks, you will need to limit airflow there as well. Place a 1x6 board on the floor behind the stack, tilted to a 45˚ angle. This kicker board will help distribute the airflow more evenly through all layers of lumber. Basically, you don't want all of the air rushing out under the stack, so find a way to redirect it. End baffles are also a good idea to prevent airflow from bypassing the stack entirely. For end baffles, I use 2"-thick rigid foam insulation screwed to the main baffles. The baffles do not need insulating properties, and plywood would work just as well.

I cannot stress the importance of baffles enough. Without baffles, the top layers of lumber experience "potato chipping" with cupping, twisting or warping. This problem is magnified if the lumber is thin or flatsawn. Thicker lumber like 5/4 or quartersawn lumber is naturally more stable. In addition, weight on top of the stack can be helpful, but nothing replaces baffles for the best lumber yield. The last thing to do before starting the kiln is to close the gable vent with an insulated cover.
My kiln schedule starts with running all fans and the dehumidifier for two days, measuring and removing water as it accumulates. Initially, I set the DH to 40% RH, because I don’t want to remove moisture too quickly. I usually see a large volume of water in the DH each night when I check the kiln.

An anemometer confirms that your effort constructing baffles was worthwhile. Measure airflow over the stacks of lumber in various locations. Air speed of 350 feet per minute is appropriate for common hardwoods such as oak and maple. Also check that air isn’t escaping around the side baffles or under the stack of lumber. Adjust the baffles or fan direction to achieve good airflow.

After two days operating only the fans and DH, I take note of the temperature. (I have found that remotely monitoring the temperature and humidity with a WiFi sensor can be very helpful. It’s a nice use of technology and adds a measure of safety as well.) If the fans and dehumidifer generate enough heat to maintain a temperature of 100˚ to 120˚ F, then I won't use the auxiliary heater. If the temperature is below this range, I start the heater and adjust the thermostat accordingly. After four days, I decrease the RH setting on the DH to 30% and continue to run the fans.

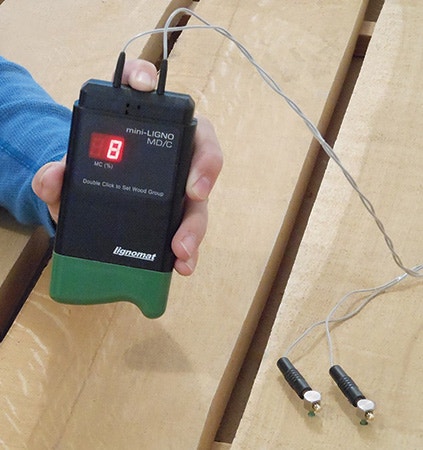
After seven to 10 days, I reverse the fan direction to make sure all stacks of lumber dry evenly. Soon the DH won't show much water collected in the tray. If MC readings still aren’t at the desired range, the heat may need to be increased for the remainder of the drying cycle. Remove samples from the stack, and cut an inch or two off one end. Take a moisture reading in the end grain with a pin-type moisture meter or remote probe.) Once the core readings are 6% to 8% on a fresh cut, the lumber is dry and ready for sterilization. Omitting the sterilization phase can lead to costly losses from insect damage, so don't skip it.

For the sterilization phase, air temperature needs to be around 140˚ F, for three to five hours. Take the electronics out of the kiln, and continue operating the heater and fans during this phase. The DH is not needed at this time, as the lumber is already bone-dry. I find that unplugging the DH is helpful during the sterilization phase so I can add a second heater, without overwhelming my electrical circuit.
Once the lumber is sterilized, it is ready for the conditioning phase. To condition the lumber, I introduce steam into the kiln for about two hours. This returns some moisture to the very dry exterior of the lumber, while not affecting the core moisture level. I use a Rockler steam generator. During the conditioning process, the only equipment operating are the fans, heater and the steam generator — no dehumidifier.


Keep the inspiration coming!
Subscribe to our newsletter for more woodworking tips and tricks