Using Your Router to Cut Dado Joints
The router is the one tool that will handle all the dadoing and grooving you'll do in woodworking. The dado is prime-choice joinery. It follows that hoary adage of woodworking, "Use the simplest joint that will work."
It certainly works. The dado joint has a centuries-long history of use in cabinetmaking, furniture making, just in woodworking in general.
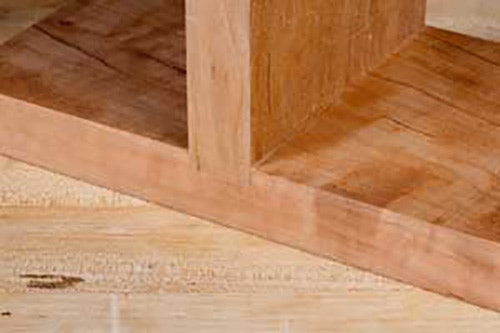
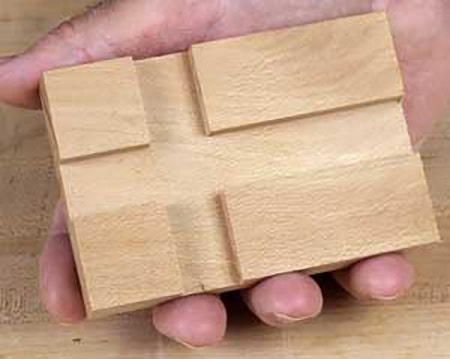
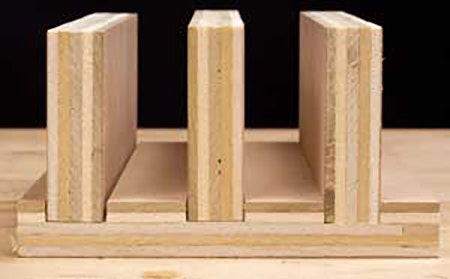
It definitely is simple. A dado is a square-walled, flat-bottomed channel cut across the grain of the wood. (When it runs with the grain, the channel is called a groove.) You cut a dado or groove into one board, and the end of a mating board fits into it. One well-placed, properly sized cut makes the joint.
The dado does not have to be deep to create a strong joint. In solid wood, 1/8" is deep enough, 1/4" in plywood, MDF, or particleboard. Just this shallow channel helps align the parts during assembly, and the ledge it creates is enough to support the weight of a shelf and everything loaded on it. The dado also prevents the shelf from cupping.
The one stress it doesn’t resist effectively is tension. It doesn’t prevent the shelf from pulling out of the side, in other words. Only glue or fasteners can do that. Because all of the gluing surfaces involve end grain, the glue strength is limited.
Keep in mind that a snug fit of mate to dado is essential for a strong joint. The cut must be to just the right width. The bottom needs to be smooth and flat, the sides perpendicular. Glue won't compensate for a rough, ill-sized dado. Get the fit right.
How to cut a dado? A dado cutter in a table saw hogs out through dadoes in no time at all. No question. But the router has a lot of pluses that compensate for its lower cutting speed.
One is that its cuts are precisely sized -- the diameter of the cutter determines the width of the dado. Another is that the cut is invariably clean and square -- no raggedy bottom. Yet another is the router's ability to cut stopped dadoes.
In the end, the router is the one tool that will handle all the dadoing and grooving you'll do in woodworking. No workpiece is too big or too small. Any router will do - large or small, fixed-base or plunge.
Typical Step-by-Step
To avoid problems, be as methodical as you can in setting up a cut. The process includes installing a bit in the router, making the depth-of-cut adjustment on the router, securing the workpiece, and positioning a guide. The trick in routing - as in all woodworking - is to get the setup right (if not the first time, at least before you actually cut the good wood).
How to Choose a Router Bit for Dado Cuts
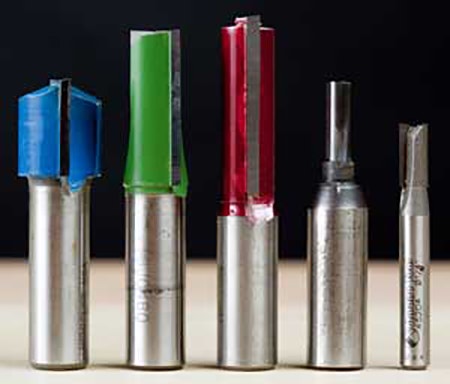
You cut dadoes and grooves with straight bits. That's pretty simple. While you can use specialized dado-cutting bits, the commonplace, conventional straight bit - the double-flute - will give excellent results for all but the most troublesome workpieces.
A variant of the double-flute straight that is valuable for dadoing plywood is the shear-cut straight.
This bit's cutting edges are at a slight angle (usually about 3 degrees) to the bit's axis. A down-shear bit slices down on a face veneer, yielding a cleaner edged cut.
Straight bits are made in an enormous variety of sizes. Cutting diameters range from 1/16" to 2", with flute lengths from 1/4" to 2-1/2". Even metric sizes are available.
So how do you choose? The rule of thumb has long been: Use the shortest length that'll do the job. Dadoes seldom exceed a 1/2" depth, so a bit with the 3/4"-long flutes - a size common in bit sets - is plenty long. Shorter is better if you do a lot of dadoing. For stopped dadoes, make sure you are getting bits that have plunge-cutting ends. Most do these days, but check before you buy.
Setting the Cut Depth
With the chosen bit secured in the router's collet, the next step is to set the cut depth. The conventional wisdom is that the router is a trimming machine, that you should waste no more than 1/4" of stock per pass. Given that 1/4" as about as deep as a dado ever needs to be, you're set for a one-pass job.
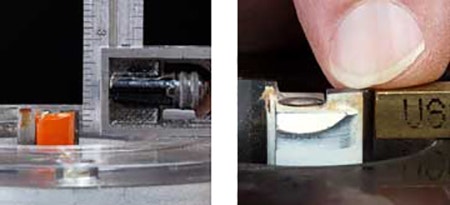
There's no one depth-setting technique you have to use. Hold a small square or rule against the router base beside the bit. Or adjust the bit's top flush with the surface of a setup shim. Use a setup gauge.
However you choose to do it, set the cut depth, and lock it.
Marking the Cut Location
Laying out the cut (or cuts) is straightforward. Of course, you want to locate the cuts so your project can be assembled in proper alignment. But you also want to lay out - locate - the cut in a way that makes it easy to position the guide fence accurately. And you want to minimize the measuring, squaring, and markup.
A sensible way is to mark the center line - and just the center line - of the intended cut. The guide fence then is offset a distance equal to the radius of your router's base. The width of the cut itself is irrelevant with this layout. And the offset distance is the same to either side of the line.
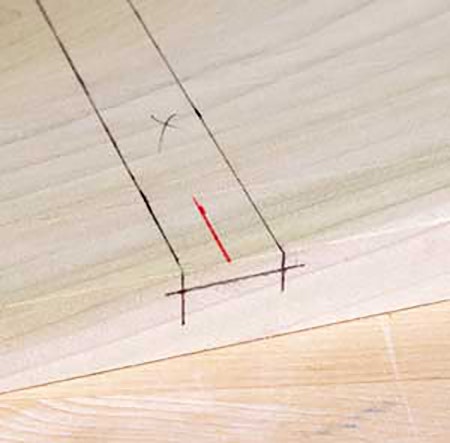
An alternative is to mark just one edge of the intended cut, and offset the fence from that mark with an easily made setup gauge.
Setting a Guide Fence
Choose your guide fence with appropriate care. A scrap is fine, but be sure it is perfectly straight, with a square edge for the router base to reference. It must be wide enough and stiff enough to resist deflecting when the router bears against it and wide enough that the clamps securing it to the work will be clear of the router as you rout the dado. It should overhang the work on both ends so the router can be braced against the fence before the bit engages the wood and again, after it emerges from the cut.

You can use a manufactured straight-edge clamp. While separate clamps aren't needed with such a device, you still need to align it with a square, because it won't square itself to an edge. You've got to check the alignment.
A shop-made T-square, accurately assembled, is a great dadoing guide. It will square itself, and all you have to do is clamp it.
Before clamping the fence to the work, let's take a time out to review router dynamics. You want to harness those dynamics to keep the tool under control. Here's the key: All routers spin a bit in the same direction - clockwise. You want to move the router counter to the bit's rotation, so you move the router counterclockwise.
Try this little exercise. Stand a plunge router on a board, switch it on, and plunge the bit into the wood. Now let go of the handles. It will just stand there, wailing, perhaps lazily rotating (clockwise, of course!).
Regrasp the handles and push the router. The hole will elongate into a groove as the bit cuts a path. But the router won't move in a straight line, your best efforts notwithstanding. Because you are pushing, the router will veer to your left. Pull it; it will veer to your right. In both cases, the router is veering counter to the clockwise spin of its bit.

That counterclockwise veer is what you must exploit. Position whatever guide you are using where the router will bear against it as it is moved. In the case at hand - guiding the router along a stationary fence - the fence must be on the counterclockwise side of the router's path. If you will push the router, position the fence on the left. If you will pull it, position the fence on the right.

So, position and clamp your fence. Measure from the desired cut location, to the correct side, and position your fence. Align it with a try square, and clamp both ends to the workpiece. Feed the router left to right along the fence (or, to put it another way, counterclockwise).
Making the Dado Cut

Don your earmuffs and safety glasses. Plug in the router. Set the base on the work, its edge against the fence, the bit clear. Switch on the router and advance it across the work, keeping it against the fence.

Feed rate is significant. Beginners tend to be hesitant about moving the router through a cut, feeding it haltingly along the fence. They tend to move the router much too slowly. That prolongs the operation and degrades the cutter quickly. The goal is to get a good quality cut without overtaxing the router and the bit. With experience you develop a "feel" for pacing and loading. Without conscious thought, you weigh the power of the router, the configuration of the bit, and even the hardness of the stock. With experience, you develop a feel for how fast you can go.

When the bit emerges from the workpiece, ending the cut, switch off the router and let it wind to a stop before lifting it off the work.
One caveat: When the cut is finished, suppress the urge to return the tool to the starting point without retracting the bit or without switching off the power. While you may get away with the move, the risk is that the bit will snag, pull the router away from the fence, and mess up your dado.
Set the tool aside and take a look at your cut.
Any time you rout across a board's grain, you're going to get some degree of splintering. Most common is blowout - a ragged flap of wood fibers that the emerging cutter folds out rather than cutting off. This flap can tear along the edge, marring it. The best remedy is avoidance: clamp scrap strips to the edges. The blowout mars the scrap, not the workpiece.

Another bit of splintering sometimes occurs along the surface edges of the entire cut - I call 'em "fuzzies." A few swipes with sandpaper remedy the fuzzies. Don't view this as a sign of a dull bit; they simply are symptomatic of cross-grain cuts.

A more malign form of the fuzzies afflicts plywood. Cutting a dado across the grain of plywood's face veneer often lifts splinters that extend beyond the dado's edge, leaving ugly divots. A down-shear cutter may prevent this splintering, because the cutting edges push down on the veneers as they slice.


Keep the inspiration coming!
Subscribe to our newsletter for more woodworking tips and tricks