Using a Cove Cutting Jig
Coves are one of the most common decorative shapes in woodworking. You'll find them in various sizes on furniture, picture frames, crown molding and just about anything else made of wood that incorporates decorative shapes.
Most woodworkers are familiar with cutting this common shape with a router, but fewer are practiced in the method of cutting coves on a table saw. Below, we'll cover the basics of the procedure, with a focus on the makings of a reliable cove cutting jig.
The table saw method has a couple of considerable advantages over the router and cove router bit: A router is limited to one cove radius per bit. A table saw and a single blade, on the other hand, give you almost unlimited options for cutting coves of different proportions. A table saw will also cut coves in large sizes that are well out of range for even the largest routers and router bits. To cut a cove on a table saw, you simply take advantage of the saw blade's circular shape and run the stock over the blade at an angle. By changing the height of the blade and the angle at which the stock meets the blade, you can set up for virtually any depth-to-width proportion of cove.
Still, most woodworkers don't take advantage of the versatility offered by shaping wood on a table saw. Most will consider it only when they need a decorative element that's in visual balance with a certain project, and absolutely can't find a "stock" molding or router bit that does the trick, or when they have no choice but to match a few feet of molding that's no longer in production. We think that has a lot to do with problems in the process - difficult set up, lack of confidence in the procedure, poor results caused by stock movement during the cut, etc. And that, we're sure, has a lot to do with not having the right equipment.
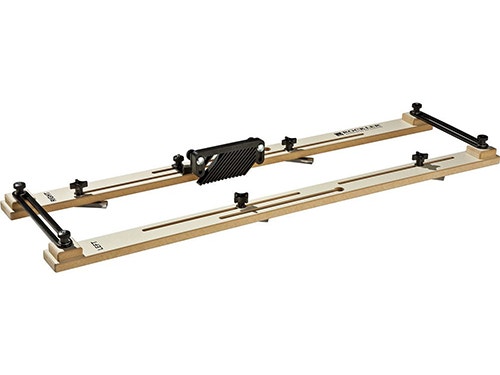
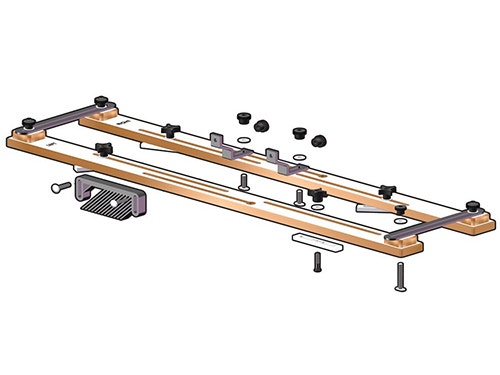
The key element in cutting coves safely and effectively on a table saw is having a good system for guiding the stock over the blade - a good jig, in other words. And in terms of cost, time invested and results, we think the Rockler Cove Cutting Table Saw Jig is pretty tough to beat. It's miles ahead of the typical shop-made jig, and makes cutting coves on a table saw easy and reliable enough to qualify as a "routine" procedure, instead of a last resort. To show you what we mean, here are a few requirements that a good coving jig has to meet, and how the Rockler jig handles them:
Above all, a cove cutting jig shouldn't take hours to set up. Cutting coves on a table saw is already more involved than using a router and router bit: Unfortunately, when you're coving on a table saw, you can't just point a raw piece of lumber in the general direction of the blade and make a perfect cove in one pass. Instead, to cut the cove safely and to end up with a smooth final cut, you have to hog out the majority of the material from inside the cove first, and then make a couple of final passes to smooth out the profile. That, by itself, isn't a major hassle. But if you add in lots of tinkering with the jig - clamping and un-clamping the jig's fences to make minor adjustments, for example, or rigging up a makeshift featherboard arrangement to hold the work flat on the surface of the saw - the process starts to seem a little cumbersome.
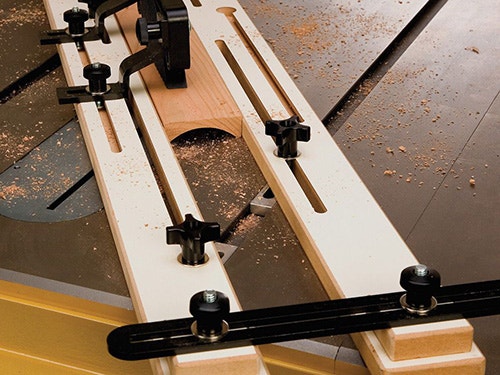
The Rockler jig excels when it comes set up, and especially when it comes to getting the jig positioned and attached to the surface of the saw. Instead of clamping to the underside of the saw bed - which, you may have noticed, isn't as quick and easy as it sounds - the Rockler jig uses an expanding miter track clamping system to hold the jig fences securely to the table. A quick turn of a few knobs locks the jig in place, making adjustments to its position easy and free of undue monkeying around.
The central component of every cove jig is the fence - the straight edge that guides the stock through the cut. The Rockler coving jig is patterned after the tried-and-true "parallelogram" jig design, and therefore actually has two fences - one to support either side of the stock. Here again, locking in the distance between the two fences to perfectly fit the width of the stock is a matter of turning a couple of knobs.
Next, there's the matter of keeping the stock in firm contact with the surface of the saw. A smooth final cut depends on the stock's not being able to move off course horizontally or vertically throughout the cut. The Rockler cove cutting jig's integrated featherboards adjust as easily as all of its other components, and ensure that minor bows in the lumber won't involve you in unpleasant sanding sessions straightening out ridges in the finished product.
Finally, there's the "fear factor." If you've never tried it, running stock the "wrong way" across a table saw may seem a little scary - like forcing a table saw to do something it just wasn't designed for. In reality, when done correctly, cutting coves on a table saw is not a dangerous procedure, and has been practiced without incident by woodworkers everywhere for years and years.
The Rockler cove cutting jig offers the safest arrangement for guiding the stock through a coving cut. The jig's two fences support the stock securely and reliably on both edges, and the integrated featherboard keeps it flat on the surface. It's been thoroughly tested, and comes with a complete set of instructions for performing the entire procedure safely, both of which should add considerably to your comfort level while you're getting used to the process.
Whether you just want to expand your wood shaping options or you need a coving jig to complete a project, a solid, easy to use cove cutting jig is a handy thing to have on hand. And when you find out how easy and comfortable it is to add coves of virtually any proportion to your bag of tricks, the Rockler Cove Cutting Table Saw Jig is likely to fall in with the tools that you reach for on a regular basis.


Keep the inspiration coming!
Subscribe to our newsletter for more woodworking tips and tricks