Turning Cabriole Legs

How to turn in more than one axis to create cabriole legs — a furniture feature made popular in the Queen Anne style.
Multi-axis turning is a furniture-making technique dating to the Queen Anne period. Queen Anne reigned from 1702 to 1714, but she never used a piece of her furniture, nor was the style called by that name until a century and a half later. The style really took off during the reign of George I, her successor, which is why the English call the style Georgian. It was tremendously popular in the Colonies, becoming the predominant style of the eighteenth century. There are fine examples in the collection of Colonial Williamsburg. Elements of the Queen Anne Style are still used in furniture today, and a hallmark of the style is the cabriole leg.

Most cabriole legs were carved, which was expensive because hand work was, and still is, labor-intensive. Cabriole legs were also turned, in a fraction of the time that it takes to carve one. Turned legs were often employed for the back legs of furniture that would be against a wall when the client wanted to save some money. Turned legs were also used on small tables. Most of these legs were turned with converging axes; the exception was the Hudson River Duck Foot chair, for which they were turned in parallel axes. (This chair is rarely made, but if you understand converging axes, parallel is a walk in the park.)
Turn in Converging Axes
Turners created the cabriole shape by turning the leg in two converging axes. The first step is to turn the foot of the leg with the blank chucked on center, as in any spindle turning. The area between the foot and the pommel, which is the part of the leg left square to accept the aprons, is also turned during this on-center chucking.
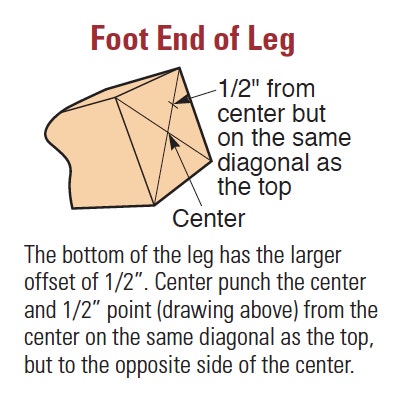
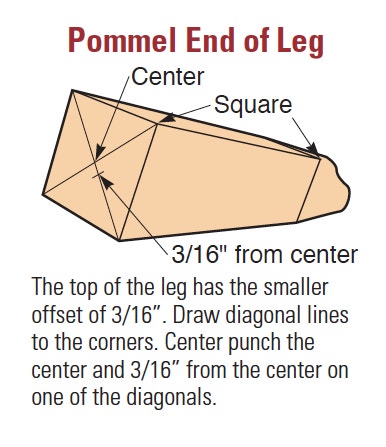
Then the blank is chucked in a new axis with the bottom of the leg being offset considerably more than the top, but in opposite directions along the same diagonal between two corners of the blank. The idea is to have the two axes converge just below the pommel. The leg is now turned in this axis with a lot of material removed at the bottom and practically none at the pommel.
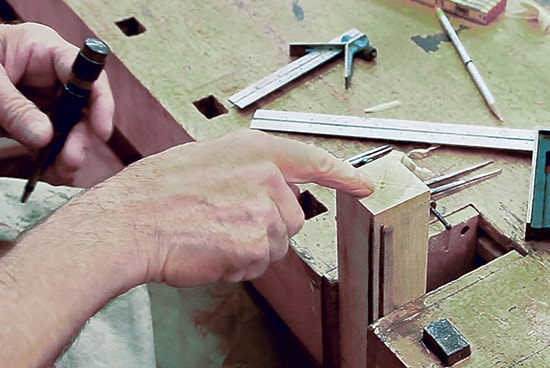
An automatic center punch eliminates setting down the center finder and marking knife to punch marks.
Preparing the Billet
Billet preparation is very important in any furniture turning, but especially so for cabriole legs. For grain matching reasons, I try to cut all the legs for a table from one plank. Milling starts with jointing one face and one edge, then cutting squares with the table saw fitted with a high-grade ripping blade. Because the plank is slightly thicker than the desired leg dimension, a second rip cut is necessary, but I get perfect squares that are dead straight.
Very accurate layout is key to getting consistent results. That being said, I have demonstrated the turning of cabriole legs so many times that I can grab a billet of any size and turn a reasonable leg, guessing at the offsets once I turn the foot. Turning a second one the same would be where the problem would arise.
When putting the measurements onto my stock for layout, I draw diagonals between the corners of my perfectly square billets with the aid of a machinist’s center finder and a marking knife or scribe to draw the lines. I use a set of dividers to transfer the distances, first adjusting them on a steel ruler, then picking up a center punch mark with one leg and swinging the other across the appropriate diagonal to mark the offsets. Draw a line at 7" from the top to denote the pommel.

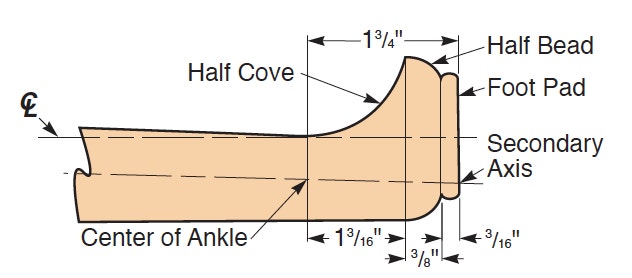
Most cabriole legs have an ankle diameter that is half (or slightly less) of what the billet will turn to. In the case of my drawing 1-3/4" yields an ankle of 7/8". Properly proportioned, most legs will have the ankle at its narrowest between 1" and 2" above the floor.
Figuring the Offsets for A Converging Axis Cabriole Leg
The easiest way to figure the offsets is to draw the leg full-size on a piece of shelf paper. Draw a center line, the pad foot, the half-bead and the line denoting the bottom of the pommel, which is the area left square to accept the aprons. Now draw the half-cove that forms the top of the foot and the ankle. Draw a straight line from the cove that forms the ankle to the bottom of the pommel. Find the center of the ankle. Use a long straightedge to draw a line that crosses through the center of the ankle and slightly below the pommel on the center line. This will tell you the offsets on each end.
Turn the Foot and Shaft

Turning your first cabriole leg will be intimidating. The first part is turning the foot and the shaft to the pommel round. To turn the top of the foot and the shaft, we chuck on the offset marks. Once the lathe is started, the final taper of the leg shaft will reveal itself when you study the ghost.

The hardest part is turning the half cove that forms the top of the foot. This can be scraped in mahogany, but even in this wood, you can obtain much better results by shear cutting with a spindle gouge. I start by cutting a full cove well above where the final half cove will be. I widen the cove toward the top of the leg until the shaft comes round. By watching the ghost, you can see how much wood you have to remove. You can only know that the shaft is round by stopping the lathe and examining it.

Once round, the cove is gradually widened in the direction of the foot. The trick is to get a final light, shear cut across the top of the foot to the shaft in a gentle, pleasing curve. The shaft may now be brought to final taper with a large roughing gouge. I grind mine to 25° and hone it to a keen edge. The final detail is to turn a half cove at the edge of the pommel to lend an eye- pleasing curve that removes the sharp corners.

I sand and apply at least the first coat of finish in the lathe. The result is a stunning leg, hopefully with a well-turned ankle.

Now that you have the legs ready, you can put them to use in your projects. In my fortieth year, I cut a top, made some aprons and assembled a porringer table (from drawings found in Queene Anne Furniture by Norman Vandal, Taunton Press, ISBN 978-0942391077). A porringer is a shallow cup or bowl with a handle, so this may have been the dining table of the Colonial days. You, of course, could use yours for whatever you like!


Keep the inspiration coming!
Subscribe to our newsletter for more woodworking tips and tricks