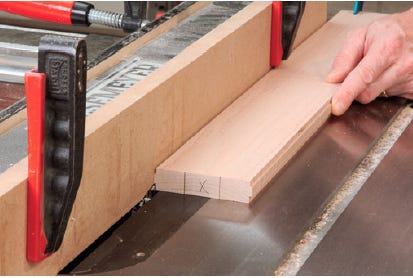
The Tools to Use for Hollow Vessels

These hollowform vases were turned using specialized tools to carve out the inside of the wood blanks, a process most turners can learn fairly quickly.
About 30 years ago, a young turner named David Ellsworth moved to our Pennsylvania neighborhood. He was a rising star in the woodturning world, known for his delicate "hollowform" vessels — as light as a feather, with walls as thin as 1/8" and just one small hole at the top.
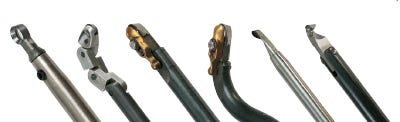
I was mystified as to how anyone could remove all that wood through such a small entry hole. The secret, it turns out, was the combination of specialized tools and techniques that David had devised — straight tools for plunging into the center of a vessel and bent tools of various curvatures for excavating the rest of the interior.
As I discovered for myself, the actual hollowing process is not as difficult as it might seem. There's definitely a learning curve, though, and you can count on some occasionally dramatic failures, so don't forget to wear eye protection when you work. Once you've hollowed a few pieces, you'll begin to get a feel for the tools and techniques. The results are worth the investment.
The Beauty of Hollowforms
The outward appearance of any turned object depends on the character of the wood itself, its shape and any decorative treatments you care to add. On an open bowl, the inside is the most visible part, though if you lower your point of view, you can see the outside shape and the figure of the wood as well. Hollowforms, on the other hand, are visible everywhere but the inside, so you can really showcase a dramatic piece of wood. They also provide an excellent canvas for further decoration, such as piercing, carving or wood burning. Segmented vessels, stack-laminated from several species of wood and hollow-turned, are also very popular.
Types of Hollowing Tools
As hollow turning has become more popular, quite a few manufacturers — including several well-known turners — are serving up a bewildering array of tools for hollowing. Despite the variety, they all hark back to the same basic principles: straight tools for turning the center and bottom of a form, bent tools for the sides and shoulders, and shanks of varying lengths and diameters depending on the depth of the vessel being turned. Where they differ is in the design of their cutting tips, which fall into three general categories depending on their shape and cutting action:
Scrapers come in a variety of shapes and sizes, many with interchangeable or replaceable tips. Typically, scrapers are flat on top and have relatively blunt relief angles. They cut by a scraping action against the inside wall of the workpiece, leaving a roughened texture on most woods. Scrapers are generally presented dead horizontal to the center of the workpiece. The straight scraper is always held horizontal during cutting, while the bent scraper can be dipped downward a few degrees on finish cuts to give a shearing action.

Carbide insert tools have a razor-sharp, cup-shaped cutter screwed to the tip of the tool shank. The replaceable cutter tip may be rotated to expose a fresh edge when needed. The carbide tools are usually tilted at an angle to the surface being cut to create a shearing action that leaves a smooth surface, even on stringy or difficult wood.
Insert cutters should never be presented in a level orientation because their aggressive cutting edges will almost certainly catch, sometimes dramatically. Instead, the tip is cocked or skewed downward and then brought up gradually into the work until the edge begins to engage, so the cutting is always a shearing action.
Ring and hook tools are the most aggressive of the cutters, with edges that are more acute than the other styles of tips. The acute cutting edge makes them best suited to slicing endgrain and less appropriate for cross-grain work. It also makes these tools grabby and apt to dig in and catch if you aren't careful. For this reason, many of the tools in this category come with adjustable shields over the cutter to limit the depth of cut.
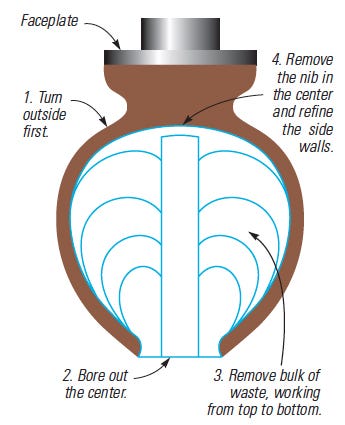
The Hollowing Process
Whichever tools you use, the basic approach for creating a hollowed vessel is from "green to finished" in one session tends to shrink to a slightly irregular or ovoid shape after you've hollowed it, which can be quite interesting. Dry blanks, of course, will stay more circular after they're turned.
Mount the Workpiece:
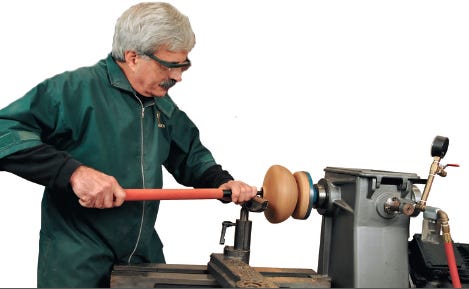
Mount the piece securely on a faceplate, screw chuck or scroll chuck. It's a good idea to use a live center in the tailstock to help support the piece as you turn the outside shape, usually with bowl gouges.
I prefer to turn green wood, because it cuts a lot easier and generates less heat than dry wood, but plenty of people turn dry. You can orient the workpiece with the grain either parallel or perpendicular to the axis of the lathe. Most turners prefer perpendicular, or "bowl," orientation, with or without the pith included. Green wood that is turned for cross-grain work. It also makes these tools grabby and apt to dig in and catch if you aren't careful. For this reason, many of the tools in this category come with adjustable shields over the cutter to limit the depth of cut.
Open the Center:
Begin the hollowing process by creating a hole in the center of the workpiece, either with a drill bit mounted in a chuck in the tailstock or with a straight scraper tool plunged in from the end. You don't need to bore all the way to the bottom until after you've hollowed the upper areas of the form.
Work Your Way Down:
Hollow the inside of your vessel with a combination of straight tools near the bottom and bent tools on the sides and in the shoulder area. Begin near the top and continue downward in increments, working the tip of the tool in whichever direction works best for you.
You'll have to stop frequently to clear the chips that accumulate inside the vessel, otherwise they will eventually seize up around your hollowing tool and could result in damage to your vessel or worse. I stop the lathe whenever the chips need clearing, and then blow them out with a long-nosed air gun attached to my compressor.
Many turners like to hollow the upper neck and shoulder areas before continuing to the lower sections of a piece. This method reduces vibration and chatter and provides the best support for the delicate walls of your vessel as you approach final wall thickness.
It's a good idea to check that wall thickness frequently, especially when you get close to your target thickness. A piece of stiff wire bent into a rudimentary caliper works fine for this, although more elaborate gauges are available.
Once the inside of the piece has been more-or-less cleared out, you can clean up the inside walls of the vessel with very light and careful passes until you reach the uniformity you want. Then, reverse chuck the piece in a vacuum or jam chuck to finish-turn the bottom.


Keep the inspiration coming!
Subscribe to our newsletter for more woodworking tips and tricks