Surface Rough Lumber with a Router

A great technique for flattening the surface of large slabs and odd shaped cross-sections.
Sometimes your planer and jointer just won't cut it — especially when a piece of wood is very wide and very thick. How would you get two opposite faces of an odd chunk of wood perfectly parallel to each other? One way is to use a router and a jig.
If you have a really nice, thick piece of wood and it is too wide to go through your planer, how can you get faces of the wood smooth and parallel? Of course, a hand plane will do the job. But if you are not skilled in the use of a hand plane, using a shop-made jig and fixture like the one shown above is an easy and accurate way to achieve your goal. (And let's just say for argument's sake that you also want to thin the piece by 5/8" or so: this method has a real advantage over hand planing.)
The Jig and Fixture
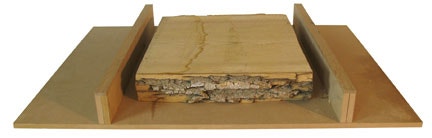
There are two simple components to make: the fixture, which holds the wood and provides two rails for the jig to ride on, and the jig, to which the router is attached. As mentioned, the jig slides around on the fixture.
First the Fixture: Almost always, this needs to be built to match the piece (or pieces) of wood that you wish to surface. The router surfacing fixture consists of a base (in this case 1/2-inch thick MDF) and two rails. Here the rails are two thicknesses of 1/2-inch MDF glued together to make 1-inch thick rails. They are affixed to the base so as to leave about 1-1/2" of open space on either side of the wood that you are surfacing. The rails need to be taller than the thickness of the wood, but not by much. In this example, they were only about 1/4-inch taller than the thickest section of the lumber. Be sure to accommodate any twists or irregular distortion in the wood as you create your rails. If you'll notice in the photos, there are 1/4-inch thick additional pieces of hardwood on top of the rails. They were added because the lumber being surfaced had a good-sized cup in it that was not noticed at first.
Secure the rails to the base with screws driven up from the underside, and you are ready to start the jig component.
The Jig: The jig is just a stiff piece of plywood. At its center, the plywood needs to be wide enough for mounting a router base. The plywood also needs to be long enough for the router to be positioned completely to one side of the fixture, and yet still have overhang sticking out beyond the other rail of the fixture. The rule of thumb here is it’s better to be overly long than to be just a hair too short.
Drill out a large hole in the center of the plywood. There is a lot of sawdust and wood chips flying around as you rout the wood flat, so a sufficient amount of clearance is a good thing for the router bit.

Using a combo-square, mark lines across the jig at the edges of the hole. Next, use those lines to locate and predrill holes to drive in four small screws in a box pattern around the hole (we used #6 x 1/2" screws). The screws are mounted with their heads slightly raised. In use, the screws will stop any side-to-side movement of the jig before the router bit can cut into the rails. As makes sense when you think about it, the screws must not stick out so far as to accidentally engage the stock you are surfacing.

If you have not done so already, mount the router base to the jig, and you are almost ready to get started. Install a wide carbide-tipped straight bit or mortising bit in the router. The wider the bit, the faster the routing work will go.
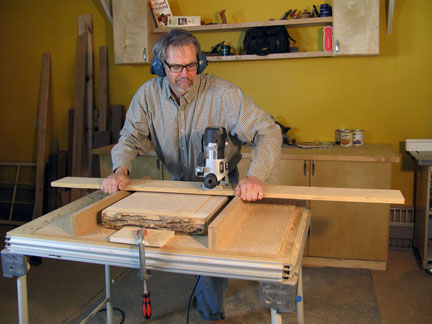
Using the Jig and Fixture: The first thing you need to do is secure the stock in the fixture. You can do this in a number of ways. Carpet tape is one, dabs of hot-melt glue is another — here, we used a couple of blocks of wood clamped firmly against the edge of the stock. You may have noticed in the photos that the wood is set up to cut across its grain. This orientation provides less chance of tearing out strings of wood fiber. Chuck a 3/4" diameter or larger straight bit into your router and set it so that it is cutting about 1/8-inch deep. When you are just starting, this is an approximate setting at best because the surface of the wood can vary significantly. With the bit clear of the stock, start the router and grab the jig outside the rails and start to rout in straight passes across the wood. You can use your hands running against the outer faces of the rails to ensure that you are moving the router accurately. If you hold the router instead of the jig and attempt to move the cut accurately, you'll find it is easy to wander a bit as you go.
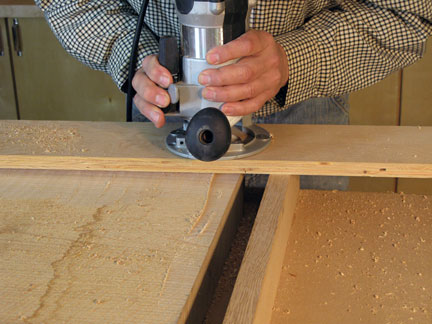
While technically you can cut both on the push and the pull stroke with the router, you'll quickly find that a typical feed action, pushing the cut into the rotation of the bit, will get you the best results. At each bit depth setting, methodically run the bit over the entire surface you are machining, even if it does not make contact at every point on the stock for the first couple of settings. Continue adjusting the bit's depth and removing stock until you have a flat surface face on your stock. Then flip the stock over, secure it in place, and repeat the process until the second face is smooth. Now you have two flat surfaces parallel to each other. They will need sanding to remove errant machining marks, and then you'll have a nicely surfaced and prepared piece of wood.

Conclusion: This technique is not for everyday use, but when the need arises, it's hard to beat. It's great for thick, wide stock and oddball situations like a cross-section from a tree trunk or other nontypical tree segments.


Keep the inspiration coming!
Subscribe to our newsletter for more woodworking tips and tricks