Sharpening a Bowl Gouge
Sharpening a gouge can be tricky, but it's a necessary and beneficial skill for woodturners to master.
In my teaching and writing, I encourage beginning turners to take a light cut and use sharp tools as a way to ensure safety. But what does a sharp tool look and feel like? How does a beginner know if the gouge or skew chisel is actually sharp or if it's the lack of skill that's causing problems? After all, even dull tools will cut! How do you go about learning to sharpen a set of turning tools when each one is shaped differently?
The market is now filled with a bewildering number of gadgets advertised to help improve your ability to get a good edge on turning tools. Sharpening is a challenging task. As with most things, though, once you decide you are going to learn how to sharpen your lathe tools - actually make a commitment to figuring it out - you will learn very quickly. The rewards are well worth the effort!
To streamline and simplify the process, I will limit this discussion to one tool, a bowl gouge. An introduction to grinding wheels and slow-speed grinders will help set the stage so you can achieve success. You'll discover that a good quality cutting edge can be obtained right off the grinder.
Use Jigs, But Learn Theory Too
There is an increasing variety of jigs and gadgets on the market for helping turners get the perfect edge on their tools. Buy one. Or buy several! I highly recommend them; however, I also believe that everyone ought to understand some of the theory of sharpening so they can use jigs successfully. I've seen some weird profiles produced by ostensibly fail-safe sharpening jigs! Recently at a hands-on workshop I spied a bowl gouge sharpened to a wicked point. I asked the owner (name to remain anonymous for obvious reasons!) why the tool was shaped like that.
The second component is a swivel arm, also made of oak. After ripping and crosscutting it to size, I rounded the ends at the band saw and used a sanding drum in the drill press to smooth the curves.
I was genuinely curious; maybe there was something I could learn from that type of grind. His reply, though, made me marvel at his willingness to try something he didn't yet understand: "It's that way because I used a sharpening jig and I don't know how a bowl gouge should be ground." Before you purchase a sharpening jig, make sure your grinder will accommodate that particular model. Not every sharpening jig will fit every grinder. You actually may have to buy that new grinder you've been coveting....
It is also important to have a good tool rest firmly attached to your grinder. If your tool rest is too small, it will be more difficult for you to achieve positive results.
Grinders Sharpen and Reshape
The terms grinding and sharpening are used interchangeably, sometimes causing confusion. A grinder is used to sharpen a lathe tool. When you sharpen, you remove just a small amount of steel, with the goal of creating a sharp edge. Grinding describes removing a significant amount of metal, usually with the goal of changing the tool's shape. But, before you begin either sharpening or grinding, there is a bit more you must learn. In this case, a bit of knowledge about grinders and grinding wheels is essential. There are some terrific new slow-speed grinders on the market today, and many of these come with the type of wheels that are well suited for sharpening lathe tools. The easiest to use are the larger diameter, wider wheels. If you can afford it, buy a slow-speed grinder, something that rotates at about 1,700 RPM and has 8" wheels that are 1" wide. Or you might want to try out the Tormek sharpening system.
A grinder should be positioned so that it is high enough to easily see what's being accomplished. The wheels should be balanced. Good lighting is essential.
It's important that you maintain the wheels of the grinder. For that, use a diamond wheel dresser, preferably a 1"-wide model. I have a smaller round one, which also works just fine. (Get rid of that old star-wheel dresser; it's too coarse!)
Dress the wheel. This is important so the wheel isn't clogged with bits of metal that will cause tools to burn when sharpening. Dressing the wheel also creates a flat, even surface to work against.
Wear a faceshield while grinding. While it is rare that a wheel will explode, it can happen. And while it might seem tempting, never use the side of a grinding wheel to sharpen a tool!
Dressing the Stone
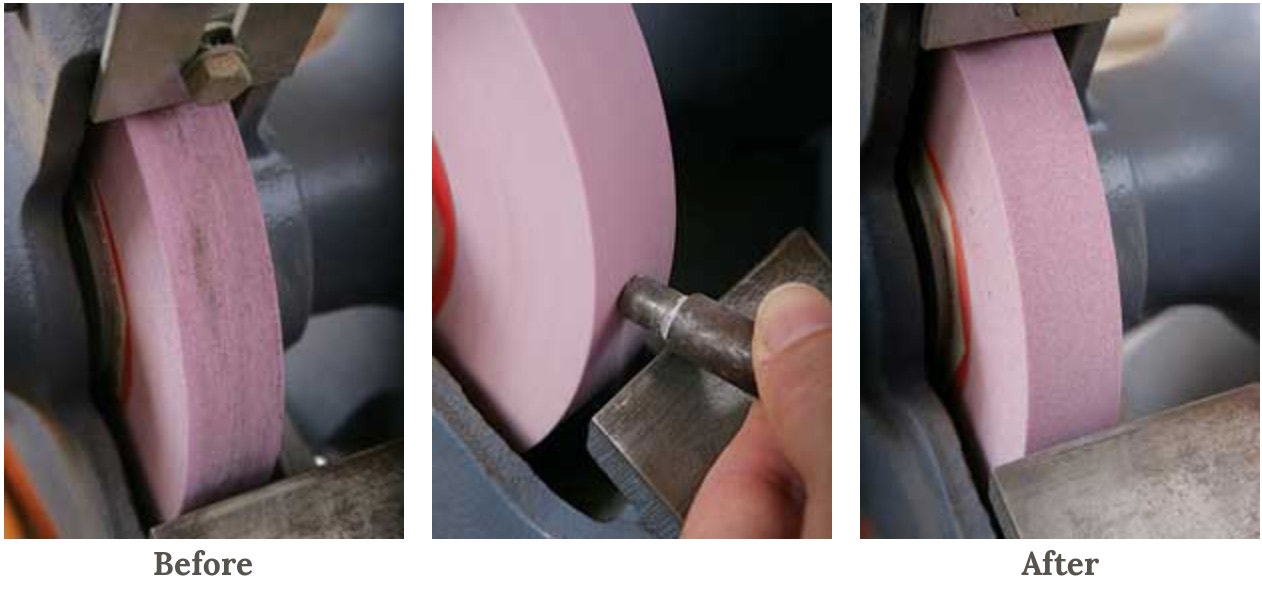
A few strokes across the grinder's wheel with a diamond wheel dresser will remove embedded metal particles and expose a fresh layer of abrasives. It also creates a flat reference surface on the wheel.
Blacken the Bevel
Sharpening a gouge involves touching the tool's bevel to the grinder wheel, which eventually sharpens the cutting edge.
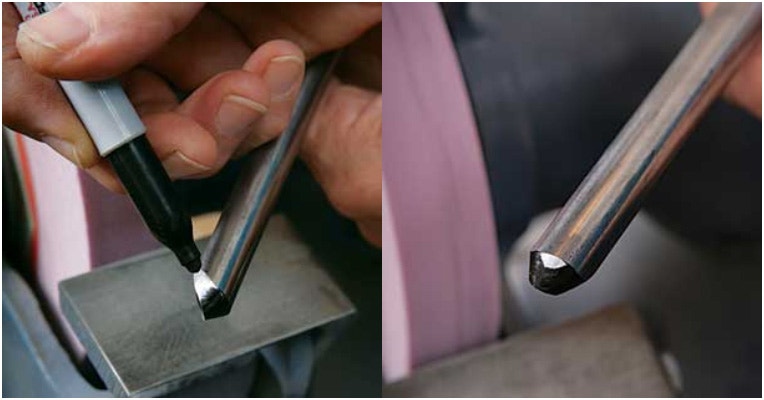
One way to help you see the part of the bevel that ends up touching the grinding wheel is to use a felt-tipped marker to darken the surface of your bowl gouge's bevel. Now, when you touch the bevel to the surface of the grinding wheel, you will know where you are doing the grinding. Adjust accordingly.
Bevel Angles and Profiles
The steepness of the bevel on your bowl gouge is somewhat of a personal preference. In general, though, a steeper bevel will result in a more aggressive cut. A bevel that's tipped closer to 30 degrees will give you good tool control. For beginners, I recommend having your primary bowl gouge sharpened with a relatively short bevel. The bevel should be concave or flat, not convex.
Insert your second 5/16" cap screw or carriage bolt up through the jig base and through the elongated hole in the swivel arm at the 45° mark. Lock it into place with a washer, lock washer and a nut. Do not over tighten it. Now add a couple of toggle clamps to the top of the swivel arm to hold workpieces securely to the base, and you are ready for fine-tuning the jig.
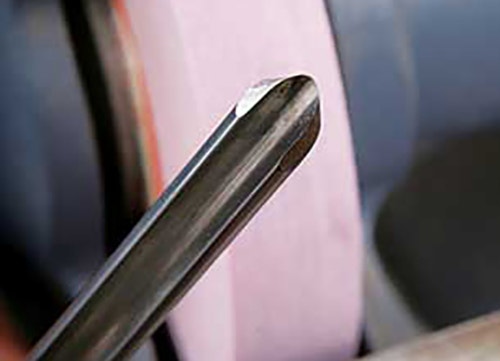
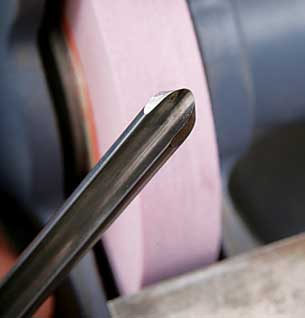
The profile of the bowl gouge should be that of a fingernail grind where the end is rounded, not square or pointed.
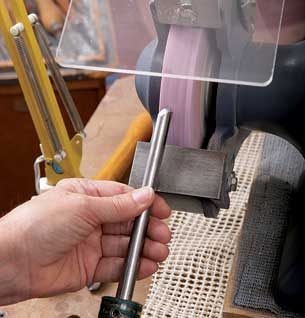
Making Contact
Put on your faceshield, turn on the grinder, and place your gouge on the toolrest at an angle so the middle of the bevel will touch the surface of the wheel. Because you will be sharpening a fingernail profile, you cannot have the tool sit flat on the toolrest. Adjust the light so you can see easily. Lightly touch the tool to the wheel. Check the bevel to see if you are holding the tool at the correct angle. Adjust as needed. I use an up-and-down, rolling motion of the tool to achieve an even bevel from one side to the other and maintain the profile of a fingernail grind. When you are first learning, you may need to re-blacken your bevel often.
Some people prefer to swing the tool from side to side while keeping the handle of the tool at the same level. Try each method, but always pay attention to what's happening where the bevel meets the grinding wheel. Changes happen quickly.
Once all the black ink is removed from the bevel, you should be left with a sharp cutting edge. Another way to check is to look down at the cutting edge and see if the bevel meets the cutting edge everywhere. If there is a shiny spot anywhere between the bevel and the cutting edge, you need to keep sharpening. Most of us use one side of our gouge more than the other, which wears the cutting surface unevenly. That means you will often be sharpening areas that don't need sharpening. That's fine.
Be sure to not let your tool heat up and discolor. If that happens, you've ruined the tempered edge of the tool. At that spot, the tool steel will not stay sharp as long. (If you do accidentally "burn" the edge of your tool, the only solution is to grind that metal away and start fresh.) Dip the tool in water to cool it off, but use that as a preventative measure rather than a cure for an already burned spot.
Honing the Edge
The need for honing is somewhat diminished by the new wheels now available. They leave finely sharpened edges. With that said, if you want to hone, especially between trips to the grinding wheel, by all means do so. If done properly, honing produces a super-fine, continuously sharp edge. A jagged edge can feel sharp, but it dulls quickly. This is a hint to all of you out there who are using a belt sander to mangle your turning tools.
Be sure to keep the bevel on the stone at the correct angle - don't round over the cutting edge. You might also want to hone the inside flute of your gouge, especially if there are mill marks. You will need some sort of stone or leather honing wheel that conforms to the profile of your flute. Be careful to not round over the cutting edge.
Making Contact
With proper sharpening techniques, you'll make fewer trips to the grinder, while at the same time increasing your turning enjoyment! I guarantee your turning skills will immediately improve when you use sharp tools. Be patient with yourself. Learning how to sharpen your tools takes practice, just like everything else.


Keep the inspiration coming!
Subscribe to our newsletter for more woodworking tips and tricks