How to Select Countersink Drill Bits for Flush-Set & Plugged Screws
Countersinking is used to ensure that flat head screws or fasteners sit flush against the workpiece.
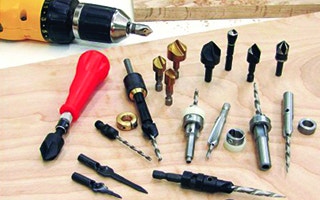
Countersink drill bits come in a variety of stiles and sizes depending on the project, the screws you're using, and personal preferences. For utility shop furniture or other quick-and-dirty projects — especially temporary items — we often don’t care much about the screws. They can be visible or not, proud of the surface or not; sometimes, it just doesn’t matter.
But for most of our work, if a screw is going to be visible we want it to look good, seated smooth and flush with the surrounding surface whenever possible. Sure, you could forcibly drive a flathead screw flush, but that almost always tears the wood surface fibers and looks terrible. In hardwood, you might not even be able to set the screw flush. This is where countersinking (or its close relative, counterboring) come in. When you top off a pilot hole with a countersink, the screw head seats perfectly: all its surfaces contact the wood with the same amount of force, making for a strong attachment and a clean look.
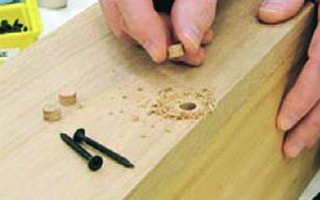
You can hide your flat-head screws with wood plugs if you drill your countersink deep enough to allow for them to be glued in over the screw. When we want those screws to disappear entirely, a properly sized deep-drilled countersink can accept a wooden plug that can then be cut and sanded flush for a smooth surface and an accented appearance. Handling these tasks, and more, is the job of a dedicated countersink. But there are a lot of them out there: one piece or a combination of drill bit and countersink, single-fluted or with multiple flutes (or none at all) and a wide range of chamfer angles make for tricky selection. As with just about all woodworking tasks, countersinks work best when correctly matched to the job at hand.
Types of Countersink Drill Bits
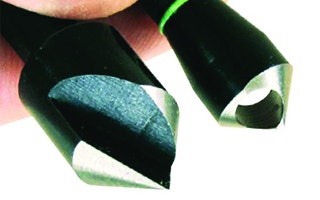
Fluted drill bits have one or more cutting edges, cross-hole countersinks have an angled hole in the tip which acts as the cutting edge. One-piece countersinks come in two main flavors, the most commonly recognized being a fluted countersink, which has a short shank with an elongated cylinder topped with a conical tip. (The shape always reminds me of the old Apollo command module.) The most typical fluted countersink used to have four cutting edges on the cone, although one-piece fluted countersinks today more commonly have an odd number of cutting edges — usually one or five.
Fluted countersinks come in several sizes, able to cut conical holes intended to fit screws of varying head dimensions. A pilot hole is first drilled for the screw, followed by countersinking the hole to allow a flat-head screw to seat flush with the work surface. It’s always best to use a countersink with a body diameter that closely matches that of the screw head; using one too narrow won’t create a big enough countersink to accept the screw head, and using one too wide runs the risk of creating a crater-sized countersink that completely swallows the screw.
A fairly recent type of one-piece countersink called a cross-hole countersink has no flutes. Instead of sharpened cutting edges, the bit has a hole bored through the cone at an angle. As the bit spins, the trailing edge of the hole makes the cut. Used the same way as fluted bits (pilot hole first, countersink second), cross-hole countersinks cut very smoothly and remove material quickly, and they excel at ejecting chips as they drill. These drill bits generally cost a bit more than their fluted cousins.
Getting the Angle

The most common chamfer angles are 82° and 90°, but most screws have an angle 82° so that is the angle that should be used in most projects. Countersinks are available with cones shaped to create six distinct chamfer angles — 60°, 82°, 90°, 100°, 110° and 120° — designed to match a particular screw’s head angle.
Screws with 90° heads are made to the ISO Standard; they’re usually metric and far more common overseas. Most recognized in North America is the Unified Thread Standard of 82°, which matches just about all woodworking screws you might encounter in the U.S. and Canada. However, both standards of countersinks are readily available here.
Since chances are good that you’ll only use screws with 82° heads, does it make a difference which countersink you buy and use? Well, that depends. With the 90° countersink, because of the 8° difference the very bottom of the screw head makes contact with the wood first, leaving the sides and top of the screw unsupported. The screw must be further tightened to bring the rest of the head into contact with the countersink, creating a greater force on the wood at the bottom. Essentially, what you’re doing is forcibly elongating the countersink by overdriving the screw. With the 82° countersink, all surfaces of the screw head make contact with the wood at the same time and with an equal amount of force.
Common sense will tell you that matching the screw to the countersink is the correct way to go. This is especially true with hardwood, as forcing the screw tighter in an effort to properly seat the screw into the countersink puts a lot of stress on the head — try it with a brass screw, and the head will likely snap off. For hardwood, matching the countersink is always best. For softwood, however, not nearly as much stress is created when seating an 82° screw in a 90° countersink, and the difference may be unnoticeable.
Countersinking: Two Step Process or Team Effort
With the drill bits I’ve described so far, countersinking is a two-step process: pilot hole first, followed by the countersink. It’s effective, but time consuming. However, a wide variety of combination countersinks do both tasks at the same time. Going by several names — countersink drills, pilot screw countersinks and piloted countersinks are just a few — these drill bits wrap a fluted countersink around an adjustable drill bit. (Crosshole countersinks aren’t used for these.)
It's rare to find the old-style flat steel piloted countersink bits, but they are great for drilling countersinks quickly (if inefficiently). The original idea for these was around years ago with piloted countersinks made of a single piece of flat steel with the ends rolled to form a shank.
Flip-style countersinks have two ends one to drill the pilot hold and set your countersink, then use the other end to drive the screw. Today’s versions produce better results and are far more versatile. Styles vary, but each works basically the same way.
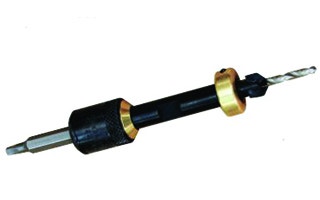
Each countersink is really a combination tool, and it consists of a separate drill bit centered in a through-hole in the body of the countersink and held in place by either a setscrew or a collet action of the countersink body. The drill bits can either be straight or tapered, their drilling length adjustable simply by loosening the setscrew or collet, sliding the drill bit to the desired length and retightening.
Most of these countersinks can be used with a stop collar that sets the depth of the countersink, and most come in sets that include varying sizes of matched countersinks and drill bits to accommodate the screws being used.
Nearly every major tool manufacturer that offers drills (as well as a few who don’t) produces basic, inexpensive combination countersinks of this type. Many of these are constructed in a “flip” style, with a double-ended cutter. When it’s snapped onto the driving body in the countersink mode, you can drill both pilot hole and countersink. Snap the countersink off, flip it around and snap it back in to expose the appropriate driver bit to set the screw.

Modern countersink bits include the Rockler Pro Tapered Countersink, the CleanStop countersink from Woodworker’s Supply and the Jack Rabbit from Jack Rabbit Tool.
Each has some unique features. The Pro Tapered comes in a set of three complete countersink combinations, sized for #6, #8 and #10 screws.
The drill bits are nicely tapered to match the profile of traditional woodworking screws, and each drill bit has a flattened shank for secure locking with the setscrew. A depth stop with two setscrews is included for each bit, and these countersinks have the largest main shank of 3/8".
For cutting action, there are two extra-long flutes that extend up the countersink body to help eject chips through the depth stop. The three-piece set sells for about $60, but each countersink is also sold individually, with #5 and #12 countersinks also available.
The CleanStop shares a similar pair of long flutes for chip ejection, but it uses straight drill bits instead of tapered. Four combination countersinks sized for #6, #8, #10 and #12 screws come in the set, but only two depth stops are included: they must be shared among the four countersinks. The depth stops are unique and feature a two-piece design with a polymer cap attached to the front of the metal stop. The cap spins freely but stops when it contacts the workpiece to help prevent marring or burning the work surface. The main shank is a 1/4" hex design. The four-piece set sells for about $60, but countersinks are also sold individually.
The Jack Rabbit set includes the same four sizes as the CleanStop, but it uses a single body. Each countersink is a separate collet that screws into the driving body, tightening on the drill bit as it’s put in place. The business ends sport four short flutes that do not extend past the depth stop in typical use. A single brass depth stop is included for the driving body.
The Jack Rabbit countersink is a “quick-change” combination, using separate drive shanks sporting both Phillips and square-drive ends. In use, you drill the pilot hole and countersink, then just snap the driving body off the shank and drive the screws home in a quick one-two action. The set, which includes a pair of wrenches for tightening the collet-style cutters, two double-ended driver shanks and a magnetizing ring for the drivers, sells for about $50 as of 2010. All three sets include a storage case, as well as Allen wrenches. Replacement drill bits are available for all.
Other Countersink Drill Bit Styles

A specialized countersink along with a rounded tenon cutter and drill creates perfectly seated mortise-and-tenon joints. Although there’s not always a lot of call for it in many woodshops, there’s a specialized countersink for making rustic log furniture with round mortise-and-tenon joinery.
Once a hole (the mortise) has been drilled to accept the round tenon of a furniture component, these wedge-shaped countersinks easily taper the top of the mortise to exactly match the tapered shape of typical round tenons. The mortise-and-tenon joint mates perfectly for a very strong connection. These countersinks are generally used with a heavy-duty drill.

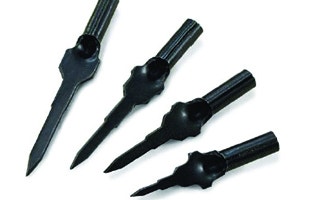
You can make basic countersinks with a handheld tool, all they are are a comfortable-to-grip handle with a countersink bit snapped onto one end. Not all countersinks require a drill, however. Hand countersinks consist of a handle similar to a screwdriver’s, with individual countersink bits that snap into the front. First, drill your hole and then, with a few twists, you have a basic, no-frills countersink ready to accept the screw. They’re excellent to keep within arm’s reach or stashed in the toolbox for making a quick countersink or two without taking the time to fetch your drill and regular countersinks. These guys do take a bit of muscle power, however, and your wrist will get its exercise if you make several dozen countersinks in oak with one of these. But for a quick one-off countersink, they can’t be beat.
Using Countersink Bits

Most modern piloted counter sinks are both depth-adjustable and have bits that are removable for easy cleaning, sharpening, and replacement. The most important thing to keep in mind when using a countersink is to match the size correctly to the screw being used. This goes for all aspects of both the pilot hole and the countersink itself. A too-large countersink will swallow the head of a screw in what will look like a moon-sized crater; a too-small countersink won’t fit the screw head, and forcibly driving the screw in can tear the wood fibers around the countersink.
If you don’t drill the countersink deep enough, the screw will remain proud of the surface; go too deep and the screw will seat too shallow. With use, you’ll quickly get the feel of particular countersinks, but until then it’s wise to adjust all your settings (drill bit depth, countersink size, depth stop location) and make a test drill into a piece of scrap before drilling the real workpiece.
When countersinking, speed isn’t always your friend. Drilling too fast can lead to too-deep or too-large countersinks, especially in softwood. High speed is also one of the main causes of “chatter,” a countersink with a ragged edge and an inner surface that is chewed up in an undulated pattern. For traditional tapered wood screws, a countersink with a tapered drill is logically the best to use. Straight wood screws, such as those ubiquitous black screws from the home center, work optimally with straight drill bits. However, in most uses except in the hardest of hardwoods, the type of drill bits used in countersinks are interchangeable. In softwood, the difference is negligible.
Keep a close eye on the drill bits in your combination countersinks. Like any bits, they cut inefficiently when dull. Remove them as needed and replace them. Just about all countersink manufacturers make replacement bits that are easy to swap in. Same goes for the cutting edges of the countersink itself. Sharpen them as necessary or replace them. Again, all the manufacturers offer replacements. (In some cases, the replacement cutters are sold together with new drill bits.)
Other Uses for Countersink Drill Bits

One of the biggest conveniences a good countersink provides is being able to drill a pilot hole and the proper countersink, and simultaneously put both at the bottom of a deeper hole that will accept a wooden plug. These deep countersinks are sometimes referred to as “counterbores,” but that’s technically not quite accurate.
You can make deep countersinks easily by setting the countersink’s depth stop to allow the countersink to drill more deeply into the worksurface. Be sure to measure the size of your plug to be sure your countersink’s body will make the right-size hole. Likewise, set your depth stop carefully. As mentioned earlier, a quick test drill in scrap is always a good idea when making adjustments to countersink sets.
Speaking of depth stops, be careful with them. There’s no need to ram that countersink down into the workpiece until the depth stop bangs to a stop. All that will get you is a marred surface. And if you don’t stop drilling soon enough, the spinning depth stop can easily burn the wood surface to boot ... yet another reason to avoid high-speed countersinking. The most efficient way to make a countersink is to take it easy, and decrease the drill speed as the stop nears the surface. When it just barely kisses the wood, you’re done. It’s likely that after you get used to how a particular countersink works, you’ll leave the depth stop in its case. Once familiar, you’ll be able to tell the correct depth instinctively.
There’s one last task at which countersinks excel, and it has nothing to do with wood: they are the fastest, most efficient way to deburr a freshly drilled hole in metal. You might not think there’s a lot of call for that in the woodshop, but think again. Drilling holes in hinges, metal angles, jig components, cast-iron for table attachments, shelf brackets and the like all leave an unsightly — and dangerously sharp — burr around the edge of the hole. One quick touch with a countersink removes this burr. It’s best not to use your regular woodworking countersinks for this task, however. Instead, pick up a couple of cheap, one-piece fluted countersinks just for the purpose. (They make expensive countersinks for metal drilling, but for occasional deburring, the cheapest you can find will do the trick.) Keep them with the drill bits you normally use for metal, and you can’t go wrong.


Keep the inspiration coming!
Subscribe to our newsletter for more woodworking tips and tricks