Refacing Your Cabinets with Veneer
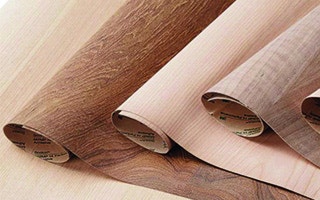
In this article, we'll take you through the process of refacing your cabinets with pressure sensitive wood veneer and precut end panels. Along with providing step by step instructions, we'll point out the tools and materials you'll need to complete the project, all of which are available at Rockler Woodworking and Hardware. Once you've refaced your cabinet frames you can easily replace the doors and drawers using the Rockler Custom Cabinet Door and Drawer options The made-to-order doors and drawer fronts are available in a variety of styles.
Tools Needed to Complete Project
- Pressure Sensitive Veneer
- Rockler Veneer Trimming Guide
- Veneer Smoothing Blade
- Tape Measure
- 150 Grit Sandpaper or block
- Utility Knife
- Scissors
- Tack Cloth
- Hammer
- Steel Wool
- 4" straight edge or putty knife
- Adhesive spray
- Carpenter's Glue
- Drill
- Touch-up Kit
- Phillips
- Miter box and Saw
- Finishing nails for Molding
Step 1

Remove doors, drawers and moldings. If you plan to use the old hinges, keep hinges and screws together in a convenient location. Remove drawers from the cabinets and set aside.
Next, remove any cabinet moldings. Remove any loose and/or peeling coatings from any surface you plan to cover with pressure sensitive veneer. Any depressions left in the surface should be filled with hard drying putty and sanded smooth.
Lightly sand any surfaces you plan to cover with self-adhesive coverings, using 150 grit sandpaper (Figure 3). DO NOT USE A POWER SANDER. Just scuff the surface. This will help ensure a good bond when applying self-adhesive covering. Remove any dust or sanding particles with tack cloth before applying self-adhesive coverings. Clean the surface with a mild dishwashing liquid and water with a damp cloth. Don't get it soaking wet. Rinse with a damp rag and allow it to dry thoroughly. Use household ammonia to remove wax.
Step 2
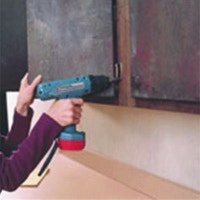
Install cut-to-size panels - Start by applying the cut-to-size plywood to the cabinet end panels. Apply wood glue to the back of the plywood, then fit it to end panel, making sure it is flush with the cabinet front and bottom. Use finishing nails to secure cut-to-size plywood to cabinet end panel. Using sanding block with 150 grit sandpaper, sand the edges of the plywood to ensure that it is flush with the cabinet's front frame. Use a clean tack cloth to remove the sanding dust. Check entire cabinet for areas where unfinished wood is exposed, such as along the sanded edges of the plywood, and seal the edges.
Step 3
Apply self-adhesive veneer or laminate. With a sharp pair of scissors, rotary cutter or utility knife and straight edge, cut the self-adhesive covering into strips 1/2' wider and 2' longer than the face frames you plan to cover. NOTE: COMPLETE ONE OPENING AT A TIME!
Step 4
Apply pressure sensitive veneer or laminate to the inside face frame edge
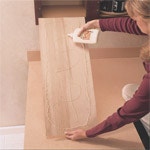
Cut veneer or laminate to length to fit inside edge of stile. Width of veneer/laminate strip should allow for trimming flush with stile after installation. Peel back just enough backing from the top of the strip to anchor the strip to the inside edge of the face frame. Make sure the top edge of the strip is flush and square with the top of the face frame opening. Then press and lightly smooth downward, peeling the backing off as you go. (Be very careful to get it lined up right the first time, because the special adhesive makes it very difficult to get off!) After applying veneer/laminate to inside edge of stiles, cut veneer or laminate to length to fit inside edge of rail. repeat application steps above. On bottom rail, match bottom rail's inside edge when applying the veneer or laminate, because you will not be able to easily trim this edge.
Trimming Overlap from inside face frame edge.
Using a razor knife, trim the overlap excess inside and outside edge of the opening from both stiles and rails. Use the face frame edge as a guide.
Step 5
Apply pressure sensitive veneer or laminate to the face frame
Start with the stiles. Peel back just enough backing from the top of the strip to anchor the strip to the face frame. Make sure the top edge of the strip is flush and square with the top of the stile. Align the strip so that theres an even overlap on both sides of the stile. Then press and lightly smooth downward, peeling the backing off as you go. (Be very careful to get it lined up right the first time, because the special adhesive makes it very difficult to get off!) Repeat above on other stile.
Peel back just enough backing from one end of pressure sensitive veneer/laminate and position it to overlap the left and right stiles by 1". Align the strip so that there's an even overlap on top and bottom of rail. Then lightly press and smooth left to right, peeling the backing off as you go. Repeat above on other rail.
Step 6
Trimming Overlap from Stiles and Rails
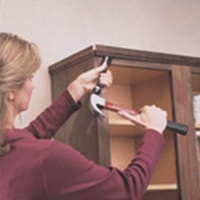
Using a razor knife, trim the overlap excess inside the opening from both stiles and rails. Use the inside of the face frame as a guide. Trim the overlay from the top and bottom of the cabinet. Using a straight edge, align it flush with the inside of the stile, extending over where the rail butts the stile. Use straight edge as a guide and cut all the way through both the layers of pressure sensitive veneer/laminate. Using the tip of the razor knife and veneer trimming guide, remove the rail excess. Again using the tip of the razor knife, gently raise the pressure sensitive veneer/laminate off the rail and remove the excess trim from the stile. Gently smooth the rail pressure sensitive veneer/laminate back down to the stile. The veneer should meet smoothly where the rail and stile join together. Repeat on other three corners. Using sanding block with 150 grit sandpaper, sand one direction toward the inside of cabinet box clean up the edge of the pressure sensitive veneer/laminate even with the inside of the cabinet face frame. Using the veneer smoothing blade or Plexiglass scraper, apply as much pressure as possible to the pressure sensitive veneer/laminate. Go with the grain.
Learn more about made-to-order custom cabinet doors and drawers.
- Pressure Sensitive Veneer
- Rockler Veneer Trimming Guide
- Veneer Smoothing Blade
- Tape Measure
- 150 Grit Sandpaper or block
- Utility Knife
- Scissors
- Tack Cloth
- Hammer
- Steel Wool
- 4" straight edge or putty knife
- Adhesive spray
- Carpenter's Glue
- Drill
- Touch-up Kit
- Phillips
- Miter box and Saw
- Finishing nails for Molding
Step 1

Remove doors, drawers and moldings. If you plan to use the old hinges, keep hinges and screws together in a convenient location. Remove drawers from the cabinets and set aside.
Next, remove any cabinet moldings. Remove any loose and/or peeling coatings from any surface you plan to cover with pressure sensitive veneer. Any depressions left in the surface should be filled with hard drying putty and sanded smooth.
Lightly sand any surfaces you plan to cover with self-adhesive coverings, using 150 grit sandpaper (Figure 3). DO NOT USE A POWER SANDER. Just scuff the surface. This will help ensure a good bond when applying self-adhesive covering. Remove any dust or sanding particles with tack cloth before applying self-adhesive coverings. Clean the surface with a mild dishwashing liquid and water with a damp cloth. Don't get it soaking wet. Rinse with a damp rag and allow it to dry thoroughly. Use household ammonia to remove wax.
Step 2


Install cut-to-size panels - Start by applying the cut-to-size plywood to the cabinet end panels. Apply wood glue to the back of the plywood, then fit it to end panel, making sure it is flush with the cabinet front and bottom. Use finishing nails to secure cut-to-size plywood to cabinet end panel. Using sanding block with 150 grit sandpaper, sand the edges of the plywood to ensure that it is flush with the cabinet's front frame. Use a clean tack cloth to remove the sanding dust. Check entire cabinet for areas where unfinished wood is exposed, such as along the sanded edges of the plywood, and seal the edges.
Step 3

Apply self-adhesive veneer or laminate. With a sharp pair of scissors, rotary cutter or utility knife and straight edge, cut the self-adhesive covering into strips 1/2' wider and 2' longer than the face frames you plan to cover. NOTE: COMPLETE ONE OPENING AT A TIME!
Step 4
Apply pressure sensitive veneer or laminate to the inside face frame edge
Cut veneer or laminate to length to fit inside edge of stile. Width of veneer/laminate strip should allow for trimming flush with stile after installation. Peel back just enough backing from the top of the strip to anchor the strip to the inside edge of the face frame. Make sure the top edge of the strip is flush and square with the top of the face frame opening. Then press and lightly smooth downward, peeling the backing off as you go. (Be very careful to get it lined up right the first time, because the special adhesive makes it very difficult to get off!) After applying veneer/laminate to inside edge of stiles, cut veneer or laminate to length to fit inside edge of rail. repeat application steps above. On bottom rail, match bottom rail's inside edge when applying the veneer or laminate, because you will not be able to easily trim this edge.
Trimming Overlap from inside face frame edge.
Using a razor knife, trim the overlap excess inside and outside edge of the opening from both stiles and rails. Use the face frame edge as a guide.
Step 5
Apply pressure sensitive veneer or laminate to the face frame
Start with the stiles. Peel back just enough backing from the top of the strip to anchor the strip to the face frame. Make sure the top edge of the strip is flush and square with the top of the stile. Align the strip so that theres an even overlap on both sides of the stile. Then press and lightly smooth downward, peeling the backing off as you go. (Be very careful to get it lined up right the first time, because the special adhesive makes it very difficult to get off!) Repeat above on other stile.
Peel back just enough backing from one end of pressure sensitive veneer/laminate and position it to overlap the left and right stiles by 1". Align the strip so that there's an even overlap on top and bottom of rail. Then lightly press and smooth left to right, peeling the backing off as you go. Repeat above on other rail.
Step 6


Trimming Overlap from Stiles and Rails
Using a razor knife, trim the overlap excess inside the opening from both stiles and rails. Use the inside of the face frame as a guide. Trim the overlay from the top and bottom of the cabinet. Using a straight edge, align it flush with the inside of the stile, extending over where the rail butts the stile. Use straight edge as a guide and cut all the way through both the layers of pressure sensitive veneer/laminate. Using the tip of the razor knife and veneer trimming guide, remove the rail excess. Again using the tip of the razor knife, gently raise the pressure sensitive veneer/laminate off the rail and remove the excess trim from the stile. Gently smooth the rail pressure sensitive veneer/laminate back down to the stile. The veneer should meet smoothly where the rail and stile join together. Repeat on other three corners. Using sanding block with 150 grit sandpaper, sand one direction toward the inside of cabinet box clean up the edge of the pressure sensitive veneer/laminate even with the inside of the cabinet face frame. Using the veneer smoothing blade or Plexiglass scraper, apply as much pressure as possible to the pressure sensitive veneer/laminate. Go with the grain.
Learn more about made-to-order custom cabinet doors and drawers.


Keep the inspiration coming!
Subscribe to our newsletter for more woodworking tips and tricks