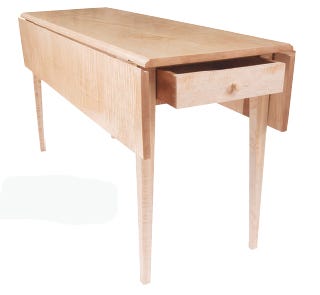
Project: Shaker-Style Drop-Leaf Table
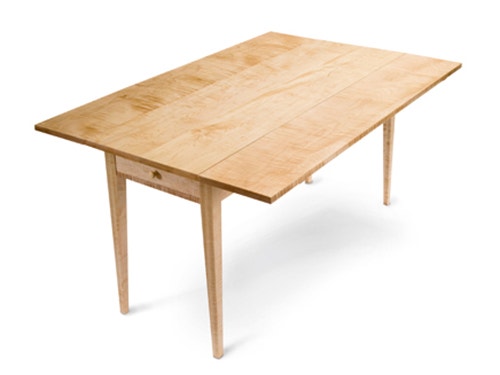
This drop-leaf table was designed based on a classic plan from Woodworker's Journal Magazine twenty years before, but modernized.
This project was a little different right from the beginning. First of all, Rob Johnstone brought me a 20-year-old plan to work from, as opposed to working out the design between us. Secondly, he showed me a pile of highly figured maple and said "pick out some good stuff."
For the Drop-leaf Table Diagrams and Materials List, click here.
And that lumber was quite impressive. Whether you call it curly, flame or fiddleback maple, you have to call it beautiful. Blending that lumber with the Shaker aesthetic took this lovely little table design from practical to nearly perfect.
Once I got my cache of lumber over to the shop, I spent some time (as is my custom) deciding which board or parts of a board go where in the table. I used four wide planks of similar figure for the top and leaves. The rest became components for the glued-up legs and the remaining pieces. In the name of conservation and keeping with a Shaker tradition of simplicity, I chose some leftover plainsawn ash and cherry from a previous project for the drawer sides and back.
After coming up with a comprehensive cutting list, I started making my rough cuts before straightening, planing and gluing up all the necessary components. The luck I had in finding wide planks then presented a challenge: how would I keep those table leaves reasonably flat for the distant future? My solution was to try another old-school technique, dovetailed slot wedges (more on this modification later).
Prepping the Stock
After busting the clamps loose, I set the top aside and went to work on the legs, scraping glue before planing them straight and square. I then set up for mortising, using a 3-hp plunge router with a 3/8" straight bit chucked in place. These are not deep mortises, so this method worked out nicely.
For the Drop-leaf Table Leg Diagrams and Materials List, click here.
After routing the mortises, I chopped the tops and bottoms square with a sharp chisel. Some folks like to round the tenons to match the holes, but I find it to be much faster the other way around, as my 3/8" mortising chisel has a "take no prisoners" approach to this task.

I then made a simple tapered leg template in 1/4" MDF, using it to transfer marks to the wood for cutting on the band saw.
After I made the cuts on one face of each leg, I re-attached the scrap with carpet tape before turning the stock over to make the second cut, similar to an approach used on cabriole legs.
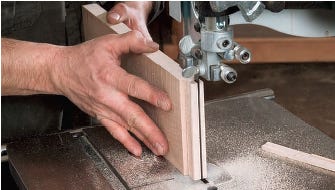
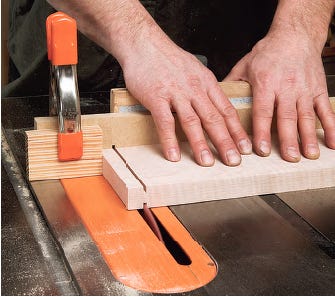
I'd planned on forming the tenons on the table saw using a dado head, but the thought of making a blade insert and an ever-looming deadline helped dissuade me, sending me instead to the band saw.
After cutting the tenon shoulders nice and square with the miter gauge on the table saw, I decided I could use my trusty little shoulder plane to clean things up during the final fit.
Making the Underframe Joinery
The framework on the drawer end of the table requires two different joints. The bottom stretcher attaches to the legs using a simple stubby fork-tenon arrangement, executed in roughly the same manner as all the other mortise and tenons. The upper member is dovetailed into place. I cut the stretcher first and then chopped out the dovetail mortises to match.
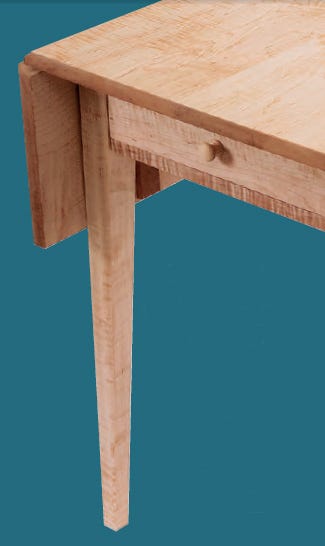
Moving on to the aprons, I first plowed the grooves all around the inside of the aprons and then cut the openings that carry the leaf-bearing turnouts. These turnouts pivot from under the top to support the leaves when they’re extended.
To form the turnout notches, I decided to do something I call "woodworking without a safety net." After making the 30 degree vertical cuts with my handsaw, I reached for my 7-1/4" circular saw (the one I use on remodeling jobs), attached a fence to it and made horizontal plunge cuts, being real careful not to cut past the vertical lines. There are several ways you could machine these notches, but I was pleased with how well the circ saw worked.
The corner blocks and center cleat were fashioned on the table saw, using an extension fence I quickly made by screwing some scrap plywood to the existing wood face of the miter gauge, then clamping a stop block for uniform sizing.
Once I got all of the various components machined up, I went to work at the bench with my planes, cleaning up all the surfaces prior to assembly. I found that the figured maple hand-planed surprisingly well. I set the plane for an ultra-fine shaving and used a freshly sharpened iron. During planing, I skewed my cuts a fair amount to further slice the curly wood and avoid tearout as much as possible.
The Underframe
Assembly was straightforward: I clamped up the long sides, went to dinner, came back, removed the clamps and then finished the carcass assembly before going to make the drawer runners from black ash, leftover local sawmill wood that Rob had lying around from a previous job. Nice stuff ... too bad it’s now buried behind the drawer under all this fancy maple "bling."
Topping It Off
I love setting hinges. It's one of my favorite things, and I take pride in this process. Folks that have seen me in action even compliment me on my level of prowess. My big problem is that sometimes I don't even look at the instructions — I should know better. That's why I aligned the barrels with the bottom outside edge of the top, when in fact you’re supposed to align them on a line extending from the point where the flat top breaks into the shaped edge. When I realized my mistake, my heart sank. But, after much wailing and gnashing of teeth, I became determined to rectify my blunder. Being (as usual) luckier than I am smart, I removed the hinges and found, to my complete surprise and utter gratitude, that they dropped right into place when turned around ... even the screw holes lined up! It's situations like this that reaffirm my love for the craft.
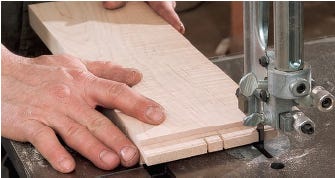
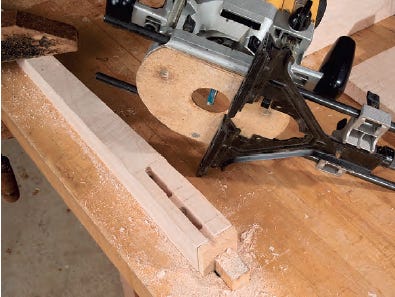
Milling the Dovetailed Wedges
Now for the wedges that stabilize the table leaves. I used some leftover cherry that I found in the shop, with the idea of contrasting elements. There are several ways to go about this: you can make them straight or tapered in their length, or you can dovetail one side or both, generally in the spirit of easier fitting. The problem with dovetail slots is that the mating surfaces of the dovetailed areas are generally not conducive to creating a solid glue joint, as they're often half end-grain. The only real positive glue surface in this particular assembly is on the flat underside of the wedge where it meets the flat horizontal surface of the housing, or cut-out part of the table leaf. With all this in mind, I decided to make them straight, to maximize glue surface, and use enough self-control to make them fit perfectly, sliding into place with easy taps of my mallet and a beater block.
I first cut the housings using a small plunge router equipped with a 1/4" straight bit guided by a clamped-on straightedge. I made two straight cuts at the narrow points of the housings and removed most of the waste from the housing. I then chucked a 9/16" dovetail bit into my router and, leaving the fences in place, cut the angled edges of the housings. Nice and simple. I then made a practice wedge using the same dovetail bit in a router table to attain my aforementioned precision fit. When I was satisfied, I made all the wedges at once. They all fit just the way I wanted them to, no hand planes or shooting boards required.
Attaching the Top to the Underframe
Attaching the top is easy, using screws from underneath through elongated holes in the corner blocks and one through the middle of the center cleat (no need to elongate that one, as it's right in the middle of the top). But first there's a bunch of finishing to do. Rob and I seem to have similar tastes in regard to finish, so when he recommended an application of linseed oil followed by shellac, I heartily agreed. These are without a doubt my two favorite finishes, especially where visual appearance supersedes issues such as durability (it's fine furniture, not a bar top). I brushed and rubbed a coat of boiled linseed oil cut 20 to 25 percent with turpentine on everything. After a good 24 hours and a bit more rubbing to make sure there was no standing residue, I started brushing coats of wax-free shellac, (cut 40 percent with denatured alcohol), using a top quality Badger shellac brush. I scraped the flat surfaces between coats using a thin, flexible card-type scraper. It worked amazingly well. I find it hard to believe how few woodworkers use this very handy technique. For my money, it's faster, easier and better than sanding. I put about five thin coats on the top and leaves, followed by a wax rub-out. The results have to be seen and felt to be believed. Install the turnout supports and mount the table top and leaves before moving onto the drawer.
Building Dovetailed Drawers

The table from 20 years ago did not have a dovetailed drawer — and that would be a fine option for you as well. But I love the look of a dovetailed drawer as it is pulled out, and I think it fits this design well.
For the Drop-leaf Table Drawer Diagrams and Materials List, click here.
Like other woodworking techniques, dovetails are better understood if you spend time to become competent through practice. Cut out the five pieces required to make your drawer and build it however makes the most sense to you — dovetails or otherwise. Fit it to the opening and apply your finish as described above, and you are done with the project. This table should serve you for years to come with grace and style.


Keep the inspiration coming!
Subscribe to our newsletter for more woodworking tips and tricks