Project: Scroll Sawn Flared Bowl
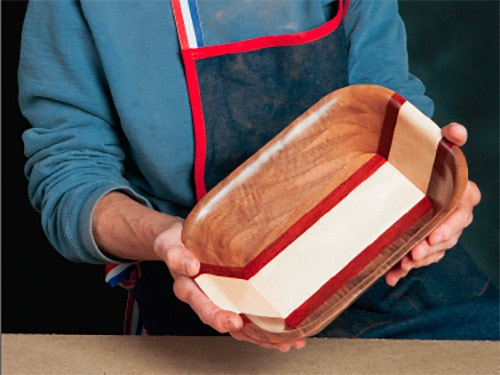
Turning is only one way to make a wooden bowl in your shop, here the author displays a bowl that she made by cutting out segments on a scroll saw.
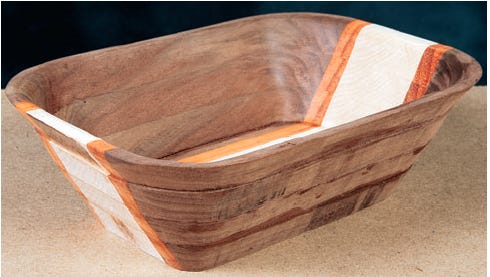
Laminated bowls are usually round, lathe-turned and made from large blanks. This rectangular bowl, with colorful stripes, is made on a scroll saw from a blank that is only 3/4" thick. The wood is cut into rings at a steep angle. When stacked and glued, the rings create the illusion that the bowl was made from a single, heavy blank. I flared the upper rim for a more fluid profile and softened the corners for ease in shaping and sanding. The technique, from start to finish, is simpler than it seems, and it provides a wonderful way to make a wide variety of attractive bowls at minimal cost.
Cutting the Rings
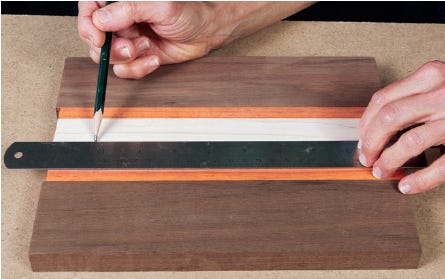
Start by gluing up the strips of wood in the following order: walnut, padauk, maple, padauk and walnut. Once the glue-up is dry, sand it just until smooth and then draw a line down the center of the maple strip.
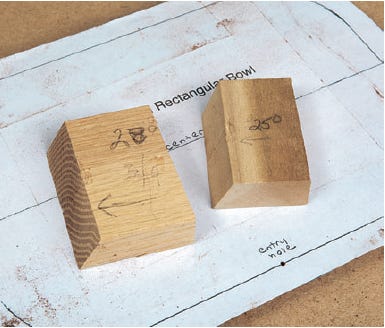
Attach the pattern with re-positionable adhesive, aligning the center of the pattern with the line on your wood. Designate one face of the blank as the "top" and label each ring as you cut it so you can reassemble the rings properly as you glue them up.
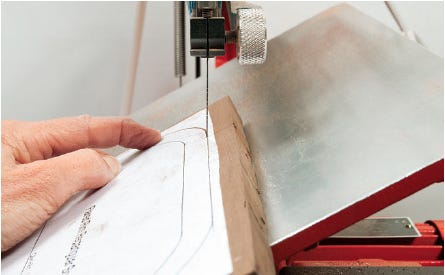
To cut the first ring, I tilted the saw table to a 35° angle, left side down. Using a #9 saw blade, I cut along the outer line of the pattern in a clockwise direction, which means I fed the wood in a counterclockwise direction.
For the Bowl Diagrams and Materials List, click here.
Cutting the Rings of the Bowl
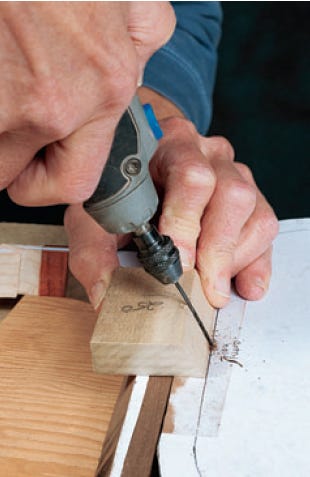
Next, I used an awl to mark the entry hole where shown on the pattern, and I drilled the hole at a 25° angle using a #54 drill bit, a 25° angle guide and a rotary tool. The hole must be drilled toward the center of the blank or the wood will not sit flat on the saw table.
To complete the first ring, I tilted the saw table to 25°, left side down, inserted the saw blade into the entry hole, and cut clockwise on the inner line. Using different cutting angles created the outward flare and reduced the ring width to 3/8"— an ideal thickness for bowls of this type.

After cutting the ring, I removed the pattern and placed the cut ring on the blank, aligning the stripes and tops. Holding the ring in place, I traced around its inner edge on the blank to create the cutting line for the second ring.

I drilled the next entry hole at 28°, facing the center of the blank, on a straight section of the line I just drew, tilted the saw table to 28°, left side down, and cut out the second ring in a clockwise direction.

I placed the second ring on the blank, aligning the tops, and traced the inner edge, to create the cutting line for the third ring.

The third ring was cut at a 28° angle, the same way as the second. The remaining piece — the base — was set aside until later.
Gluing the Rings

The best gluing sequence is to glue the rings first, sand their inside faces, then glue on the base. If you try to glue up everything at once, you'll find it impossible to sand the lower ring without gouging the base.

It's also important to be sure that there are no spaces between the rings, since that will result in unattractive gaps and dark lines. The easiest way to locate those spaces is to shine a light behind them, and the best way to remove them is to sand the rings with 120-grit sandpaper, attached by temporary adhesive to a perfectly flat surface, like a granite tile.

I used clamps and two boards to glue the rings together, making sure to keep the stripes aligned. If you’re concerned about slippage, glue up two rings first, then add the third after the first two are dry.
Sanding the Inside of the Rings

When the rings were ready, I sanded the inner surface, starting with a coarse (60-grit) paper. This rough sanding removed blade and drill marks, smoothed the ridges between the rings, and accentuated the flare on the upper rim.

Once completed, I sanded progressively to a 320-grit to create a smooth inner surface. I used a detail sander and long inflatable drum for the flat surfaces, and an inflatable ball for the corners and upper edges. As a final check, I ran my fingers over the surface to feel for bumps and ridges, and worked on them until they disappeared. Now I was ready to glue on the base.
Gluing on the Base

I applied glue and clamped the rings and base for about five minutes. Then, since it’s difficult to remove dried glue at the interior joint line without gouging the base and sides, I removed the clamps. Using a toothpick and a barely moistened paper towel, I cleaned up the squeeze-out, re-clamped the bowl and let it dry.
Completing the Bowl
The creative part — final sanding the outside of the bowl — came next. I used a detail sander for leveling the flat areas and a flexible pad sander for shaping the upper and lower edges. Coarser grits were used for shaping, followed by increasingly finer grits until the outside was smooth and passed the "finger test."
To finish, I used several coats of shellac, rubbed down well with 0000 steel wool. It’s quick and easy to apply, and it produces a bowl that is attractive, food-safe and ready to use, give as a gift or sell with pride.


Keep the inspiration coming!
Subscribe to our newsletter for more woodworking tips and tricks