Project: Picture Frame Moldings
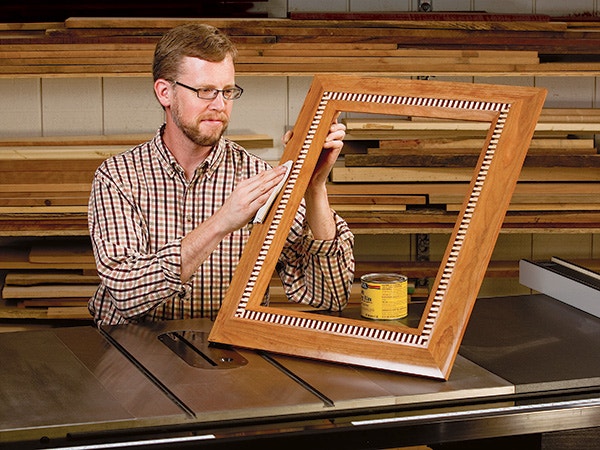
A table saw is the only tool you need to create a handsome cove-and-dentil picture frame. Suitable for art or portraits, it makes an attractive holiday gift.
Some picture frame moldings are impossible to create without a shaper or a handful of expensive router bits, but, that's not the case with this project. Editor Rob Johnstone, art director Jeff Jacobson and I set out to design a frame that can be milled entirely on the table saw, and I think we've got a real winner! Here's a handsome holiday gift — and a great way to show off a 16" x 20" portrait or art print. All you need is a sharp 10" combo blade and a dado set.
Check out the Drawings, and you'll see that the rails and stiles will require 1-1/4"-thick stock to accommodate the deep dentil inlay and the broad outer cove shape. I bought some 8/4 cherry and planed it down. Don't try to save a buck by face-gluing thinner stock — you could end up with a glue line in the cove area ... not a good look. After surfacing your stock, crosscut blanks for the rails and stiles four to six inches longer than necessary so you'll have some leeway when mitering the pieces to final length. Make up some matching scrap now, too, for testing your saw setups.

Sawing the rail and stile profiles will remove a lot of wood, and you have to do it in the correct order to leave enough material for successive steps. Begin by milling a 3/4" x 3/4" groove along the faces of both the rails and stiles to accept the dentil inlay. Use a featherboard and hold-down to press the stock tightly against the rip fence and saw table.
Shaving the Coves
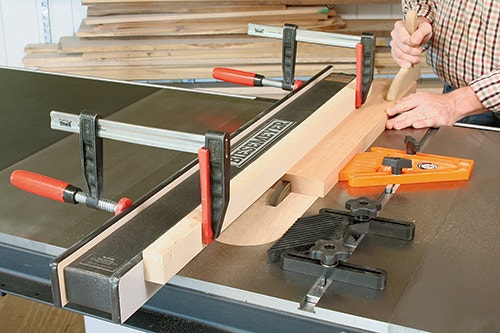
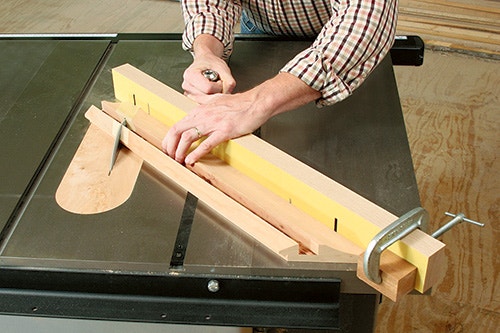
Next comes the coving operation. Replace your dado blade with a sharp, full-kerf combination blade for this task; a thin-kerf blade is too flexible for coving. If you've never cut coves before, it's actually a shaving process in which you'll run your workpieces at an angle across the blade, raising the blade about 1/16" with each pass. Two scrap fences form a "tunnel" to keep the rails and stiles on track and at the correct angle of approach. Here's how to set it up: With the blade raised to 3/4", clamp the front fence exactly 2-7/16" ahead of where the blade teeth drop into the table. Arrange this fence so it also crosses the saw table diagonally at 50.5°. Lower the blade. Install the rear fence 3-3/4" behind the front fence and parallel to it. This fence should be at least 1-1/4" thick, because you'll gradually bury the blade into it as the cut advances.
Now, you're ready to begin shaving the cove. Raise the blade to about 1/16" for the first pass. Orient your workpieces so the edge closest to the groove is against the front fence. Use a push pad and push stick to feed the wood across the blade. Then, continue raising the blade a little more each time until you’ve sawn the full cove. Carry out this entire operation first on test scrap to make sure you've got things dialed in correctly, then repeat with the rails and stiles. Pretty cool technique, isn't it?
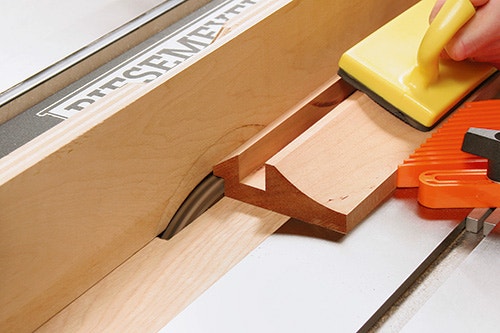
When the dust settles, remove the coving fences, and reset the rip fence to cut the little bevel adjacent to the groove. Tilt your blade to 35.5° for these cuts. Then, it's back to a wide dado blade, nested partially in a sacrificial facing clamped to your rip fence, to cut the rabbet that will hold the frame’s contents. Raise the dado blade 1/2", and project it 1/4" out from the fence to mill these rabbets.
That wraps up the shaping process for the rails and stiles. Before you assemble them, now is a good time to give the parts a thorough sanding or scraping while the surfaces are easy to reach.
Assembling the Frame
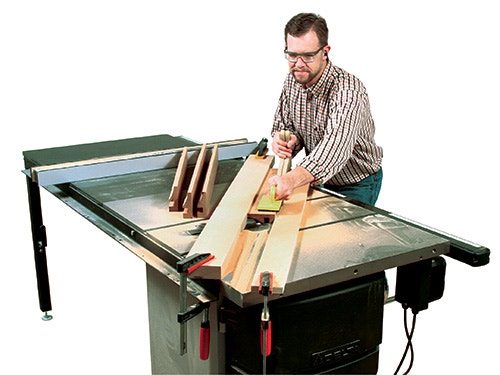
Mitering the rails and stiles is fussy, delicate work if you want them to close tightly. Honestly, these eight cuts will make or break your project. It's critical to adjust your miter gauge for dead-on 45° angles, so spend some time tuning it up and making test cuts. I fastened a long, stiff fence to my miter gauge and faced it with sandpaper to keep parts from creeping during cutting. A long fence will also enable you to use a stop block as an index for setting part lengths.
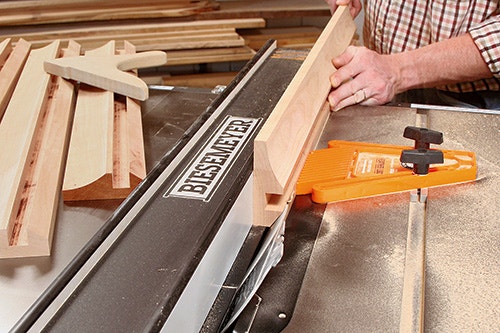
Although the photo shows me mitering both ends of a workpiece, this was actually the fourth and final rail I was cutting to fit. I would suggest you work on one corner of the frame at a time, mitering the parts and adjusting them for square before moving onto the next corner. I applied a piece of masking tape over the moldings before making each cut to keep tearout to a minimum. If a joint doesn't meet squarely, add a few paper shims between the workpiece and miter gauge on one end or the other before re-trimming. It can help you zero in on a partial degree that brings things nicely into square.

When three pieces of the frame are mitered, arrange them on a flat worksurface, and check the opposite rails or stiles for parallelism. The final piece will be the most tricky — it both brings the frame together and requires you to fit two joints at once. Make a test piece for this first and refine your settings before committing to the actual frame part.
When my joints fit properly, I cut slots for a single #20 biscuit at each corner, then glued up the frame. After the glue dries, touch up the intersections of your coves and bevels with sandpaper and proceed to finishing. I wiped on a coat of boiled linseed oil first to accentuate the cherry's rich, natural color, then sprayed on several coats of satin lacquer.
Making the Dentil Inlay

Make up a 4" to 6"-wide x 24" blank of 5/8"-thick stock for your dentil so you can rip all four strips from it after the slot pattern is cut. Dentil moldings are easy to make if you use a simple box joint jig: it's just a scrap fence fixed to the miter gauge and outfitted with a 1/4" x 1/4" pin to index each cut. Install a 1/4"-wide dado blade in your saw, and space the indexing pin 1/4" away from the blade. Plow all the 1/4"-deep slots, making sure to push the blank down firmly over the pin every time. Sand the resulting tabs gently and apply finish. I brushed on clear shellac to keep my maple dentil blonde. When the blank dries, rip it into strips that fit the frame grooves.

Cut and fit these strips one at a time. Start with a long rail, adjusting the dentil pattern left or right so the miter cuts create matching corners. Move onto the shorter dentil pieces, then finish up with the last rail. Consistency of the pattern is key here to a balanced appearance. Glue the dentil in place.
Now order the glass and cut a hardboard backer to size, and this project will be ready for its portrait or art print. Tack these layers in place with metal window glazing points. Add a hanging wire, and your custom frame is all set for its holiday debut.
Click Here to Download the Drawings and Materials List.


Keep the inspiration coming!
Subscribe to our newsletter for more woodworking tips and tricks