Project: Building Custom Racing Rig
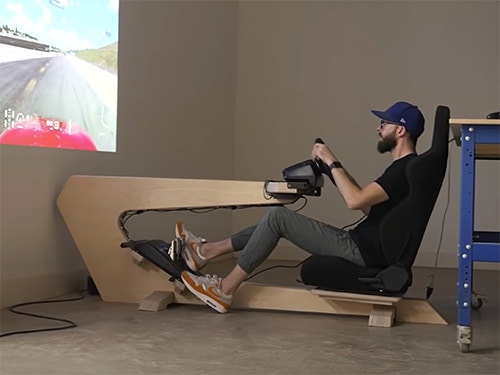
In this video, Chris Salomone designs a home arcade racing rig to play driving simulators.
Chris Salomone loves racing games, but has never owned a driving wheel. He designs and builds his own custom simulator including a projector display.
You can find more great projects and techniques from Chris Salomone at his website.
Please Note: The contest mentioned in this video has ended.
Featured Tools:


Chris Salomone: Something that you might not know about me is that I have always loved playing racing video games. We're talking Outrun, Gran Turismo, Mario Kart. RC Pro Am, Gran Turismo 2, Heynong, Gran Turismo Prologue, Gran Turismo Sport, you name it, I love it. But I've always played with either this or this when I'd rather be playing with this. Well, thankfully I just found the perfect excuse to make that happen.
Today, we're kicking off the Rockler Hobby Challenge, where the basic idea is to take something that you love and build something to help you enjoy it even more. Now, at the end of the video, I'll talk about it a little bit more, how you can enter, the prizes, all that stuff, but for now, let's start building this simulation rig. For the sim racing rig that I want to build, I have two basic ideas. The first, most obvious one is just make something that looks cool. The other idea would be to do something that's like discrete in a way, so maybe it looks like a different piece and it folds up in some way or something like that so it doesn't just look like a sim racing rig just sitting there. The cool looking idea is going to be bigger, ergonomically might be a little bit better. What's a cooler idea?
You probably already guessed by seeing the thumbnail for the video, but we decided to go with the cooler looking version. Our starting point was determining where all of the crucial bits would go. That'd be the seat, the steering wheel, the pedals, and then once we had that figured out, I could start to kind of design around them.
Dolores: Ready do one of those things, and then boop.
Chris: All the pieces to start figuring out what we're going to do. I say we kind of open stuff up, see what we got, and then maybe mock up some dimensions for the ergonomics and then that way I can design around that little leather boot.
Shaun: That's snappy.
Chris: Oh, man, this seems fun. I'm excited about this. If we have a panel here that attaches to, and then this panel needs to attach to the feet. I mean, God, this is going to be hard. We're going to want them like up kind of higher. That's pretty good. For them we can move back from there. We'll be okay, and it's not like we're going to take drives to San Francisco. We don't need to be that comfortable. If you want, we can start there. I can start just like roughly modelling things up. Let's start with that, and then we'll refine.
Shaun: Okay.
Chris: Good?
Shaun: Yes. Is this good content?
Chris: Yes, you can stop.
Dolores: I don't understand what it looks like. Is it a chair? Is it a whole little like a photo booth, little room?
Chris: Google sim racing rig.
Dolores: This has a big footprint. We should just have it come from the ground, the basement under there, and then just-
Shaun: This is now-
Chris: Lift up our house.
Shaun: Build a DIY basement.
Chris: You like my sim racing rig? It only cost us $150,000.
Dolores: This is insane.
Shaun: Do you think you'll drive? You'll try it?
Dolores: I'll try it once.
Chris: I can see her trying it. You're like a drink driver.
Dolores: I don't drink.
Shaun: Brake, brake, brake.
Chris: Here's the design concept. At this point, we'd figured out where in space the steering wheel, pedals and seat would live in relation to one another. From there I could start figuring out what kind of shape I could make that would hit all of those key dimensions and then hopefully just look cool beyond that. The basic idea was to make a sort of central spine shape that sort of flowy and organic and maybe very mildly race car inspired.
Once I had that figured out, I would have to come up with a way to make a few sort of mounting blocks that would act as intermediaries between the spine and the things that we needed to mount to it. Here's the basic idea that I came up with. From there I could model everything in 3D and then present it to the group. What do you think, Dlo? You like it?
Dolores: Yes. It's like a letter opener, but upside down.Shaun: Have you laid that out on a sheet of plywood?
Chris: No, I have not.
Chris: People always ask where I get my inspiration from, and I usually say the sketchers logo.
Dolores: You should start working sketchers.
Chris: All right, let me figure this out.
Shaun: All right.
Chris: More to come.
We've got our basic shape down. We know what we need to do, but now we need to find a way to take it from the computer and get it into reality on a sheet of plywood. There's a couple of different ways we can do that, and the most basic is going to be just finding some kind of plot points within the model that we drew and then translating those onto a piece of plywood and essentially just kind of connecting the dots.
That's what I did first, and you can see here that we can get a pretty good shape. A lot of this isn't super critical, really only a few little points are critical. The rest of it's just kind of a organic shape that we need to be reasonably close. That said something that you could do, but it takes a very specialized machine, although it will do it more accurately is use the CNC, so here we're flashing forward to me cutting out some small templates that I can use to create my big template.
Really we only need to do this one time. We just need to get to the point where we've got our first shape cut out of plywood, and then once we do we can use that as our template moving forward. I'm going to go ahead and get that taken care of, and then we'll have to figure out some other stuff, but this is the first order of business so let's get that done. Oh, my shoulder hurts.
Dolores: Are you ever afraid that you won't be able to like build your idea?
Chris: Oh, yes. I have the least confidence that you could have in something I have in this.
Dolores: It makes perfect sense, because if I were you, I'd be like, how the hell am I going to do this?
Chris: I mean, you're helping me to lose more confidence right now.
Dolores: Well, that's why I didn't wanted to ask.
Shaun: What are you not confident about?
Chris: It's just so different. The ergonomics of it involved, like the ergonomics of this are more complex than the ergonomics of a chair, and that's why people don't build chairs, whereas a coffee table or a dress or whatever just needs to look good and the dimensions don't really matter.
Shaun: The thing about something like this that comforts me and makes me not as nervous about it is that there's nothing riding on it. If I'm making a piece for a client or even if it's going to go in my own home, it's like, I don't want to screw it up.
Chris: The video would be honestly, if we totally felt on it, the video could end up being better. Dolores, I like the way that you introduced this topic then shut the-
Shaun: She's just clicking away over there.
Chris: While I was jigsaw on this, I had a thought. Remind you of anything?
Shaun: A racetrack.
Chris: Yes, we got a nice Chicane for the sim heads out there. All right. That's all. Unless you got anything else to say.
Shaun: That was just what you wanted to show me is that it was a racetrack?
Chris: Yes, I just wanted to show you that, now I got to route all this stuff.
Chris: I've got the first two done. I need five total. I'm thinking these two just go on the outside, then to save material on the inside we kind of make it out of piecemeal where you don't need to see it. Structurally, I don't think that should be an issue as long as we stagger the joints.
Shaun: When we were talking about this earlier, I was kind of imagining that because you have like some weird off cuts and we have like, we have a bunch of small scraps. Like in my head I was thinking what you would essentially do is like maybe take this piece, which is essentially useless for most applications and you could just lay it wherever it makes sense, trace it out and as long as you have that straight edge, attach it here and then you just start building around three times. I'm not sure what would be faster or what's more efficient or you-
Chris: That's the thing that always gets me, and me and you are the worst at this. We sacrifice a lot of time to be efficient with material which is good if you're a hobbyist in their garage, but when you're actually trying to get stuff done I waste so much time.
Shaun: Even if we had a free lumber supply, I still would be like, "I just feel bad, I don't want to be wasteful. Maybe this firstly you try it like this, you get it out of these weird chunks.
Chris: I could get all three or all six of these pieces probably just from this. This is a really weird shaped unless I can find some square pieces. These.
Shaun: There's that.
Chris: There's probably a pretty big question that a lot of you are asking right now, which is where's the TV go? While you could definitely mount a TV to the spine or on the wall we're not, and that's because we're going to use a projector. More specifically this Cinebeam 4K projector from LG, and there's two main reasons that we decided to go this way. First is image size and quality. By adjusting the distance from the wall, I can get a super vivid 4k Ultra High Definition image anywhere between about 60 and 140 inches.
Having that ability to adjust screen size coupled with the ability to adjust my proximity to the wall, I'll be able to make the image fill up my entire field of view, which will be just really immersive, and speaking of that image, I'm telling you video doesn't do it justice, but when you see it in real life at full scale, 140 inches at 4K is jaw dropping. Here's our genuine first impression.
Shaun: It's looks really good, though.
Chris: Yes, it does.
Shaun: It looks very sharp. It's not even that dark in here and it looks good.
Chris: We were going wild with it, and we're not that much bigger than it's actually meant for.
Shaun: I mean, this is like 400 inches, and it looks great.
Chris: No, I wanted to see what 140 looks like. Does it look like a cool bike?
Shaun: Yes, we could be new motorcycle builders West Coast chopper style.
Chris: This is West Coast choppers now. Obviously, this spine portion of the build is put together. Up until this point, it's just been repetitive. It's been a lot of cut-out-of-shape, glue on the layer, template route it five times over and over so now we've got the spine. Still got to make the feet, but I'm ready to start putting the things that matter on here where it's going to actually start getting crucial. Right now it's just an abstract shape. At some point, the seat was going to go here. We're going to put the pedals here. It's already fun. I think I'm going to just stack up some blanks of plywood to be the proper thick nine.
Shaun: Is that what these are?
Chris: I haven't done those yet.
Shaun: Shoot, sorry.
Chris: I was going to do like a stealth bomber shape. That's for you. I know how much you like that B52-- No, B- don't tell me.
Shaun: Which one?
Chris: The one that looks like Batman would fly.
Shaun: The Angular one or the-
Chris: That looks like a flying triangle. B50, 40, 20, 30, 70, 80?
Shaun: I hope I'm right.
Chris: I think you're wrong. I feel like I've named everything already. B- all right so far. Bea Arthur.
Shaun: What?
Chris: Bea Arthur?
Shaun: That's it. That's what they named it.
Chris: The Bea Arthur Bomber. B2 Bomber.
I told you I knew what it was called. What? How did that come up? This doesn't look like it.
Shaun: You said, you-
Chris: Oh, that's right. Yes, this thing is going to look like the B2 Bomber for you because I know how much you liked that one.
Shaun: Yes. Sure.
Chris: Here is going to be the footplate that the pedals are going to go on, but then we're going to need some support because we're going to be stomping down left and right. It's going to build some little wings that come out here and for that-
Shaun: Wings?
Chris: Yes. I was thinking of paying homage to another one of your favorite planes.
Shaun: Yes. What's that?
Chris: The Blackbird, that's the fastest. Was the fastest.
Shaun: I don't know if it's the fastest plane.
Chris: Do you know the number?
Shaun: Actually, might still. Yes, definitely know the number.
Chris: Is it a B?
Shaun: No. You don't know. If you don't know, you'll never guess it.
Chris: I know it.
Come on, guys. I know it. Then, anyway, so I'll put some wings coming out here for you because I know you like that.
Shaun: Nice. What about the part that the seat sits on?
Chris: That's just going to be a square.
Shaun: What is that going to be rem-
Chris: It's right here. Here it is. Oversized. I'm going to have to cut her down.
Shaun: What's that going to be reminiscent of?
Chris: This reminds me of like an aircraft carrier, and I know your favorite aircraft carrier.
Shaun: My favorite?
Chris: Yes.
Shaun: Not much of a boatman.
Chris: It is SS. They start with that.
Shaun: Sure.
Chris: Nimitz.
Shaun: Nimitz is a class of aircraft carrier.
Chris: Well, and the best. All right, so as far as the assembly should just all be like screwed down to stuff, except for I'll have to do pocket holes for these little wing guys that come out here. I'm thinking because they'll have a flat spot up here, so I think that I'll do a pocket.
Shaun: You're going to put the wings and the platform will be separate?
Chris: There'll be like a platform that the whole pedal thing-- it'll actually be two bars and then to support the underside of those bars there'll be those four little like wings that come out and so those that sit like flush with this, it would basically be like a piece like sticking out of right here. I think all you'll see is the front and the back of them. I could put them under here, but they'll be angled up, so it's probably better to go on the top side and then have the footplate cover it. I'll see once I get them made.
Shape is all done, got the steering wheel mounted. This just has nine screws going through it. Then I drilled a couple of extra holes into the mounting plate so that we can get two screws through there, plus it's clamped to the bottom. For the pedals, I've got these two mounting blocks that these are screwed into. I only screwed in two of them so far, but we'll do the rest after, and then there's these little like support wings so that it's nice and sturdy. The seat, I have a lot of trouble envisioning things, I can't picture things in my mind well. I had to like stare at it for 20 minutes and I feel like we had figured this out before, but I just couldn't remember what the solution was. Basically, on the underside of here, I mounted two little runners so that it's an inch and a half thick on the underside. That way I can screw into something with longer screws and it's not poking through the underside. There's screws that will go through the underside here into those runners.
This little nut right here is just a placeholder. This is basically like what would be on the underside of the chair that these bolts go into. I drill the holes through those runner plates and through here. This goes all the way through to the ground and there should be just enough room that we can basically get up through here and tighten that to the bottom of the seat. Is that how we had talked about doing it?
Shaun: No, we had talked about just doing away with the runners.
Chris: Oh, really?
Shaun: Yes. That was where we'd left it even though-
Chris: That would have been way easier.
Shaun: Yes, or-
Chris: Because that's the hard part. It's like a Roshambo. It's like you can't do A if you've done B, but you can't do-
Shaun: Honestly, all you'd have to do is put the chair on here. Get the two back ones if we had to close to even get to it.
Chris: Just cut this a little short?
Shaun: Yes. Then do the same thing up here. It's very, very close, but all you really need is just like a little. That might be easier.
Chris: That might be easier. I actually wanted to shape the seat plate a little bit like mimic a seat shape so that it gets narrower at the back and wider at the front and maybe curve it here and here. If I do that, it's going to expose more of it. If it's already like almost exposed, if I do that, any material that's beyond these rails is basically doing nothing.
Shaun: It doesn't matter. Right.
Chris: Before the nut was up here and it couldn't go down because it starts hitting that. Okay. We'll reconvene in 45 minutes.
Shaun: Okay. See you then.
Chris: Okay. Slots drill, seat cut short. Should we attach them back up and see if this'll work?
Shaun: Yes, let's do that.
Chris: When we do our final mounting, we'll pay closer attention to that.
Shaun: Yes, that's quite a bit better.
Chris: That's better.
Shaun: It's not like as much of a stretch.
Chris: Okay. Man, we're going to get made fun of by people who build stuff and people who are into sim racing. For people who are going to make fun of us about building stuff, like we know we're idiots, so we make fun of ourselves all the time.
Shaun: Hey, speak for yourself.
Chris: Okay. Shaun is good at building stuff. I would say I'm bad. Like I am slightly less than average. When it comes to building stuff, I'm just creative, and so I compensate with that.
Shaun: To be fair, this type of what you're doing here is like your-
Chris: The worst.
Shaun: That's your biggest-- What's that called?
Chris: My weakness.
Shaun: Yes. Your biggest weakness is this type of stuff. I know.
Chris: Shaun's weakness is the English language. Then to the people who will make fun of us that are like from the sim racing community, I've never even used a steering wheel before. I have no idea. I'm just doing it for fun. It's just something I've always wanted to do, but like either I was a little kid and couldn't have one or now being an adult don't have the room for one, but when this project came about, I was like, oh, let's try, it'll be fun. I'm sure this is going to be a completely stupid project if you were a hardcore sim racer and you saw this. Plus I'm playing Gran Turismo, which like people, if you're into sim racing, you'd be like, oh it's not a sim game. You got to get iCar or whatever.
Shaun: What? Grand Turismo is not-
Chris: Like people who are super into sim racing would be like that's a video game.
Shaun: Oh, I thought that I would've been like-
Chris: No, there's like-- It's called like iCar or something like that. iCarly. If you need me to design a coffee table, I can knock that out for you.
Shaun: Now that we've headed off all the bad comments-
Chris: Oh. People will probably make fun of us also because-
Shaun: We're talking about it.
Chris: We say like too much.
Shaun: I definitely do.
Chris: You can get on us for that.
Shaun: What else?
Chris: I don't drink. That's pretty pathetic. Generally speaking for like doing a hobby that people consider a man's man hobby. I'm not a man's man. Although I do have a wife.
Shaun: And you got two kids.
Chris: I got two kids, so that means I've at least twice that we know of with her, twice that we know of. Now I got to make feet. We got to hook everything up.
Shaun: Yes. I see. Let's get some laps in.
Chris: Hot or otherwise. All right. Making the feet is going to be a process that's really similar to making the spine, only obviously a lot smaller, which was great because it meant that I could route out the entire shape on the X carve rather than having to make a template on it, so basically less manual labor. Then I could glue nail and clamp everything together and once they were dry, attach them to the spine with a few screws.
Chris: Now we need to get under one. Obviously we wouldn't want this set up permanently like this, but what did you think of the size?
Shaun: Once I get used to it, it felt pretty normal.
Chris: You know, when you're playing it and you're focused on it, it's like taking up all of your vision.
Shaun: Like you have to make a conscious effort to like look at your shifts and what gear you're in and stuff.
Chris: So then I might want it even a little bit smaller. Maybe mounting the projector almost right behind this.
Shaun: We did have it there and then we pushed it a little bit back just because it was pretty small, but yes, we could move it forward.
Chris: Okay, so I'm thinking then what I'll do is I'll I'll basically build a small box.
All right. So as I thought about it more, there were three basic ideas that I came up with for projector placement. The easiest would be mounting it right in front of the steering wheel. The biggest possible downside to this would be shaking since it's physically attached to the spine. Though, I don't know, maybe that would make it feel more realistic, who knows? A slightly harder idea would be building a little table that kind of hovers over the spine. This would detach the projector so shaking wouldn't be an issue, but the downside is that it would have to sit further forward to not interfere with our legs and feet, which means that the whole rig would need to be farther from the wall. The biggest idea, and I'm guessing the best, would be to build some sort of cabinet behind the rig that the projector can sit in or on.The benefit here would be that you could house other components and cables, and, really, you could go pretty nuts with this. Maybe even make some sort of partition wall or bookcase or whatever fits this space where this thing's going to live. All that said, I think the best decision is to probably try these projector placements out and then see what makes the best experience and fine tune from there.
The other thing I still need to do is create amount for the stick shift. Again, I've got a few ideas. They all kind of boil down to the same idea, though, which is creating some sort of stand that attaches to the spine. That said, this is the one that I like the most. I think it fits aesthetically with the spine the best. Honestly, I'm not sure if I'm going to actually want to use the stick shift. To me, it seems like it's fun, but probably kind of worse than the paddle shifters. This idea is also the least attached and therefore it can be removed the most easily.
I know something like this rig would not be for everybody, and I had a ton of fun building it and I've had a ton of fun so far playing with it.


Keep the inspiration coming!
Subscribe to our newsletter for more woodworking tips and tricks