Measuring and Marking Basics
If you're like most woodworkers, you've spent a lot of time picking out the best woodworking machinery, hand planes, chisels, scrapers, rasps, clamps and all manner of specialized jigs, tools and accessories that help make your work more accurate and go more smoothly.
In the process, have you given much thought to the most fundamental tools in your shop - your marking and measuring tools?
It's worth taking stock of your marking and measuring tool kit. Most of the common problems in woodworking - joints that fit badly, out of square frames and casework, etc.- can be traced back to marking and measuring errors. And the majority of marking and measuring errors are rooted in a simple matter of using the wrong marking and measuring tools. In short, a tape measure just wasn't designed for making the close-tolerance measurements that many woodworking projects require. In this article we'll take a look at a few of the most common marking and measuring tasks in woodworking and at some of the tools that make the process easy, intuitive and accurate. Then, to help you get set up with a basic kit, we'll pick out a few essentials from Rockler's broad selection of marking and measuring tools.
Measuring and Marking Linear Dimensions
In most woodworking projects, measuring and marking linear dimensions is the first crucial step, and depending on the project, it can make for some exacting work. In projects that involve intricate joinery and small, close-fitting parts, measuring and marking errors as small as a few 100ths of an inch can turn up later as gaps in joints, misaligned parts and a host of other less-than-appealing results.
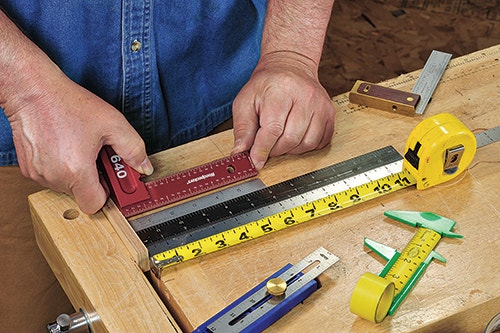
Measuring from point "A" to point "B" is a simple process, but your results still depend on how accurately you are able to translate a measurement into a physical mark on a piece of wood. If you've ever tried to hold a tape measure flat on a board while you accurately mark off a measurement, you know that just getting a clearly defined mark in exactly the right spot can be a surprising challenge. For precise measuring and marking, the tool you use needs to be readable and, of course, accurately calibrated. Going beyond that, the best distance measuring tools offer a little help in getting the mark in the right place.
Incra Precision Marking Rules are famous for their accuracy, lay flat, and have an easy-to-read scale. But what makes them the tool of choice for linear measuring is that they make it virtually impossible to put a mark in the wrong place. Incra rules are made with micro fine guide holes positioned at 1/32' increments so that, used in conjunction with a mechanical pencil or a metal scribe, you'd really have to try hard to put a measurement mark anywhere other than exactly where it's supposed to be.
Special features of some tools further simplify one of the most common measuring tasks in woodworking - measuring and marking a distance from an edge. Tools like the Incra Precision T-Rule and Precision Bend Rule take care of positioning "point A" in the "point A to B" measuring formula while still offering the famous Incra accuracy and easy-to-use design. All that's left for the woodworker to make a perfectly positioned mark at a precise distance from an edge is to get the scribe or mechanical pencil in the right guide hole and make a mark.
Measuring Squareness
When you put a square on the end of a board to check a cut, you're trusting the "known" 90 degree angle of the square to tell you something about the piece of wood. But how square is a square? Some manufacturers tell you. Crown Hand Tools' rosewood and brass Try-Miter Square is manufactured in accordance with British Standard 3322, which means that it is accurate within a tolerance range of .01 mm/cm, or a little over 2 thousandths of an inch over its 6' blade. Part of the benefit of knowing the tight tolerance range of the square you are using is knowing that it is manufactured in accordance with a standard. A good many squares on the market don't boast a manufacturing standard at all.
Do fractions of a degree really matter? Often, inaccuracies in angle measurements that you are not even aware of multiply in accordance with the number of slightly off-square marks and cuts you make over the course of a project. When you are joining a large number of parts a tenth of a degree here and a tenth of a degree there really starts to add up. Remember, too, that you'll use a square to check the angle of your table saw blade and miter saw fence alignment. Slightly off-square angle settings on these tools are multiplied by two every time you make a joint or join two boards and can noticeably affect the flatness of edge glue-ups and miter joints.
The Crown try-miter square is especially handy because it also allows you to check and mark the second most common angle in woodworking - 45 degrees. A combination square takes that versatility and adds to it with a graduated scale and a blade that can be adjusted and locked into position to gauge depth or distance relative to the edge of a material. The combination square was borrowed from the machinist's tool chest years ago, and because of its all-around usefulness, it remains the "workhorse" square in most woodworking shops.
Angles Other than 90 and 45 Degrees
90 and 45 degree angles may be the most common in woodworking, but they're not the only ones that come up. For marking angles other than 90 and 45 degrees, most woodworkers use a sliding bevel, or "T-bevel." The T-bevel's sliding blade is infinitely positionable and has the added benefit of giving you four possible handle-to-blade angle orientations when the tool is set up in the "T" shape (with some of the blade on either side of the handle).
If you're shopping for a T-bevel, it's important to look for one that has a good lock down mechanism so that you don't run the risk of accidentally moving the angle setting while you're using the tool. This classic example by Crown with a rosewood body and steel blade cinches down more than well enough to hold a setting for as long as you need it to.
Measuring Angles
A T-bevel is strictly an angle marking tool; it doesn't' tell you anything about the measurement of the angle. For that you need an angle measuring tool, and there you have a few choices. But to simplify matters, we can divide angle measurement into two basic tasks. In general, you'll either want to set a tool or make a mark at a known angle, or you'll want to know the angle measurement of an existing angle, like the angle of a corner where two walls meet. From the host of angle measuring tools on the market, here are a couple of top picks for the two tasks.
If you need an accurate measurement of an existing angle, you won't do better than the Starrett Protractor / Angle Finder. The tool is calibrated to read both inside and outside corners and quickly gives you not only the angle of the corner, but also offers the correct miter setting for your saw. Starrett is one of the most trusted names in calibration and measurement tools, so you can be confident that the Protractor / Angle Finder's precision matches its speed. A tool like the Starrett angle finder is an essential angle measurement tool for fitting your work into the real world, which, as anyone who's ever installed cabinets, crown molding or any kind of trim will tell you, isn't always laid out in perfect 90 degree angles.
Measuring Depth, Gap and Thickness
Often, woodworking projects require that you measure a short distance with extreme accuracy. Fine tuning the depth of a rabbet, checking the width of a dado and measuring the thickness of veneer or stock all call for a tool that will give you extremely precise short distance readings. For these necessarily finicky measuring tasks, you really can't go wrong with a digital caliper.
The digital caliper is the latest advancement in a precision measuring tool that migrated from the machinist's tool kit into the wood shop years ago. They're equipped with sets of jaws that measure inside and outside dimensions with accuracy in the 1000ths of an inch range, and a probe that slides down from the bottom of the tool to gauge depth with equal precision. Calipers are also available in models that have a dial readout and a standard calibrated scale, but the modern digital variety is so easy to use and read that most woodworkers find the slight upcharge for the feature well worth the price.
Putting Together a Basic Measuring and Marking Kit
- 1. Tape Measure. Did we give you the impression that we don't like tape measures? A tape measure will always be an irreplaceable woodworking tool.
- 2. Incra Precision Marking Rule. As we've pointed out, you can't beat this tool for precision measuring and marking.
- 3. Incra Precision T-Rule. Measuring and marking a distance from an edge is one of the most common tasks in woodworking. The Incra T-Rule is the tool for measurements up to twelve inches.
- 4. Cabinetmaker's Pencil Set. A quality graphite pencil that sharpens to a micro-fine point for accurate marking.
- 5. Try-Miter Square or Engineer Square. Judging squareness is so central to woodworking that we think every shop should have a tool that does it accurately.
- 6. Combination Square. One of the most versatile marking and measuring tools ever introduced into woodworking.
- 7. T-Bevel. For years and years the T-bevel has been the tool for marking angles other than 90 degrees.
- 8. Incra Precision Protractor. A specialized tool that will give you the angle measurement precision you need for complex projects.
- 9. Starrett Protractor / Angle Finder. The best tool for dead-on accurate angle readings.
- 10. Digital Caliper. There really isn't any better way to get precise measurements of the depth of your rabbets, the width of your dadoes or the thickness of your stock.


Keep the inspiration coming!
Subscribe to our newsletter for more woodworking tips and tricks