Making Rabbet Joints
Understand the many types and applications of rabbet joints.
One of the first joinery cuts that new woodworkers try is the rabbet. A rabbet is simply an open-sided channel or recess along the edge or across the end of a board or panel. Easy to cut, it helps locate parts during assembly, and it provides more of a mechanical connection than does a butt joint.
I vaguely remember thinking, back when I was tackling my first home improvement projects, that with practice I'd "outgrow" rabbet joints. Well, of course, I'm still cutting rabbets, because woodworkers never "outgrow" them.
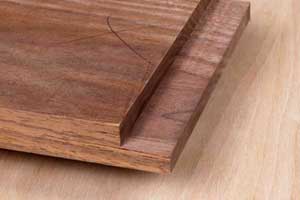
The most common form of rabbet joint is what I call the single rabbet joint. Only one of the mating parts is rabbeted. The cut is proportioned so its width matches the thickness of the mating board, yielding a flush fit.
The depth of the rabbet for this joint should be one-half to two-thirds its width. When assembled, the rabbet conceals the end grain of the mating board. The deeper the rabbet, the less end grain that will be exposed in the assembled joint.
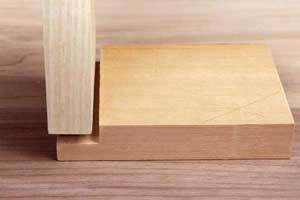
In the double-rabbet joint, both the mating pieces are rabbeted. The rabbets don't have to be the same, but typically they are.
Either form works as a case joint. In casework, you often see rabbets used where the top and/or bottom join the sides (end-grain to end-grain) and where the back joins the assembled case (both end-to-end and end-to-long). In drawers, they're often used to join the front and sides.
Because end grain glues poorly, rabbet joints that involve it usually are fastened, either with brads or finish nails or with screws concealed under plugs. (OK, in utilitarian constructions, we don't sweat the concealment.)
Either form also makes a great right-angle edge joint. We see this in the case-side-and-back combination, but also in practical box-section constructions like hollow legs and pedestals. Long-grain joins long-grain in these structures; that glues well, and you have a terrific, strong joint.
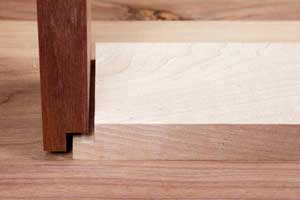
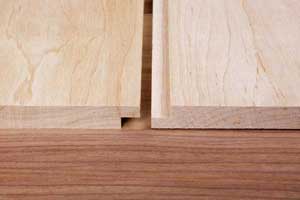
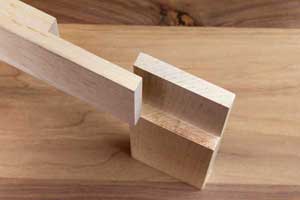
A rabbet joinery variation very useful in casework — especially casework being built of sheet goods —is the rabbet-and-dado joint. This is a good rack-resistant joint that assembles easily because both boards are positively located. The dado or groove doesn't have to be big; often it's a single saw kerf, no deeper than one-third the board's thickness. Into it fits an offset tongue created on the mating board by the rabbet.
It is a good choice for plywood casework, because it's often difficult to scale a dado or groove to the inexact thickness of plywood. It's far easier to customize the width of a rabbet. So you cut a stock-width dado, then cut the mating rabbet to a custom dimension. An extra cutting operation is required, but the benefit — a big one — is a tight joint.
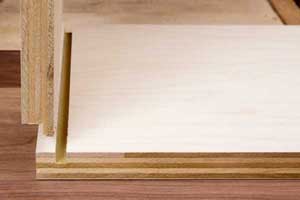
We don't necessarily think of the rabbet as a flat edge-to-edge joint, yet we all know of the shiplap joint.
A shiplap joint is formed by overlapping rabbets cut into opposite faces of adjoining boards. I'd call it a carpentry kind of thing, used in siding and natural wood paneling. But you'll see it in the backs of centuries-old cupboards and cabinets.
The joint allows individual boards to expand and contract seasonally without opening gaps between it and its neighbors. And that's the whole point of shiplaps. The rabbets are quickly cut, absolute precision is irrelevant; yet they serve a valid purpose.
In the same vein, we seldom perceive the rabbet as part of a frame joint. But almost all end-lap variations incorporate a rabbet cut in at least one of the mating parts. To make a half-lap joint, for example, we cut rabbets across the ends of the mating parts and nest them together. The joint mates face grain to face grain, an excellent gluing situation (even if the grains cross in the assembly), thus yielding a very strong frame joint.
There are two additional rabbet joint variations I want to mention.

The mitered rabbet joint is one of those you see in drawings but seldom see in real projects. That's a shame. It's a good joint and it isn't difficult to cut on the router table. The joint's benefits are its clean appearance, its improved stress resistance over a plain miter and its ease of assembly.

The dovetail rabbet joint is simple to make on the router table. You use a dovetail bit instead of a rabbet or straight bit. The joint comes together neat and square. It's more resistant to racking than a conventional rabbet joint.
Overall, rabbet joinery is simple to cut. Effective tools and techniques abound. The router, in my opinion, is the best all-around rabbeting tool. You can take the tool to the work, or the work to the tool. You can cut a precise width without measuring. You can rabbet curved edges, you can rabbet narrow edges.

It almost seems that rabbeting is something a router does best. Yes, it does do it well, but there are pitfalls to be wary of. It's awfully easy to gouge the cut or round the end of the shoulder when using the router handheld. And chipping at the edges of a long-grain cut is common.
There's more to the operation than merely selecting the rabbet bit with the correct cutting width, chucking it in your router, setting the depth of cut, and routing. But that's the obvious way to do the cut, so let's look at that approach first.


Keep the inspiration coming!
Subscribe to our newsletter for more woodworking tips and tricks