Making a Miter Cutting Sled
A swiveling arm and multiple pre-set stops enable this table saw sled to cut miter angles quickly and accurately.
Recently, I wanted to make a garden lantern that required quite a few small, but accurately sized and mitered pieces — and I didn’t want to make them on the chop saw. I have to confess that I've never had a totally satisfactory relationship with the chop saw (or miter saw, if you prefer that name), despite the fact that I own a well-recommended model from a good brand. While I am sure that they are extremely useful in house building and general carpentry, I find that the short back fence and the small table don’t allow me to control the material as much as I want to for fine woodworking.
So, what to do for the small, mitered pieces for my project? This is my answer: it's a sled with a swiveling arm that locks to my most important miter angles and holds workpieces securely for cutting. Here's how to build it.
Making the Base and Arm
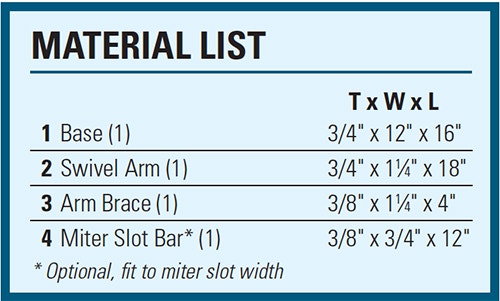
The first requirement is a good base. Mine is made of oak and measures 3/4" thick by 12" wide by 16" long. Plywood would work fine, too. Either way, chamfer the corners to reduce splintering.
The second component is a swivel arm, also made of oak. After ripping and crosscutting it to size, I rounded the ends at the band saw and used a sanding drum in the drill press to smooth the curves.
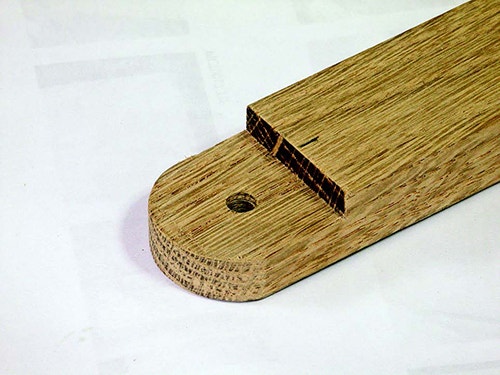
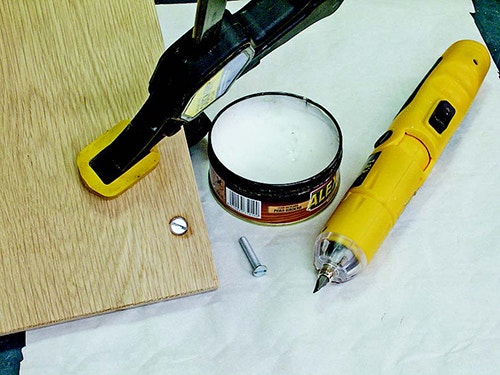
On one end of the swivel arm, I drilled a 5/16" centered hole through the piece, then removed half its thickness for the first 1-1/2" of length. Measure 4" in from the other end and cut a 3/8"-deep, 1-1/4"-wide dado into the bottom face for the arm brace. Make the brace so it fits snugly in the dado, but before gluing and screwing it to the arm, round over its end and drill a 5/16" centered hole through it. Elongate this hole with a rattail file to about 1/2".
Installing the Arm
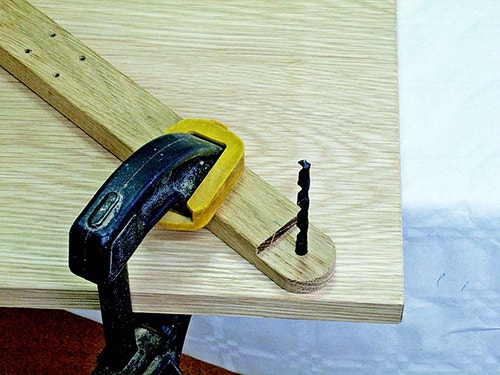
Here's how to install the arm. First, position and clamp the swivel arm to the base so the pivoting end is about 1-1/2" in from the bottom right corner. Now, using the arm hole you already drilled as a guide, drill a matching hole through the base. Then remove the bit from the drill press and use it as a pin to line up the holes in the two components.
The jig requires two 5/16" x 1-1/2"-long flathead cap screws or carriage bolts. The first of these fasteners is going to be the fulcrum of the swivel arm. It should fit the holes in the arm and base snugly so there’s no unwanted play.
Countersink (for cap screws) or counterbore (for carriage bolts) the bottom of the sled base so the head of your cap screw or carriage bolt won't foul the surface of your table saw. Install the arm on the base with a washer and nylon insert locknut.
Now it's time to establish miter stopping points for the arm. For that, you'll need an angle finder. These are inexpensive and come in a variety of sizes. Mine is 12" long. Adjust your angle finder to 45°. Set the swivel arm against the angle finder and then mark where the elongated hole on the arm is positioned on the base. If you want the jig to be really useful, repeat this process for 30° and 22.5°, as I have done, to give you the angles for six- and eight-sided frames. Now drill a 5/16" hole through the base at each of the reference marks you've made. Countersink or counterbore these holes on the underside of the jig base, too.
Setting Up the Jig

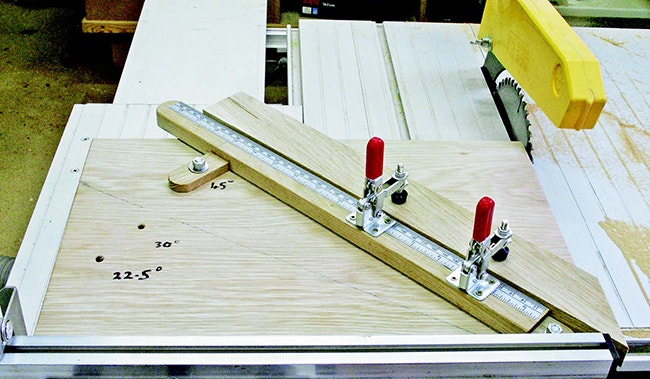
You'll notice in the opening photo of this article that my table saw has a sliding miter table feature. If your saw doesn't have one, then make a miter slot bar from a scrap of stable hardwood so your sled can be guided by the miter slot instead. The bar should slide in the miter slot with no extra side-to-side play. Position the bar on the sled base so the edge of the base will come to within about 1/8" of the blade. Attach the bar to the base with short countersunk flathead wood screws.

Notice also that I hold the sled against the fence of my sliding table with a couple of short handles attached to the front edge; if you are running this jig along a miter slot, those will be unnecessary for you.
Insert your second 5/16" cap screw or carriage bolt up through the jig base and through the elongated hole in the swivel arm at the 45° mark. Lock it into place with a washer, lock washer and a nut. Do not over tighten it. Now add a couple of toggle clamps to the top of the swivel arm to hold workpieces securely to the base, and you are ready for fine-tuning the jig.
Clamp a piece of square-edged scrap to the jig. Hold the jig against the fence of your sliding table (if applicable), and slide it forward or along the miter slot to trim the end of the scrap. Repeat this with a second piece of scrap. Then set the two mitered ends together to form a square corner, and check the test corner for accuracy with an engineer’s or combination square.

If the scraps don’t form an exact right angle, loosen the lock nut on the arm brace and adjust the arm's angle slightly — this is why we elongated the brace hole. Now re-cut the scraps and check them for square again. When you are satisfied that the jig is cutting a true 45° angle, trace the exact position of the swivel arm’s back edge on the jig base.
Repeat this process to set up the other two angles. From now on, and if you have a sliding table on your saw, as long as its fence is set to produce an accurate right angle, the jig will automatically produce three different miters just as accurately. (If you use the jig with a miter slot bar, your jig will be accurate as well once the miter angles are determined and drawn on the jig base.)
Adding the Ruler
If you cut a lot of miters, you may want to add a ruler to the top of the swivel arm as I have done. This is how you calibrate it to the blade. Miter-cut the end of a piece of scrap to 45°. Now measure the exact length of the remaining scrap, and draw a line across the top of the swivel arm where the scrap ends.
Unscrew the toggle clamps, and trim a stick-on tape rule to the length of the swivel arm. Remove the backing and apply the tape to the swivel arm, making sure the measurement you took for the end of the scrap corresponds with the correct measurement on the tape rule. Replace the toggle clamps. This ruler will only be accurate when you are cutting 45° miters. However, it will give you quite a good guide for the other angles.
Adding the Ruler

Miters are essential any time you don't want to show end grain. Of course, the 45° setting on the jig will be useful for making square corners. The 30° and 22.5° angles are handy for producing glued-up blanks to form arches and circular frames or other items.
I have found that the jig works best when taking a fine slice from the end of workpieces. With a quality crosscut blade installed in my saw, the jig produces angle cuts to a degree of accuracy that I've never been able to achieve with my chop saw. Because of this, I tend to use my chop saw to rough-cut the pieces to length, and then finish-size them with this jig. I have also found that the second toggle clamp holds short workpieces safely for mitering.
Click Here to download a PDF of the related drawings.


Keep the inspiration coming!
Subscribe to our newsletter for more woodworking tips and tricks