Making Kitchen Tongs
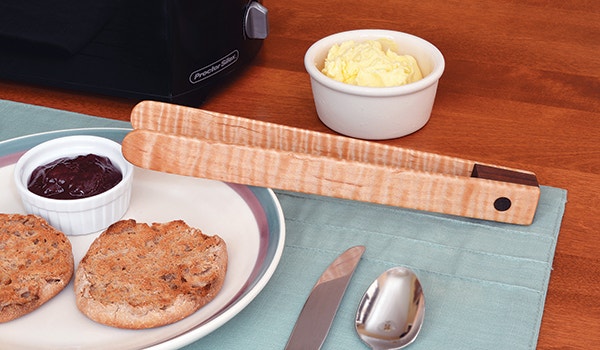
Rounded sides plus a wedge fulcrum create tongs that can be adapted in length to serve a variety of functions.
I sometimes have a hard time getting things out of a toaster. Full-size pieces of bread are usually OK, but smaller pieces (and just about all English muffins) don't seem to pop up high enough to grab without burning my fingers on the toaster. Of course, if you don’t let the toast cool for a few moments before grabbing it, you can burn you fingers on the hot toast, too.
An easy-to-make pair of grabbers like these "toasty tongs" will fix all that. And there's no need to relegate them strictly to toast duty, either. The tongs presented here also go perfectly with a veggie tray, and by changing a few key dimensions you can use the same process to create tongs of any size for any cooking task.
So, with that in mind we decided to just go into the shop and proceed with two main goals. The first, to come up with two attractive but very different styles of picture frames. The second was that they should not require a builder to purchase 10 additional router bits just to make them.
As with most utensils used for cooking or food preparation, it's best to steer clear of open-grained wood. I've selected some outstanding tiger maple for the tongs themselves, while the fulcrum and rear accent present a wonderful contrast in dark walnut.
Tongs of this length must be able to bend easily, so you'll want to start with stock no more than 3/16" thick. Anywhere from 1/8" to 3/16" is a good working range.
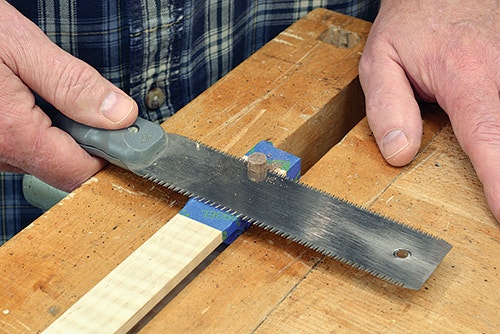
Cut the two sides of the tongs to a width of 1", then to a length of 9". Now, round one end of each piece for the front of the tongs and sand the two pieces up to 150-grit. Set them aside for now.
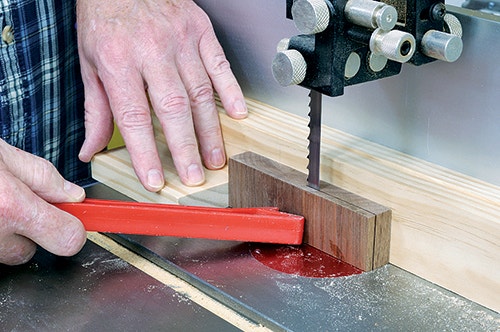
The tong sides are attached to a fulcrum on the back end that sets the angle of the tongs. The fulcrum is just an angled wedge that anchors the two halves together. You can cut the wedge with any saw capable of cutting an angle, but this is a really small workpiece and I found it easiest to do on a band saw by tilting the table and using push blocks to keep my hands clear. For tongs of this length, a wedge angle of 2-1/2˚ on each side made for an opening on the business end of 1-1/2", which will nicely handle both toast and cut veggies. (More on angles a bit later.)
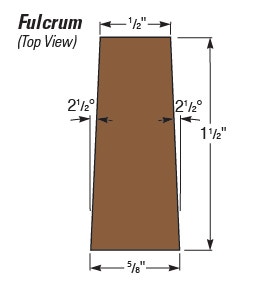
To achieve the 2-1/2˚ angled sides on the wedge, tilt the band saw table to 5˚. Slide your workpiece into the blade — the orientation has the grain on the fulcrum vertical here — and cut a small section. You don't have to cut much, as this piece will only be 1" wide. Back the workpiece out of the cut, return the band saw table to level, and cut the resulting wedge to size. I only made a single 5˚ cut, but once you square the ends when cutting the wedge to width and length, it evens out to 2-1/2˚ on each side.
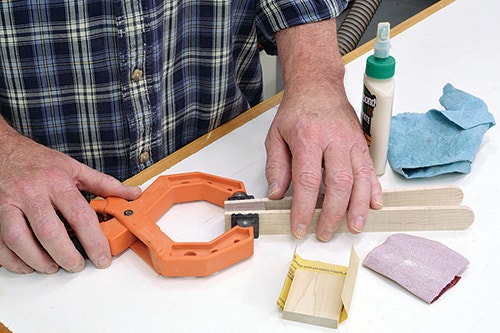
Apply glue to the wide faces of the fulcrum, clamp the tong sides into place and allow to dry. This glue joint is long-grain to long-grain, so it’s plenty strong. Although it doesn’t strictly need reinforcing, an accent not only looks great, but it will make the fulcrum joint even stronger.
Center a 5/16" hole through the fulcrum. If drilling this hole by hand, be sure to angle the drill so the hole goes squarely side-to-side. On the drill press, support the tongs on one end to angle the assembly so the hole is vertical right through the fulcrum.
Glue a short length of 5/16" walnut dowel into the hole, then secure the tongs in a vise and trim the dowel flush. Once cut, sand the dowel smooth.

To make it easier to slip the tongs down into your toaster, let's bevel the ends a bit. You can do this with a rasp or coarse paper on a sanding block, but a disc sander is easiest to work with, as the squared table helps make the bevel even and level side-to-side. Remove beveling marks by following up with sanding through higher grits with a sanding block. These tongs will get a finish of boiled linseed oil, so I sanded up through 220-grit.
As I typically do when oil finishing kitchen utensils, I flooded on the oil and let it soak for a bit and then wiped off the excess. The next day after it was dry, a once-over with 400-grit sandpaper made the wood smooth as can be before adding two more coats of oil and then buffing the tongs to a soft sheen when fully dry.
As noted earlier, you can make these any size. A set of tongs 12" in length would work well for salad or for using with a skillet, while bumping up the length to between 18" and 20" (with a fulcrum lengthened to 2-1/2" to 3" for strength) would be ideal for using with the grill. As you lengthen the tongs, also consider making them wider than the 1" used here. With additional length, you can also make the tong sides thicker.
Keep in mind that the longer you make the tongs, the wider the resulting opening will be. Do a dry assembly of your components and decide if the opening is appropriate to the intended use: if it's too big, decrease the angle when cutting the fulcrum so the opening is smaller.


Keep the inspiration coming!
Subscribe to our newsletter for more woodworking tips and tricks