Making Dowels with Router Bits

All you need to make dowels in any species you like is a half-round router bit.
Why make dowels? It's a fair question, until you encounter a project where the home centre options for dowels won't do. As you probably know, wood species of common dowels is pretty limited: red oak, poplar, maple and possibly cherry or walnut. What happens when you want to accent some stylish joints with dowel pins and you wish you had a dowel made of cocobolo, Osage orange or purpleheart? Good luck finding them! Or, say you're building an outdoor chair made of cypress or redwood. You want to cover the screw heads with wood plugs, but should you use a red oak dowel to do it? Not if you want the plugs to last as long as the chair will. Most common dowel species aren't suitable for exterior use. But, there's a solution: all you need to make dowels in any species you like is a half-round router bit. As the name implies, it makes a semicircular cut. Half-round bits come in many radii, starting with 1/8-in. and going up to 1-in. or more. For most woodworking projects, a 1/8-, 3/16- and 1/4-in. half-round bit would be all you'd need for the majority of dowels you're likely to use for woodworking. They'll make 1/4-, 3/8- and 1/2-in.-diameter dowels, one after the next, whenever the need arises. Here's how:
Step 1: The key to successful dowel making is to begin with carefully prepared stock. Select material with straight grain and no visible defects, and choose a piece that's a couple of feet long and 6 or more inches wide for safe, easy machining. You'll want to start with at least twice as much dowel stock as you actually need to convert into dowels; there will be some fine-tuning and test pieces involved to refine your router table setup.
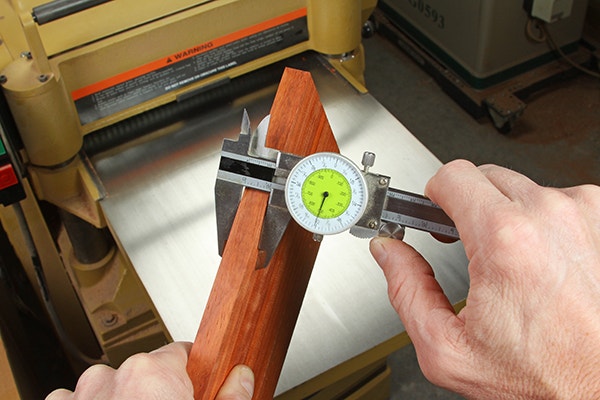
Step 2: Flatten one face of your workpiece at the jointer, then head to the planer to reduce its thickness to match the dowel diameter you want to make. For our example in these photos, we'll make some 1/2-in.-diameter dowels from padauk with a 1/4-in. radius half-round bit. As you're planing down the material, use a dial callipers to check your progress. Get as close as possible to the final targeted stock thickness.
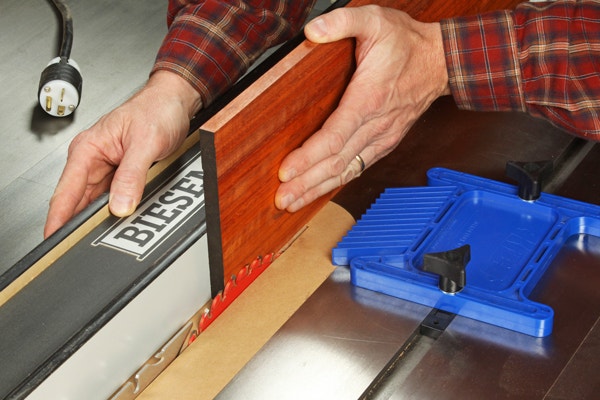
Step 3: Take your board to the table saw, stand it on edge beside the blade and shift the rip fence over until the fence just kisses the opposite face of the workpiece. Lock the fence. With the fence at this position, you can rip square dowel blanks whose widths will match the board thickness. After you cut the first blank, check its proportions with a callipers again to ensure the dimensions match. Then cut your workpiece into as many dowel "sticks" as the board will allow. Use a featherboard, positioned just ahead of the blade on the infeed side of the saw, to support each rip cut. Guide the cuts between the rip fence and the blade with a narrow push stick.
Step 4: With your handful of dowel sticks ready, it's time to install the half-round bit and zero in the correct settings. This is an important process because, in order for your dowels to have circular profiles, the bit needs to be set precisely. Chuck it in the router table, and raise the cutter until the bottom edge of its "C" shaped cutting profile is flush with the table top. Set a small square or rule against the bit and inspect your bit height, sighting across the table with your eyes even with the table for a straight-on view.
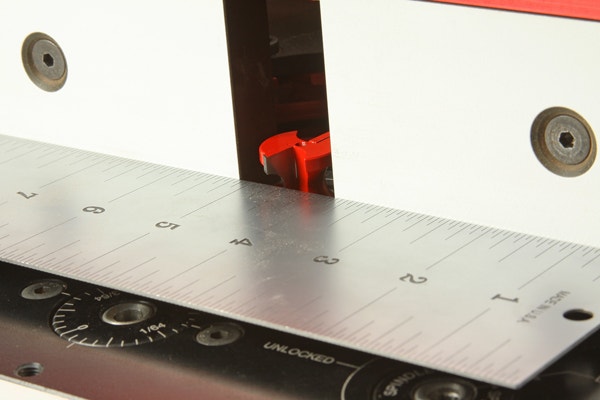 half-round router bit installed in table" />
Step 5: Now, open your router table's fence facings and slide the fence up and around the bit. Turn the router bit until its cutters are perpendicular to the fence facings when viewed straight down from above. Then, adjust the fence back or forth until the deepest part of the bit's convex cutters is flush with the fence's face. Use a thin steel rule to check this alignment, and see Photos 4 and 5 for clarity. (Note: For dowels 3/4-in. in diameter or less, you can set the bit to make the full radius cut in a single pass.

However, for larger diameter dowels, set the bit height as described in Step 4, but begin the routing process with the fence exposing only about half the bit's cutting profile. Make one or two more passes, moving the fence back some each time, until you expose the whole cutting profile. This will reduce wear and tear on the router and bit as well as produce cleaner, burn-free cuts on the dowel stock.)
Step 6: Install a featherboard just ahead of the bit on the infeed (right) side of the router table, and clamp a second featherboard to the router fence. Position it on the outfeed side of the bit. This way, the dowel stock will be pressed firmly down against the table and in against the fence.

Step 7: Start the router and feed the stock into the bit at a moderate pace. Use a push stick to advance the blank up to the first featherboard. Once it reaches this point, step around to the outfeed side of the router table, and pull the dowel the rest of the way through. The featherboards will keep the dowel immobilized while you change positions.

Step 8: Next, flip the dowel blank end-for-end so the remaining square edge is against the router table fence. Keep the original "up/down" orientation the same. Push the workpiece through the bit again to complete the dowel shape.
Out-of-round Dowels and Their Causes

Hopefully, your first router table setup has produced a perfectly round dowel. But, as we forewarned, you may need to do some fine-tuning to correct less-than-perfect attempts. Take a look at Photo 8. The left-most dowel is round. The four other darkened examples need some tweaking. Here are their causes:
Second from left: This dowel turned out oval-shaped, horizontally, during routing. Chances are, the stock is a tad too wide, but the bit is set correctly. Use a slightly narrower workpiece, and rout again.
Center: The flat sides of this dowel indicate that the deepest part of the bit's convex cutter is not flush with the router table fence, so part of the cutting profile isn't being exposed. Re-check the bit/fence setting carefully.
Second from right: If the dowel emerges from routing with a single flat top or bottom, either the stock is too thin or the bit is set too high or too low in the table. Adjust the bit height, and try another dowel. If the problem persists, prepare some slightly thicker stock.
Right: Here, the dowel is oval, top to bottom, after routing. Either the stock is too narrow, or the bit's profile is slightly proud of the router table fence: it's cutting away too much material with each pass. Double-check your stock dimensions and the bit's fence projection again.


Keep the inspiration coming!
Subscribe to our newsletter for more woodworking tips and tricks