Making Custom Knives

A folding pocketknife or fixed blade is handy to have around the house or in the field. I recently tried my hand at making my own knife from a kit.
There are several knife kit sets available. I chose the 440 stainless steel knife kit from Sarge Knives. Open one of these kits Saturday morning, and by lunchtime you’ll have a custom-made knife ready for finishing. Cut, drill, sand and glue — that’s about all there is to it. You could make the knife as a gift, or give the whole kit to a fellow woodworker to craft on his or her own.
Simple Templating, Drilling
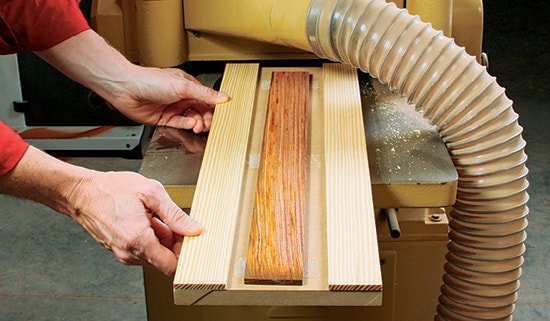
There’s no metalsmithing involved in building these knives; you’re simply making the two wooden handle halves, called scales, which attach to the metal liners (folding knives) or the tang (fixed blade knives). We’ll make the larger folding knife here. Start by jointing and planing a piece of stock for the scales down to about 1/4" thick. Make it long enough to lay out two scales end-to-end and wider than necessary. On the folding knife, the flat ends of the scales fit against raised metal bolsters. Their intersection forms about a 7° angle, so crosscut the two ends of the scale blank to this angle. Doing this will help keep the grain pattern of the wood running parallel to the knife body.
The knife blade is razor-sharp. Before you start handling it for the building process, wrap the blade with three layers of electrical or duct tape for safety. Then lay the knife on the scale blank so the bolster is snug against the angled end of the wood. Trace around the edge of the liner to form two opposing scale shapes. Draw the shapes on the "show" side of your workpiece, and mark the scales with an "L" and "R" to orient them clearly.
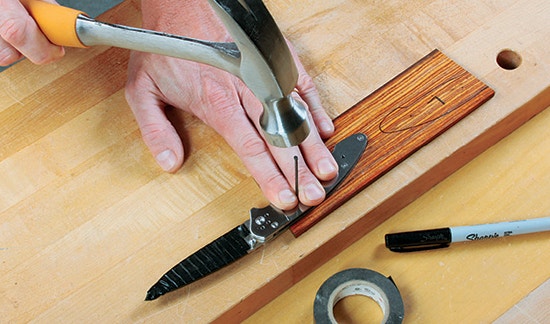
Each scale will be attached to the metal liners with two tiny machine screws and epoxy, so drilling for those screws is your next step. Use a finish nail or 1/16"- diameter drill bit to mark a centerpoint for each screw hole, tapping the nail or bit through the liner holes as a reference. Now, search your drill bit collection for a 3/16" brad-point bit to counterbore the screw heads and a 3/32" twist bit for drilling the screw shank pilot holes.
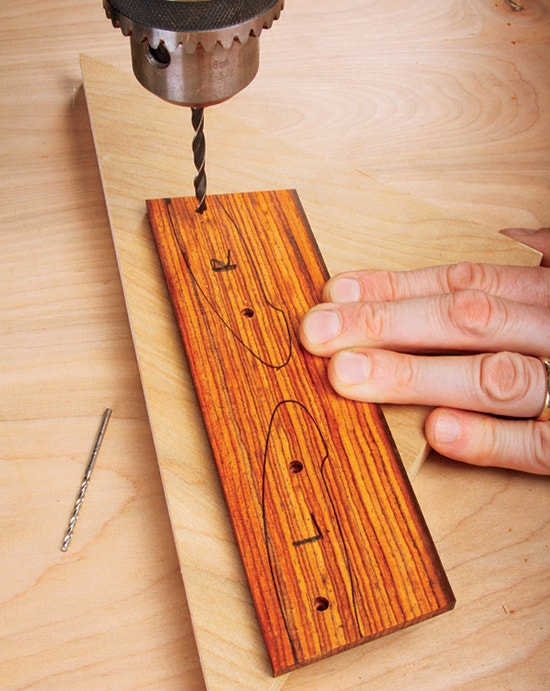
Sarge's instructions recommend that, when fully seated in the scales, the screw shanks should not extend more than 5/64" through the back side of the scale material. So, drill a couple of 3/32" pilot holes through a piece of scrap liner stock, then follow with the 3/16" counterbore to adjust your drill press for the correct counterbore depth. Slip a screw into the test holes and measure the amount of protruding thread. Once you’ve got an accurate test hole, drill the four counterbores into the two scales at the centerpoints you marked previously. Switch to the 3/32" bit and, aligning it with the spur centerpoints created by the brad point, drill a pilot hole through each counterbore.
Tipping the Scales
It's time to cut out and shape the scales. A scroll saw, band saw or coping saw will do the job. Just make sure you cut about 1/16" outside of the two tracings so there's a bit of extra material all around the scales for the shaping process. Screw the scales temporarily to the liners.
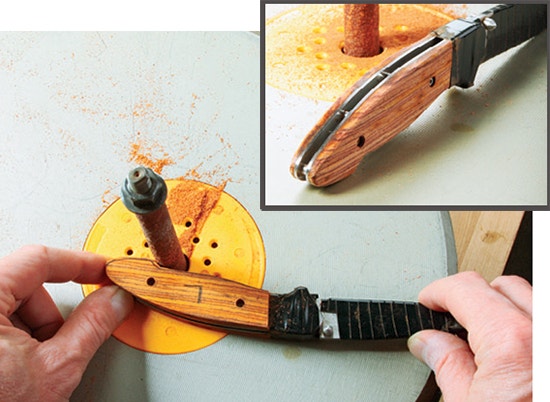
After wrapping the bolsters with tape to protect the metal, install a coarse sanding sleeve in your spindle sander (or a sanding drum in your drill press) to sand the two scales until their edges are flush with the metal liners. Keep the knife moving to prevent divoting the wood.
Now you’re ready to reduce the scales’ thickness at the front end so they’re even with the metal bolsters and the handle has a uniform contour that’s comfortable to hold. I found the quickest way to shape the scales was to invert and clamp my belt sander in a bench vise and use it like a stationary tool. I started the sand- ing process by holding the leading end of each scale flat against the moving belt near the sander’s front wheel, and rocking the knife slowly from front to back to form a gentle arch. I continued until the back ends matched the bolster thickness but left the center areas thicker.
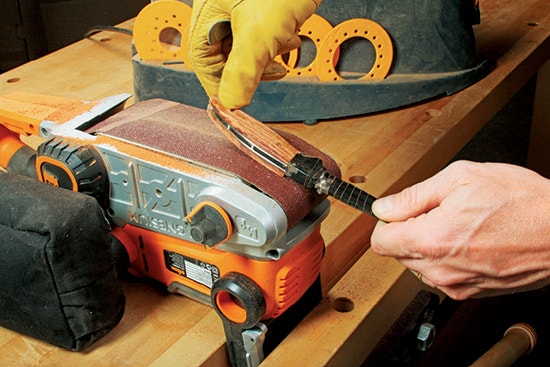
From there, I eased the edges of the scales at the spindle sander and then added more contour across the handle’s width at the belt sander again. This was easy to do by holding the knife perpendicular to the belt's travel and rolling the knife gently across its narrow width. Once you finish the rough shaping, work up through the grits by hand to remove all surface scratches. Start with 100- grit, and follow with 120-, 150, 180-, 220-, 320- and 400-grit. Look closely for scratches.
Finishing Up
Any durable wood finish will work for this project. I applied a coat of dewaxed shellac to seal the oily cocobolo I used for my knife scales, then followed with two coats of oil-based poly. After it thoroughly dried, I buffed the finish to a shine on a cloth wheel in the drill press.

Remove the scales, clean the liners with acetone and epoxy the scales in place. Install the screws and belt clip. Your new knife is ready for gifting. Now make another one ... this time, for you!


Keep the inspiration coming!
Subscribe to our newsletter for more woodworking tips and tricks