Maintaining a Band Saw
How to set your band saw blade tension, blade tracking, and guide blocks.
Next to the table saw, the band saw is one of the most important machines in most woodshops. You can use it to saw straight or curved parts, create joinery, cut turning blanks from green logs, resaw planks into book-matched parts and veneers, and much more. But to keep this versatile tool performing well, it requires both occasional maintenance and regular adjustments and tune-ups.
Some tasks, such as the inspection of wheel tires, motor belts and pulleys, etc. need only be done a couple of times a year or so. But most basic adjustments, including setting the blade guide blocks and thrust bearings and adjusting the tension and tracking of the blade, need to be done each time you change the band saw's blade. Following this schedule of maintenance and tune-ups helps prevent the saw from developing vibrations and blade wander (where the blade doesn't cut true and won't easily follow the line of cut) and keeps your band saw cutting straight and true.
Tensioning and Tracking the Blade
For the next series of band saw adjustments, fit your saw with a good-quality 3/8-in.- or 1/4-in.-wide blade: one that's straight, with no lumpy sections and a smooth, well-aligned weld. First, drop the guide post that holds the upper guide assembly down to a couple of inches above the saw table and remove the blade guard assembly, if necessary. Then, adjust the blade guide assembly and thrust bearing so that they're retracted all the way back, and loosen and remove each of the guide blocks. Repeat all this on the lower guides.
You'll want to don gloves for the next step: Carefully slide the blade onto each wheel, roughly centering it on each tire. Now increase the blade tension, just until the blade gets taut. A good trick I learned from machinery expert Robert Vaughan is to sight the saw blade from above and increase the tension until the blade stops straightening out, then give theadjustment about 1/2 to a full crank more.
Note that this might not correspond with the indication on your saw's blade tension scale. That's OK. Just avoid over tensioning the blade (as some woodworkers have recommended). This WILL NOT make a band saw cut better, and can cause problems of its own, such as excessive wear to tires and wheel bearings.
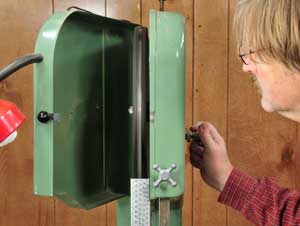
Tip: always remember to replace the pin that locks the halves of the saw table together after removing and replacing the blade. The table is much weaker without the pin in place, and could crack if the table were accidentally knocked or leaned on heavily.
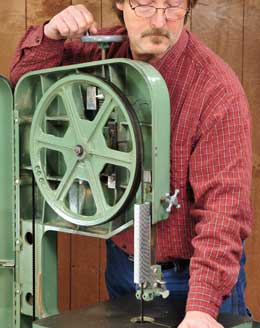
Now spin the saw's wheels slowly with your finger while adjusting the tracking slowly. The ideal is to get the blade to ride on center of the tire, atop the crown.Once you've achieved this, close the lower wheel door, plug the saw back in and turn the saw on. Standing on the side of the saw opposite the doors (just in case the blade gets thrown), fine tune the tracking setting until the blade runs smoothly and consistently on the center of the tire. Lock the tracking adjustment in place. If the blade wanders back and forth on the crown, inspect the tires again and replace or recrown them as necessary. If the tires are in good shape, check the alignment of the wheels, as described in the next section.
Checking Wheel Alignment
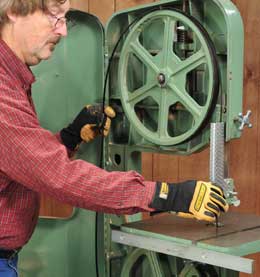
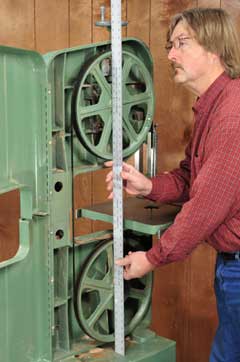
If your saw blade wanders during cutting and/or you need to turn the tracking control and tilt the upper wheel excessively in order to track the blade, you should check to see if your saw's wheels are improperly aligned. Ideally, the two wheels should be coplanar with one another, as well as on axis (in line, when viewed from directly above). You can do this with a long (3-4 ft.) straightedge, placed across the faces of both wheels. Adjust the tilt of the upper wheel until the straightedge rests fully across the rim of the upper wheel and contacts the rim of the lower wheel. Ideally, the straightedge should contact the lower rim in two places, top and bottom. If it doesn't, the wheels aren't coplanar. To check the plane of a three-wheel band saw's wheels, compare the plane of the drive wheel relative to each of the other two wheels.
With some saws, you can correct wheels that are out of plane by removing one of the wheels and adding thin shims on the axle, and space them to bring it into plane with the other wheel. On other saws, this isn't easily done; best to contact a machinery specialist to do the work.
Adjust Guides
Once the blade is tensioned and tracking well, you're ready to adjust the guides that keep the blade from twisting sideways or deflecting excessively backwards as you cut. As the majority of band saws use friction blocks guides, I'll describe the steps needed to condition and set these properly (if your saw has ball bearing guides, skip down to the section on adjusting the guides, below). Start by removing both sets of guide blocks from the upper and lower assemblies. Inspect the face of each block for wear. If it's grooved or distorted, you can recondition the face of a standard steel guide block by grinding or filing it until it's smooth, flat and square relative to its edges. If your saw has phenolic "Cool Blocks," recondition them with a disc or belt sander.
Tip: By dressing both surfaces of each rectangular block, you can simply reverse them the next time they wear down.

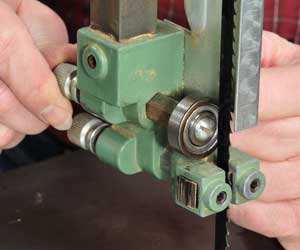
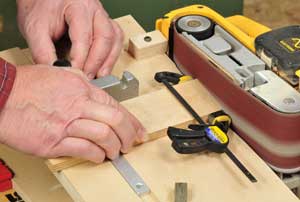
With the guide post raised a couple of inches above the saw table, insert the blocks into the upper guide assembly. Now bring the guide assembly forward until the front edge of the blocks is just a hair behind the back edge of the blade gullets (the scooped spaces between the teeth). Now spin the top wheel by hand and slowly press one guide block until it just kisses the blade. Tighten the lock screw that holds that block in place, then gently press the opposing guide block until it just touches the blade, and tighten its lock screw. Now give the saw's wheels one more spin to make sure that blade runs freely. If not, back off one or both guide blocks just a hair. Fit and adjust the blocks in the lower guide assembly the same way.

Before adjusting the thrust bearings, check to make sure that the bearings are clean and spin freely. If the bearing's just a bit sluggish, lubricate it. Turn the knob that moves the bearing forward until it just touches the blade, then spin the wheels. Back the bearing off until it only makes light contact with the blade, spinning once or twice per a complete revolution of the wheel. Remember that all guide components need to be readjusted each time a new blade is installed.


Keep the inspiration coming!
Subscribe to our newsletter for more woodworking tips and tricks