Machine Cut Mortise and Tenons
Modern machines and jigs simplify and streamline their construction.
In some ways, benchtop mortising machines are akin to a drill press. In other ways, they are much different.
Mortising Machines
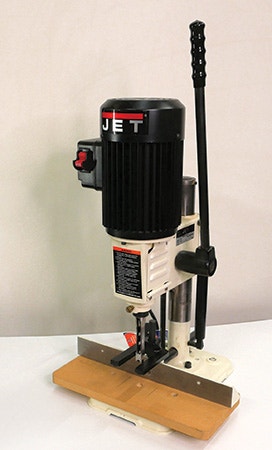
In other ways, mortisers are much different. They are built around an induction motor sitting on top of the machine assembly, and the chuck is fixed to the shaft of the motor directly. They are mounted to a framework that is fixed to a robust column. A substantial rack-and-pinion gear allows a hand lever to force the chisel and auger down into the wood with powerful leverage. That's important, as it often takes significant force to drive the chisel and auger into the wood. It's one reason the lever is so long and built so strongly.
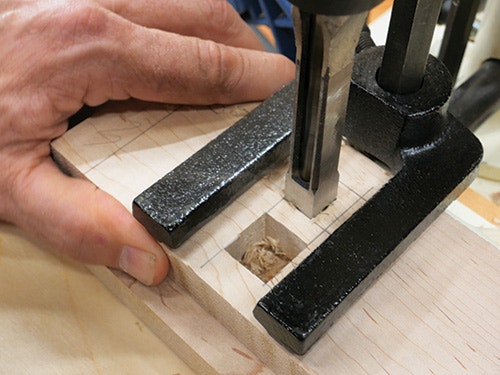
The bed of the machine, attached to a cast-iron base (into which the column is seated) has a replaceable sacrificial board to protect the chisel and auger as you machine through mortises. Mortising machines have a rudimentary holddown system that helps keep the stock you are mortising from lifting up as the chisel is withdrawn. These hold-downs are a critical feature, as it is very common for the stock to want to lift up.
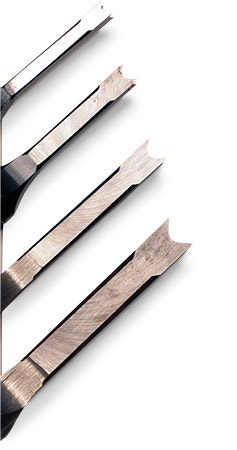
The way the whole system works is that the auger bit rotates inside the hollow square chisel. The end of the bit cuts into the wood first, and a specially-designed spiral groove lifts the waste inside the hollow chisel to an opening on one side, where the chips will be expelled. Usually, this works, but sometimes the chips clog inside the hollow chisel and need to be removed manually. While all that is happening, the four sharp corners and the flat faces of the chisel are cutting the hole square, with the auger removing that waste, too.
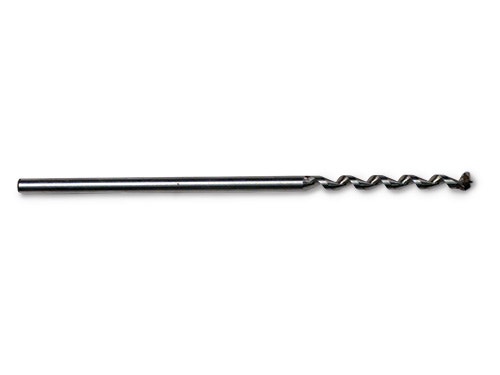
The key to making these machines work best is to keep the chisel very sharp and the auger properly set. The auger's cutting edge needs to be about a dime's thickness below the end of the chisel. This allows the auger to remove the bulk of the waste, while the chisel only chops the corners and flat surfaces. Bore the mortise in short steps, raising the chisel up to allow the auger to discharge the waste. Another tip is to chop the opposite ends of a mortise and then chop out the waste between those first cuts in a series of overlapping steps. This method keeps the bottom and top of the mortise fully vertical and can prevent the chisel from accidentally bending. That's it for creating the square hole portion of the joint. Now, on to making its mating part.
Table Saw Tenoning Jig
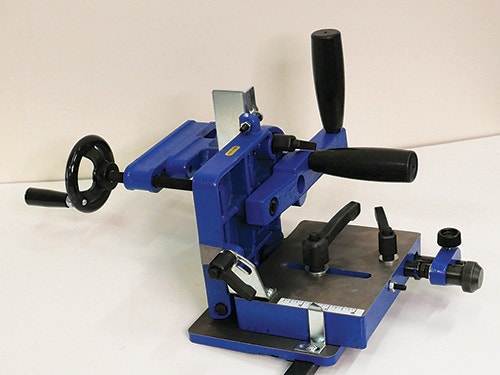
As with many woodworking tasks, there are several ways to raise tenons. Router tables and band saws are two of them. But a very common and effective way to do it is by using a cast iron tenoning jig on a table saw paired with either a standard or dado blade.
The tenoning jig has a bar on the bottom that rides in the saw's miter grooves. These jigs have been around for a long time and are very adjustable. One of the reasons they are so popular is that you can set up repeatable, accurate cuts. If you are making a bunch of tenons, once you've set the jig up, you can work very quickly.
Tenoning jigs consist of a heavy-duty cast-iron base joined to several adjustable "fences." Those parts allow you to form something as complicated as an angled tenon or one cut at exactly 90 degrees. They set how much material the saw blade or dado cutters will remove in each pass and where that stock will be wasted away.
A screw clamp firmly secures the piece being cut, and a handle enables the stock to be pushed through the cutters. This system keeps your workpiece in a rock-solid grip and your hands far from the saw blade, adding safety to the control and accuracy it provides. The mass of the cast-iron jig also promotes smooth cuts.
Table Saw Tenoning Jig

Using a mortising machine and a table saw tenoning jig will significantly speed up the time it takes to make this tried-and-true joinery. Even so, some basic rules apply, whether you are making them with these tools, hand tools or in some other manner.
When you're making these joints by hand, it's best to chop mortises first and then size the tenons to fit the opening. The same goes for machine-cut mortises. Mortiser chisels come in diff erent sizes, but there is no subtle adjustment when using them ... you get what you get. The tenoning jig, on the other hand, can be adjusted in tiny increments to make tenons fit whatever mortise you've cut.

A quick way to revive the sharpness of a hollow chisel is by honing them on a very fine diamond stone. Keep the face flat on the surface and make just a few passes per face. There are also cone-shaped hones for these tools, for honing the interior end at the tips. But use hones with caution, as you can do more harm than good to the chisel with them if you are not very careful. Finally, as mentioned before, adjust the auger bit so its cutter extends slightly beyond the chisel edges. This is a must for effective use of a mortising machine.


Keep the inspiration coming!
Subscribe to our newsletter for more woodworking tips and tricks