Layered Color: Special Effects with Stain
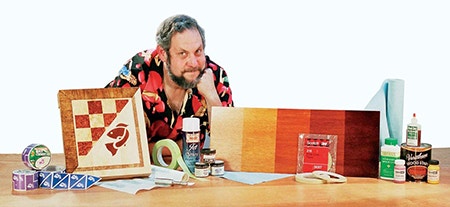
Slap some stain on a piece of wood and you change its color. Apply several layers of stain and you can add depth, hide sapwood streaks and mismatched wood, make one wood mimic another, match a commercial finish or fool the eye to create inlays and stringers that don’t really exist. Layering stain is one of the simplest, yet most effective, tools for bringing wood to life, or changing its appearance entirely.
The reason is simple. Lay on several coats of paint in different colors and you will see only the last one, since each coat of paint obscures the ones below. However, apply several layers of stain, and each one adds color while combining with what is below. Stain on raw wood still allows you to see the wood. Layers of stain have the same ability to add color and blend with one another while letting each contribute to the overall appearance.
Uniformity and Richness
Probably the most common use for layered staining is in commercial finishes. Large companies use a multi-layer stain schedule to blend mismatched wood, hide sapwood or other anomalies, and ensure that every single piece comes out exactly the same color, no matter what differences there were in the wood used. Typically, they will start by staining the raw wood, often with a dye, to create a background color. After the wood is sealed, a pigmented wiping stain will be added. Once that is sealed, a thicker "glaze" of pigment stain is wiped on and off to bring out highlights and further unify the color. Finally, a clear coat with dye added to it is sprayed on to blend everything together into a consistent color.
This same layered recipe can also add richness and depth. Not all wood is dazzlingly beautiful on its own, and commercial furniture makers often must make the best of cheaper, plain wood. We all do, sometimes. By adding layers of dye, then pigments as wiping stains and glazes, and finally toners, we can, like the manufacturers, create a rich, multi-hued depth for rather unexciting wood. Below, I explain one recipe that perks up simple lauan, but the same tricks will work on poplar, gumwood, alder, willow, and a host of other plain woods.
Fooling the Eye
Less common, but far more intriguing, is the use of stain layers to fool the eye. I've seen acres of red alder stained to mimic more expensive cherry, poplar colored to look like mahogany, and gumwood mocked up to impersonate walnut. That is just the tip of the iceberg, though.
If you add masking materials, you can create convincing stringers, inlays, and even cross-grain edge banding. Glaze a sealed section of plain wood, then use a bit of fine steel wool to add grain lines in a different direction, and you can create convincing "veneer" patterns.
Types of Colorants
Both dyes and pigments are used as raw wood stains, and both show up in layered work, too, although in different formats. Dyes are frequently added to clear finishes, which are then sprayed or brushed on in thin layers. Called "toner" or "shading lacquer," these translucent, colored finishes act like the theater gels used to create colored spotlights. They appear as if a film of colored plastic wrap was used to envelop a piece of furniture. Applied evenly, they will add a uniform color coat that floats atop the wood. Hence, they can add both color and uniformity. In spite of the fact that they are translucent, excessively heavy coats can still obscure the wood, making it too much of a good thing.
Pigments are used in more or less the same form as in stains, but they tend to behave differently when put over sealed wood, even when it is only a thin coat of sealer. Rather than be absorbed by the wood, they sit on top, but still lodge more heavily in carvings, flutes, and even the grain of open pore woods. The fact that the wood is sealed means you will have more opportunity to manipulate the stain, and can often wipe most of it back off. Thus, you can add graining patterns, color density variations and visual textures with the pigments. As with dyes, too much pigment will start to muddy the look of the wood. To make pigment stains easier to manipulate, they are also sold in a slower drying, thicker bodied format called "glaze." You can use either glazes or stains for any of these layered techniques. The important thing to remember is to let the material dry, then add a coat of clear finish over each coat of color.
Types of Masking
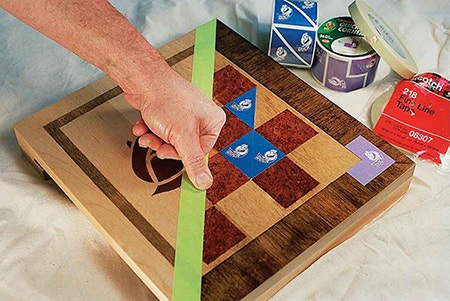
Staining raw wood in a masked pattern requires two steps. First, apply masking over the portion you intend to stain. Now seal what will become the unstained areas with a sealer, such as Zinsser® SealCoat. When the sealer is dry, remove the tape and mask the sealed areas. The sealer under the masking tape will help create a crisp, stained edge. Otherwise, the stain could migrate through the wood underneath the masking.
Techniques
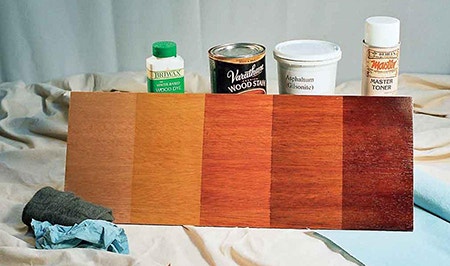
To create the look of rich, brown mahogany, I started with an amber yellow dye on lauan. The dye adds a background glow that will create highlights in the final finish. After a thin coat of Zinsser SealCoat had dried, I applied a cordovan pigmented wiping stain to bring out contrast in the pores. That was also sealed, then a uniform glaze of asphaltum lent a brown tint to the wood. Finally, a light spray of reddish toner made the whole piece darker, while blending everything together.
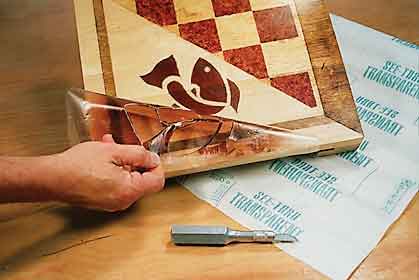
Faux Veneer
I used pre-cut masking squares to lay out the checkerboard, but first I dyed the raw wood over the entire board, then sealed it. That gave me the color for the light squares. Once the masking was in place, I daubed on pigmented stain to give a mottled burl texture to the contrasting blocks. When the board was done, I masked it, exposing only the last two inches around the edge. These got a thick pigmented glaze, which I wiped with fine steel wool to make a grain pattern going 90 degrees to the edge of the table. Miters were made not by masking, but by holding a piece of coarse sandpaper, rough side down, over the wet glaze while creating the directional lines with steel wool. The rough grit sits over the wet glaze without smearing it, creating a very effective masking shield.
The stringers were stained directly into the raw wood. I first masked the thin line that would become the stringer, then sealed all the rest of the board. After removing the stringer masking, I masked on either side of the raw stripe before staining the wood. For the inlaid fish, I cut the shape out of clear book cover material, then pressed it down, protecting both the unstained areas and the stringers. A light spray of toner lacquer created the inlay.
If you can't afford the most expensive species, don’t despair – layering stain can take an otherwise ordinary piece of wood to exciting new levels.


Keep the inspiration coming!
Subscribe to our newsletter for more woodworking tips and tricks