Installation Tips for European Hinges
With the European hinge cup holes drilled, you're ready to begin laying out the location of the hinge mounting plates on the cabinet. The goal of this step is to lay out the hinge mounting plate locations so that they correspond correctly with the location of the hinge cup holes on the door. This can be accomplished in a number of ways. With the help of the hinge instructions and a little arithmetic, you can measure and lay out all of the hinge mounting plate screw locations in advance. As an alternative, here's a fairly easy method that requires almost no math, very little measuring and is guaranteed to work:
To begin, you'll need to recall (or measure) the position of the top hinge cup hole-center in relation to the top of the door. Once you have the measurement, measure down from the top of the door and make a light mark on the back edge (for overlay doors) or front (for inset doors) of the door corresponding to the center-point of the cup hole. To avoid having to erase a pencil mark later, stick a strip of masking tape in the general location of the hole beforehand.
Now, hold the door up on the front of the cabinet in the correct vertical position (with the top and bottom edge of the door overlapping the front of the cabinet by 1/2" for a 1/2" overlay door, for example) and transfer the cup hole center mark to the front edge of the cabinet.
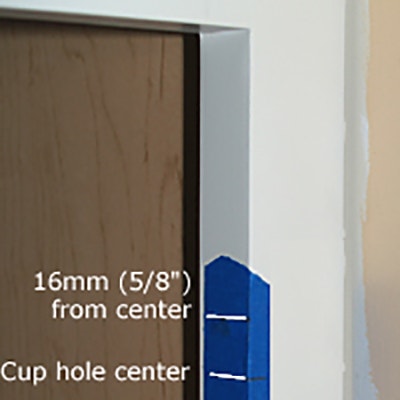
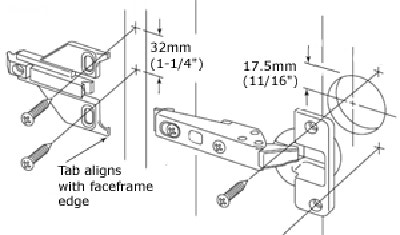
Next, you'll need to know the location of the topmost screw hole in relation to the cup hole center mark. Thanks to the standardization of European hinges, you can virtually count on the mounting plate screw holes being 32mm apart on center. So, the vertical position of the topmost screw hole will be 32mm/2 = 16mm up from the cup hole-center. Measure up and mark the top screw's vertical location on the inside edge of the face frame or cabinet wall (5/8" is a perfectly acceptable equivalent for 16mm, if you're more comfortable with fractional notation). As you'll see later, this is the only crucial vertical measurement you'll need to make.
You'll also need to know how far in form the front edge of the cabinet to position the mounting plates. For face frame cabinets, this is usually simple. Most Euro-style face frame hinge plates/brackets have small tabs that align with the edge of the face frame. To position them, you simply hold them up on the cabinet face frame in the correct vertical position and use them as a template to mark the location, or to save a little time, as a pilot hole drilling template for a self-centering bit. If you're installing face frame hinges, do that now, drilling or marking just the topmost screw hole for the time being.
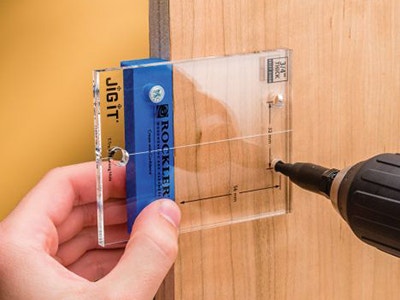
For frameless cabinet hinges, either refer to the instructions for the correct screw hole location, or use a handy Rockler Jig-It Template for mounting plates. In the case of frameless cabinets, it speeds things up to mark a line at the correct distance in from the edge of the cabinet in the general location of both hinge mounting plates at this time. Take a rough measurement of the vertical location of the bottom hinge and mark a line at the correct distance in from the edge of the cabinet for the bottom hinge plate screw holes. Then mark a "distance in" line for the top hinge and use a square to transfer the vertical position you've established for the topmost screw to the correct location on the interior cabinet wall. As with face frame hinges, drill the just topmost pilot hole of the topmost hinge for now.
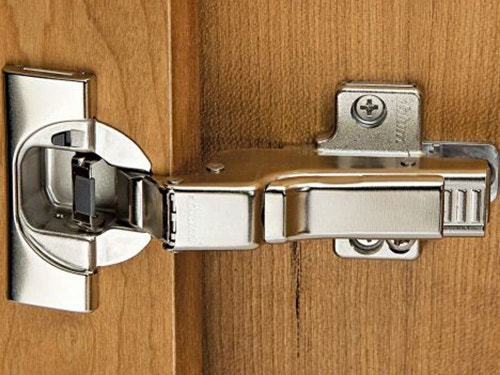
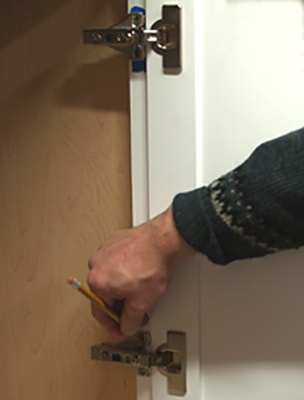
Now it's time to attach the hinges to the door. There's nothing particularly complicated here, but you will want to make sure that the hinge arm is at a 90 degree angle to the edge of the door. Using a square to align the edge of the hinge cup plates with the top and bottom edges of the door works well (assuming the doors are square). It's also a good idea to drill pilot holes for the screws using a #6 self centering bit. The self-centering bit ensures that the screws will be centered and won't pull the hinge out of alignment when they seat.
Next, screw the top mounting plate to the cabinet using the single pilot hole you've made. You can do this with just the plate (which is the easiest course if you're using clip-on hinges) or with the entire door with both hinges already attached. Either way, what you want to end up with is the door - with both hinges installed - suspended buy a lightly snugged down top hinge plate screw. This will allow you to use the actual location of the remaining mounting plate screw holes as a guide.
You're task is almost done. Swing the door into position on the cabinet and use the hinge plates to as a template to either mark or drill the remaining pilot holes. With all of the pilot holes drilled, all that’s left is to unscrew the single hinge plate screw and remove the door, erase any marks or peel off the masking tape, re-attach the door to the cabinet and make adjustments as necessary.
Once you've been through it a couple of times, you can zip through the door hanging process is a few minutes. And, using a hinge cup jig, you'll have no trouble moving from undrilled doors to the finished product in less than half an hour.


Keep the inspiration coming!
Subscribe to our newsletter for more woodworking tips and tricks