How to Make and Install Custom Wood Plugs

Replace messy, mismatched wood putties with custom wood plugs you make yourself.
Screws are a quick and sturdy way to reinforce simple joinery, but usually you'll want to hide the screw heads when you're through. There are two ways to do it: smear on some wood putty and hope it blends in well enough with the finish color of the project (it almost never does!) or cap the heads with wood plugs. The big advantage to wood plugs is that you can cut them from a scrap of the same lumber as the project, so their tone and grain blend right in. Wood plugs are a breeze to make and install. Once you try them, wood putty will seem like a poor excuse.
Tools for the Job
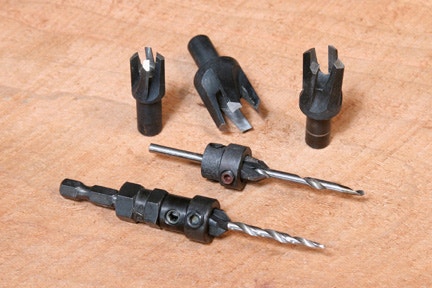
In order to "do" wood plugs right, you'll need a set of countersink drill bits that come with an adjustable collar for counterboring. But first, let's clear up a little terminology. "Countersinking" the screw means you're imbedding the screw head until it's flush with the surrounding wood. "Counterboring" involves driving the bit further into the wood to set the screw head about 1/4 inch below the wood surface and create a hollow for the wood plug. If you have the option, buy countersink bits with hex shanks. The smooth-shank variety will invariably slip in your drill chuck sooner or later, especially when you're drilling counterbores in tough wood. You'll also need a set of plug cutters that make tapered plugs. They're usually sold in three sizes for making 1/4-, 3/8- and 1/2-inch-diameter wood plugs.

Step 1: Select the correct size countersink bit for the screws you plan to use, and adjust the cutting length of the bit to match the screw length. Then, slip the counterbore collar onto the bit and fasten it in place about 1/4 inch above the tapered countersink cutters.
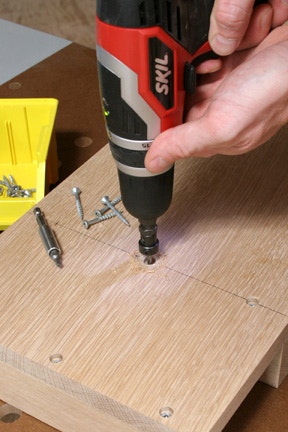
Step 2: Drill the screw pilot holes, and continue drilling until the counterbore collar just touches the wood. Don't press down harder than necessary; if you use brute strength, the collar can mar or burn the wood. Switch bits and drive the attachment screws until they seat in their holes.
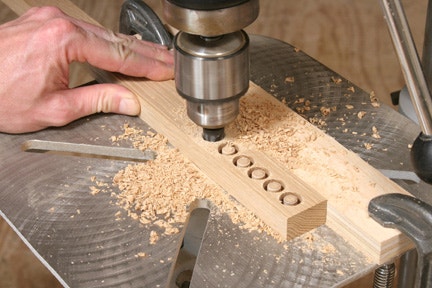
Step 3: Choose the plug cutter that matches the counterbore size of your screw holes and install it in a drill press. (Caution: Plug cutters have no pilot to guide the cut, so they're not safe to use in a handheld drill.) Clamp a fence to your drill press table to back up the plug workpiece, and select a piece of scrap stock that matches your project wood. Set your drill press to medium speed, and feed the plug cutter into the wood with slow, steady pressure. Stop cutting each plug when the cutter bottoms out in the wood.
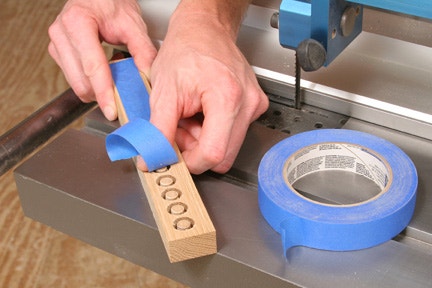
Step 4: At this point in the process, some woodworkers simply snap the plugs free with a wood chisel or screwdriver, but once the plugs are loose, it can be difficult to "read" their grain direction. A better technique is to cut them free on a band saw. Start by applying a piece of tape over the plugs and pressing it firmly in place. The tape will keep the plugs from falling out and rolling away when they're cut free.

Step 5: Set the rip fence on your band saw so the blade will cut through the plugs near the bottom of the plug cuts (which, incidentally, is actually the tops of the plugs). Lock the fence. Stand the plug workpiece on edge, and rip it in two.

Use a push stick or piece of scrap to finish this cut so your fingers stay clear of the blade. Notice how the tape holds the plugs in place after ripping - it's a helpful way to keep the grain direction clear.

Step 6: Pull the plugs off the tape and insert them lightly into the counterbores without glue. This gives you a chance to pick the plugs that best match the grain area around each screw hole. Fill one of the "wells" in the plug workpiece with glue so you can dip the plugs before inserting them. Gently tap the plugs home with a mallet until you hear them seat against the screw heads, and wipe away the excess glue.

Step 7: Trim off the wood plugs until they're nearly flush with the surrounding wood. You can use a flush-cutting saw if you own one, but a sharp chisel and mallet work nicely, too. Flip the chisel so the bevel side faces down. Hold the chisel at a fairly low angle and so the blade is parallel to the wood grain of the plug. Tap the chisel a couple times to cut the excess plug free. The goal here is to trim the plug about 1/16 inch proud of the wood surface, not flush with it.

Step 8: Now, pull out your sander and start with 80- or 100-grit sandpaper to take the plugs down the rest of the way. If you've done a careful job of selecting your plugs, they'll virtually disappear once they're sanded flush. (Believe it or not, there are four plugs visible in this photo.) Your wood putty never looked this good.


Keep the inspiration coming!
Subscribe to our newsletter for more woodworking tips and tricks