How to Use a Shooting Board?
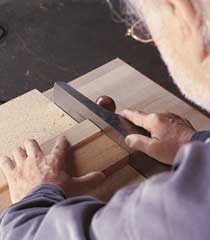
What is a shooting board and how is it used?
I have never built or used a shooting board, but plan to in the near future. I have seen numerous articles in several woodworking magazines and also on the Internet on how to build the board. The instructions for building the board are clear and well presented, but they all seem to stop short on explaining how to use the board. The first question that comes to mind is, when planing the workpiece, what prevents the shooting board itself from being planed? Also, is it necessary for the projection of the blade to be exactly the same each time you use the board? If the authors of the articles for building the shooting boards would elaborate on these and other questions, it would be helpful for amateur woodworkers. Thanks. - Richard Faunce
Tim Inman: I think your questions will all be answered if you'll just make up a "quickie" shooting board and give it a try. In fact, I'd require it if you were one of my students. Before you spend time and materials making the “perfect” shooting board, try some things to see what you like and want in your final effort. You'll be surprised how easy they are to use, how simple they really are - and you'll wonder how you ever got along without one. I have a couple of them hanging on my shop wall. I often use the one that is ugly just because it works better than the one that is pretty. To answer your specific questions, you will plane a little bit of the shooting board clamp, but only a few thousandths - the thickness of the curl. If you'll look at the sole of the plane, the cutting iron sticks out from a little "window" which surrounds it. The metal on the edge of the window makes a "stop" so the plane can't keep digging into the shooting board. The depth of the cutter setting on the plane need not be exactly the same each time. It will be pretty close, though, because you'll usually plane off about the same amount each time. Veneer is pretty easy to "overpower" by hand, so super precision isn't too important with the shooting board. A veneer shooting board is actually such a simple tool most authors probably don't recognize what a mystery it might be to someone who has never used or seen one. Thus, they fail to fill in the details that are so obvious to them. Again, my best advice: don't overthink this. Just make up a rude-crude shooter, and give it a try. Then you'll know what you want. The clamping part is the most important detail to me - and it never gets mentioned. Now go out and make one!
Stephen Shepherd: A shooting board is a handy tool for planing straight and square edges on a board. But what about a board that is 6 or 8 feet long, that won't fit on most shooting boards, so how to get a straight square edge?
Simple, you make your workbench a full length shooting board. All you have to do is have a piece of wood 1/2" or 3/4" thick as long as the board you need to plane and wide enough to support the board. The piece of wood is placed on the bench, the stuff to be planed placed on top and projecting out a 1/4" or so and clamped in place with clamps at the ends or with holdfasts or other clamping devices as appropriate.
A long jack or joiner plane is then run on it side along the bench as the base of the shooting board, (bench), the piece of wood elevates the stuff being shot and the clamps act as the stop on a regular shooting board. And the edge of your board will be square and with such a long board, either a long straight edge or string line will be necessary to determine if it is straight. The longer the plane, the truer the board will be. But on such a long board it is necessary to 'squint the joint' (get down and sight the board) to determine if it is straight.
So your only attention needs to be getting it straight as the shooting bench will always plane a square edge. Your body of the plane needs to be square and the iron set square as well to insure that the final cut will be square. This also helps in reducing the ends that tend to be rounded off and the boards planed with a belly. A shooting board or shooting bench will eliminate that problem.


Keep the inspiration coming!
Subscribe to our newsletter for more woodworking tips and tricks